REAR NO. 1 SEAT ASSEMBLY (for LH Side) DISASSEMBLY

CAUTION:
Wear protective gloves. Sharp areas on the parts may injure your hands.
-
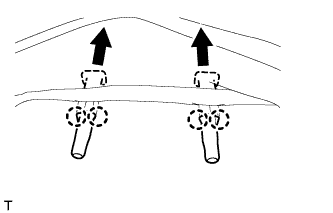
REMOVE REAR SEAT HEADREST ASSEMBLY
-
Remove the rear seat headrest assembly.
-
-
REMOVE RECLINING ADJUSTER RELEASE HANDLE LH
-
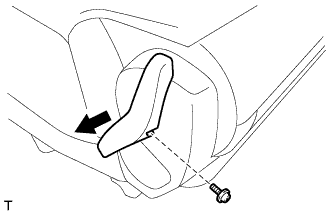
Remove the screw and reclining adjuster release handle LH.
-
-
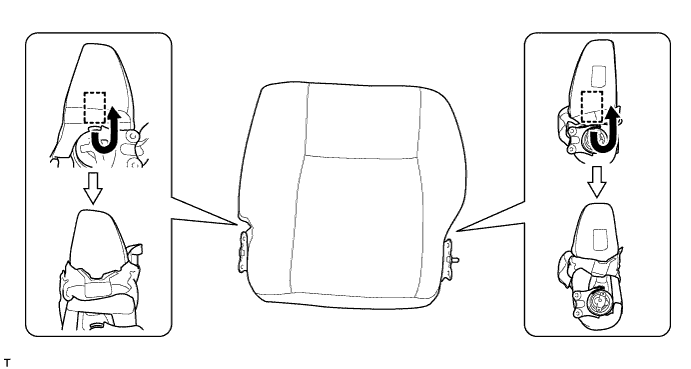
REMOVE REAR NO. 1 SEAT RECLINING COVER LH
-
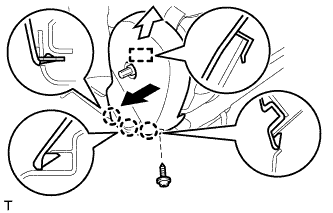
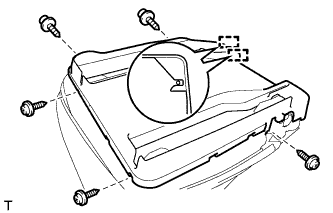
Remove the screw.
-
Pull the rear No. 1 seat reclining cover LH to detach the 3 claws.
Text in Illustration 
Pull 
Pull Up -
Pull up the rear No. 1 seat reclining cover LH to detach the guide and remove the rear No. 1 seat reclining cover LH.
-
-
REMOVE REAR NO. 1 SEAT RECLINING COVER RH
-
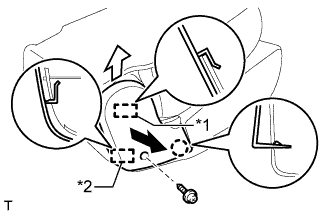
Text in Illustration *1 Guide A *2 Guide B Pull Pull Up Remove the screw.
-
Pull the rear No. 1 seat reclining cover RH to detach the claw and guide B.
-
Pull up the rear No. 1 seat reclining cover RH to detach guide A and remove the rear No. 1 seat reclining cover RH.
-
-
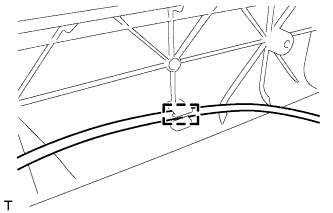
REMOVE REAR NO. 1 SEAT INNER BELT ASSEMBLY LH
-
Remove the bolt and seat belt.
-
-
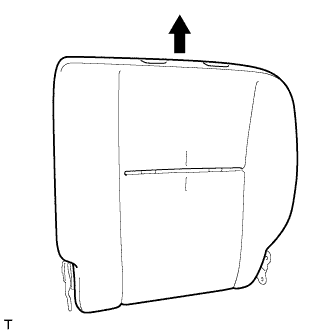
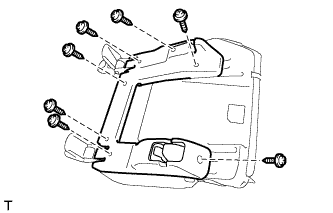
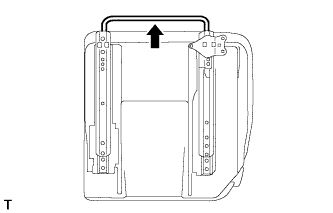
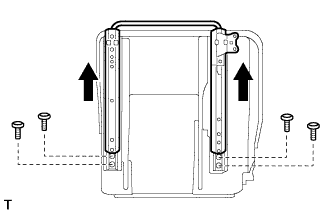
REMOVE REAR NO. 1 SEATBACK ASSEMBLY
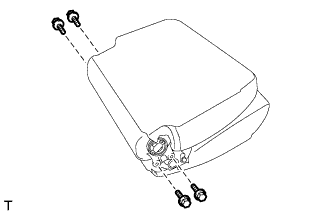
-
Remove the 4 bolts and rear No. 1 seatback assembly.
-
-
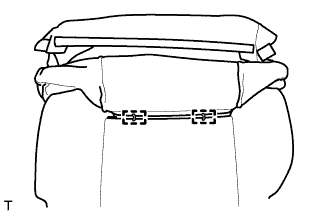
REMOVE REAR NO. 1 SEATBACK COVER
-
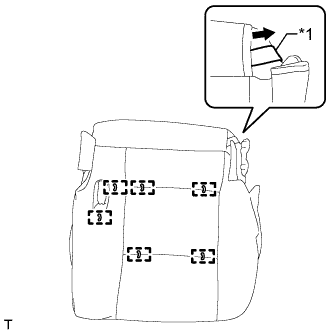
Detach the 2 pieces of fastening tape and the hook.
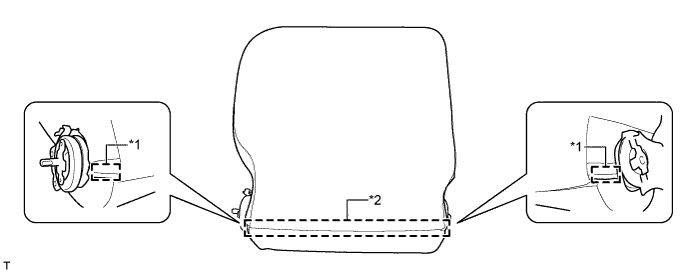
Text in Illustration *1 Fastening Tape *2 Hook -
Roll up the rear No. 1 seatback cover to detach the 2 hooks.
-
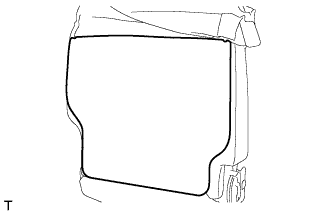
Roll up the rear No. 1 seatback cover and remove the rear seatback board LH.
-
Detach the 4 claws and remove the 2 rear seat headrest supports.
-
Remove the hog rings and rear No. 1 seatback cover from the rear No. 1 seatback pad LH.
-
-
REMOVE REAR NO. 1 SEATBACK PAD LH
Note
As the rear No. 1 seatback pad LH is affixed to the rear No. 1 seatback frame, do not remove the rear No. 1 seatback pad LH from the rear No. 1 seatback frame unless it is necessary to replace the rear No. 1 seatback pad LH. If the rear No. 1 seatback pad LH is removed from the rear No. 1 seatback frame, make sure to replace the rear No. 1 seatback pad LH.
-
Remove the rear No. 1 seatback pad LH from the rear No. 1 seatback frame.
-
If reusing the rear No. 1 seatback frame:
Remove any remaining pad and adhesive from the rear No. 1 seatback frame.
-
-
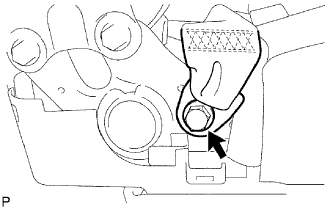
REMOVE RECLINING REMOTE CONTROL LEVER KNOB LH
-
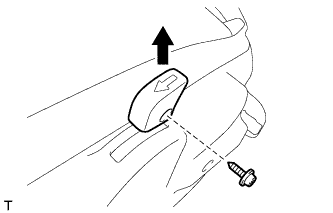
Remove the screw and reclining remote control lever knob LH from the rear seat lock assembly LH.
-
-
REMOVE REAR NO. 1 SEAT LOCK COVER LH
-
Remove the 7 screws and rear No. 1 seat lock cover LH.
-
Detach the cable clamp and disconnect the rear seat lock control cable LH from the rear No. 1 seat lock cover LH.
-
-
REMOVE REAR NO. 2 SEAT LOCK COVER LH
-
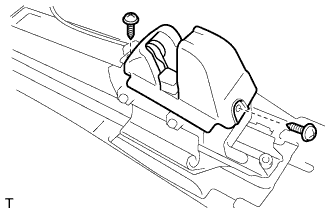
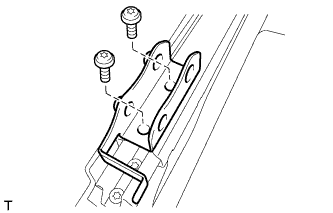
Remove the 2 screws and rear No. 2 seat lock cover LH from the rear seat lock assembly RH.
-
-
REMOVE REAR SEAT HINGE ASSEMBLY LH
-
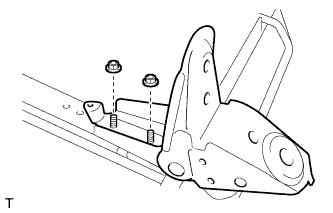
Remove the 2 nuts and rear seat hinge assembly LH from the outer seat track assembly LH.
-
-
REMOVE REAR SEAT HINGE ASSEMBLY RH
Tech Tips
Use the same procedure described for the LH side.
-
REMOVE REAR SEATBACK LOCK RELEASE BUTTON
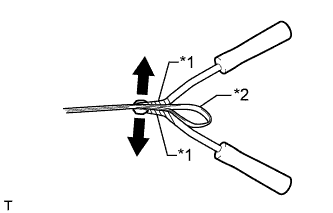
Text in Illustration *1 Protective Tape *2 Reclining Release Handle Sub-assembly
-
Using 2 clip removers, remove the 2 rear seatback lock release buttons from the reclining release handle sub-assembly.
Tech Tips
-
Tape the clip remover tips before use.
-
If a rear seatback lock release button is damaged, replace it with a new one.
-
-
-
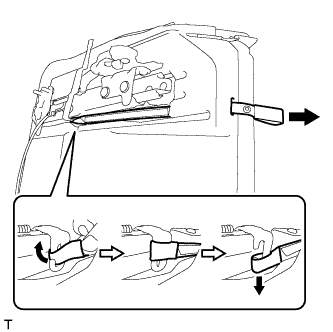
REMOVE RECLINING RELEASE HANDLE SUB-ASSEMBLY
-
Disconnect the reclining release handle sub-assembly from the rear seat lock assembly LH as shown in the illustration.
-
Pull the reclining release handle sub-assembly through the hole of the rear seat cushion under cover sub-assembly LH.
-
-
REMOVE REAR SEAT CUSHION SUPPORT SPRING LH
-
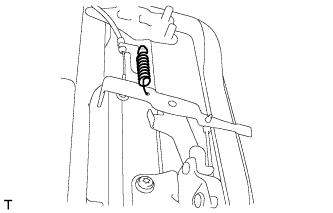
Using needle nose pliers, remove the rear seat cushion support spring LH.
-
-
REMOVE REAR SEAT LOCK ASSEMBLY LH
-
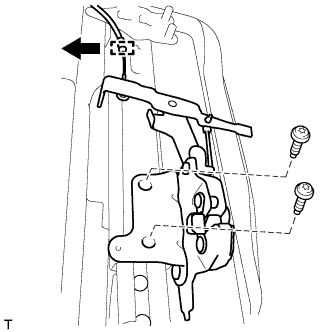
Detach the cable clamp and disconnect the rear seat lock control cable LH from the outer seat track assembly LH.
-
Using a T40 "TORX" socket wrench, remove the 2 "TORX" bolts and rear seat lock assembly LH from the outer seat track assembly LH.
-

Remove the E-ring and washer.
-

Disconnect the rear seat lock control cable LH from the rear seat lock assembly LH.
-
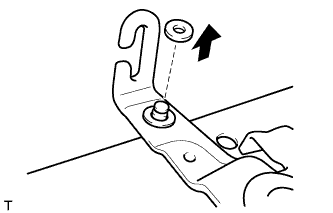
Remove the washer.
-
-
REMOVE REAR SEAT LOCK ASSEMBLY RH
-
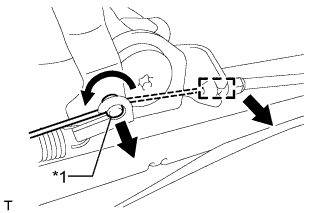
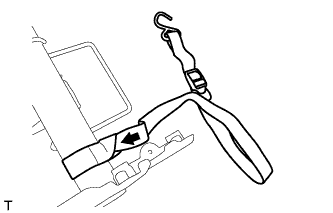
Detach the cable clamp.
-
Twist the cable end in the direction indicated by the arrow and disconnect the rear seat lock control cable LH from the rear seat lock assembly RH.
Text in Illustration *1 Cable End -
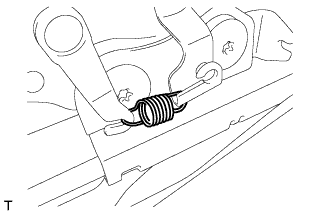
Using needle nose pliers, remove the rear seat cushion support spring RH.
-
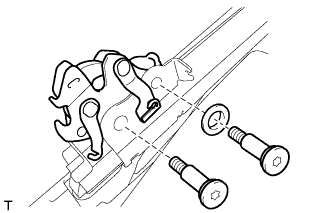
Using a T40 "TORX" socket wrench, remove the 2 "TORX" bolts, washer and rear seat lock assembly RH from the rear No. 1 seat track bracket.
-
-
REMOVE REAR NO. 1 SEAT TRACK BRACKET
-
Using a T40 "TORX" socket wrench, remove the 2 "TORX" bolts and rear No. 1 seat track bracket from the inner seat track assembly LH.
-
-
REMOVE SEAT TRACK ADJUSTING HANDLE
Tech Tips
Perform this procedure when removing and reinstalling or replacing only the seat track adjusting handle.
-
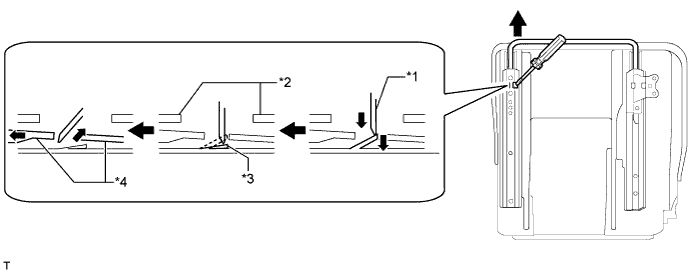
Operate the seat track adjusting handle and move the outer seat track assembly LH and inner seat track assembly LH to the position shown in the illustration.
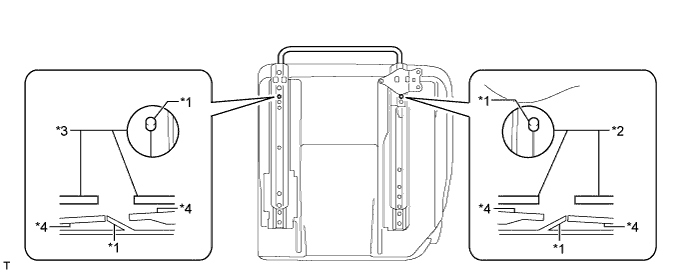
Text in Illustration *1 Seat Track Adjusting Handle Lock *2 Outer Seat Track Assembly LH *3 Inner Seat Track Assembly LH *4 Seat Track Adjusting Handle -
Insert a screwdriver into the outer seat track assembly LH and disengage the lock of the seat track adjusting handle. While maintaining that state, pull out the seat track adjusting handle to the position shown in the illustration, and then remove the screwdriver.
Note
Do not use excessive force to pull out the seat track adjusting handle.
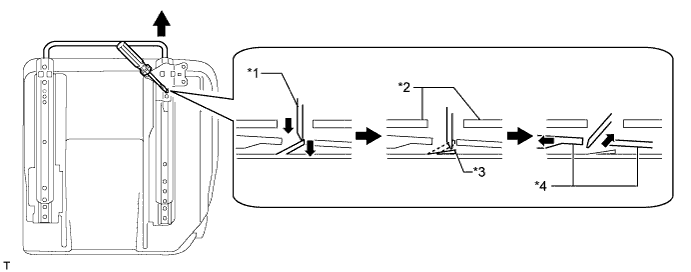
Text in Illustration *1 Screwdriver *2 Outer Seat Track Assembly LH *3 Seat Track Adjusting Handle Lock *4 Seat Track Adjusting Handle -
Insert a screwdriver into the inner seat track assembly LH and disengage the lock of the seat track adjusting handle. While maintaining that state, pull out the seat track adjusting handle to the position shown in the illustration, and then remove the screwdriver.
Note
Do not use excessive force to pull out the seat track adjusting handle.
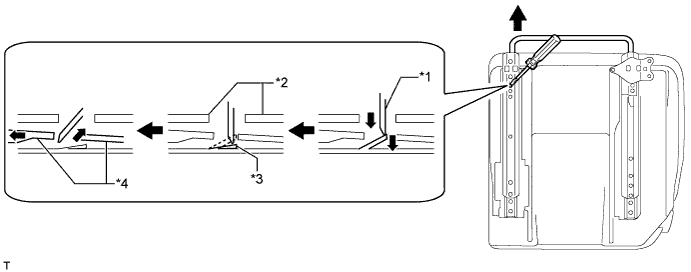
Text in Illustration *1 Screwdriver *2 Inner Seat Track Assembly LH *3 Seat Track Adjusting Handle Lock *4 Seat Track Adjusting Handle -
Pull and remove the seat track adjusting handle from the outer seat track assembly LH and inner seat track assembly LH.
-
-
REMOVE REAR SEAT TRACK ASSEMBLY LH
-
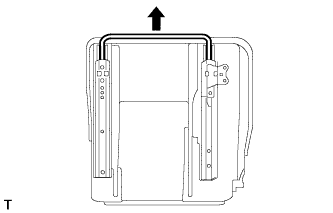
Operate the seat track adjusting handle and move the outer seat track assembly LH and inner seat track assembly LH to the foremost position.
-
Using a T40 "TORX" socket wrench, remove the 4 "TORX" bolts.
-
Operate the seat track adjusting handle and move the outer seat track assembly LH and inner seat track assembly LH to the position shown in the illustration.
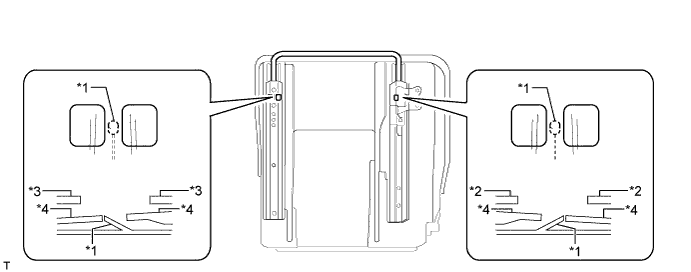
Text in Illustration *1 Seat Track Adjusting Handle Lock *2 Outer Seat Track Assembly LH *3 Inner Seat Track Assembly LH *4 Seat Track Adjusting Handle -
Insert a screwdriver into the outer seat track assembly LH and disengage the lock of the seat track adjusting handle. While maintaining that state, pull out the seat track adjusting handle to the position shown in the illustration, and then remove the screwdriver.
Note
Do not use excessive force to pull out the seat track adjusting handle.
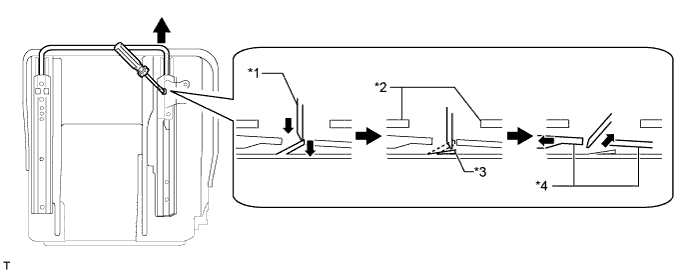
Text in Illustration *1 Screwdriver *2 Outer Seat Track Assembly LH *3 Seat Track Adjusting Handle Lock *4 Seat Track Adjusting Handle -
Insert a screwdriver into the inner seat track assembly LH and disengage the lock of the seat track adjusting handle. While maintaining that state, pull out the seat track adjusting handle to the position shown in the illustration, and then remove the screwdriver.
Note
Do not use excessive force to pull out the seat track adjusting handle.
Text in Illustration *1 Screwdriver *2 Inner Seat Track Assembly LH *3 Seat Track Adjusting Handle Lock *4 Seat Track Adjusting Handle -
Pull and remove the seat track adjusting handle from the outer seat track assembly LH and inner seat track assembly LH.
-

Using a T40 "TORX" socket wrench, remove the "TORX" bolt and outer seat track assembly LH.
-
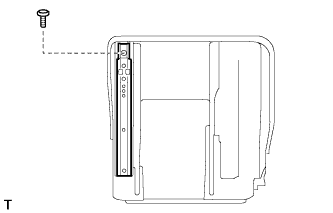
Using a T40 "TORX" socket wrench, remove the "TORX" bolt and inner seat track assembly LH.
-
-
REMOVE REAR SEAT CUSHION UNDER COVER SUB-ASSEMBLY LH
-
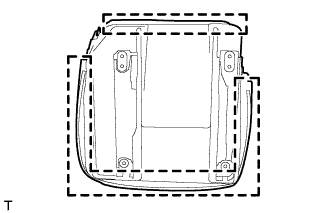
Detach the hooks.
-
Remove the 5 screws.
-
Detach the 2 guides and remove the rear seat cushion under cover sub-assembly LH.
-
-
REMOVE REAR NO. 1 SEAT CUSHION COVER
Text in Illustration *1 No. 1 Fold Seat Stopper Band Assembly
-
Pull out the No. 1 fold seat stopper band assembly from the rear No. 1 seat cushion cover.
-
Remove the hog rings and rear No. 1 seat cushion cover from the rear No. 1 seat cushion pad LH.
-
-
REMOVE REAR NO. 1 SEAT CUSHION PAD LH
-
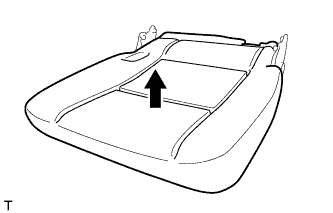
Remove the rear No. 1 seat cushion pad LH from the rear No. 1 seat cushion frame sub-assembly.
-
-
REMOVE NO. 1 FOLD SEAT STOPPER BAND ASSEMBLY
-
Untie the No. 1 fold seat stopper band assembly from the No. 1 seat cushion frame sub-assembly LH as shown in the illustration and remove the No. 1 fold seat stopper band assembly.
-