POWER OUTLET SOCKET INSTALLATION

-
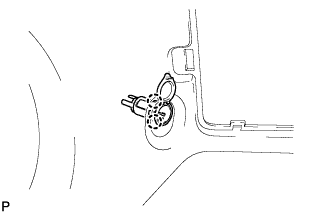
INSTALL REAR NO. 1 POWER OUTLET SOCKET ASSEMBLY
-
Attach the 2 claw fittings to install the socket.
-
-
INSTALL QUARTER INSIDE TRIM BOARD LH
-
Connect the power point socket connector.
-
Detach the 7 claws and 10 clips to install the quarter inside trim board.
-
Install the clip.
-
Connect the rear No. 2 seat outer belt floor anchor with the bolt.
- Torque:
- 42 N*m { 428 kgf*cm, 31 ft.*lbf }
-
Connect the rear No. 1 seat outer belt floor anchor with the bolt.
- Torque:
- 42 N*m { 428 kgf*cm, 31 ft.*lbf }
-
Attach the 2 claws to install the outer lap belt anchor cover.
Tech Tips
Use the same procedure for both outer lap belt anchor covers.
-
-
INSTALL QUARTER TRIM HOOK
Tech Tips
Use the same procedure for both quarter trim hooks.
-
Install the quarter trim hook with the screw.
-
-
INSTALL REAR DOOR OPENING TRIM WEATHERSTRIP LH
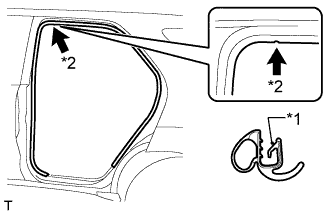
Text in Illustration *1 Paint Mark *2 Mark Position
-
Align the paint mark on the rear door opening trim weatherstrip with the mark position on the vehicle and install the rear door opening trim weatherstrip as shown in the illustration.
-
-
INSTALL REAR DOOR SCUFF PLATE LH
-
Attach the 2 clips and 7 claws to install the rear door scuff plate.
-
-
INSTALL BACK DOOR SCUFF PLATE
-
Attach the 4 claws, 2 guides and 6 clips to install the back door scuff plate.
-
-
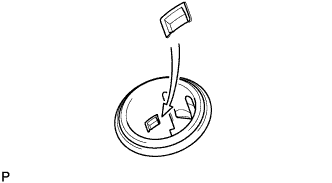
INSTALL NO. 1 POWER OUTLET SOCKET ASSEMBLY
-
Align the protrusion on the backside of the socket with the groove of the cover. Then push the socket into the cover.
-
-
INSTALL SWITCH BASE
-
Connect the connectors.
-
Attach the 8 claws to install the switch base.
-