HIGH INTENSITY DISCHARGE HEADLIGHT BULB INSTALLATION

CAUTION:
Make sure that the headlight control ECU sub-assembly LH is not connected or hot before installation the headlight control ECU sub-assembly.
Tech Tips
-
Use the same procedure for the RH and LH sides.
-
The procedure listed below is for the LH side.
-
INSTALL DISCHARGE HEADLIGHT BULB
-
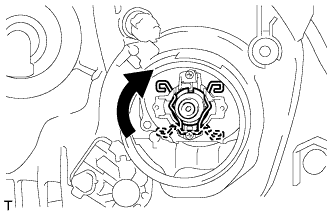
Lock the set spring as shown in the illustration to install the discharge headlight bulb.
-
-
INSTALL HEADLIGHT CONTROL ECU SUB-ASSEMBLY LH
-
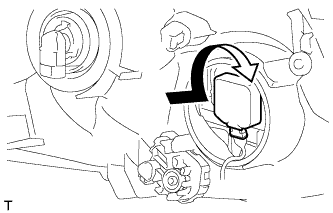
Turn the headlight control ECU sub-assembly LH socket in the direction indicated by the arrow in the illustration to connect the headlight control ECU sub-assembly LH socket.
Note
-
Make sure that no dirt or other foreign matter adheres to the headlight gasket, and that the headlight gasket is not damaged. If the headlight gasket is damaged, water can enter the headlight which can lead to malfunctions in the headlight control ECU sub-assembly LH.
-
Do not pull the headlight control ECU sub-assembly LH while the socket is connected.
-
After installing the socket, confirm that the cord is not twisted, and then store the cord inside the headlight in such a way so that it is not pinched.
-
-
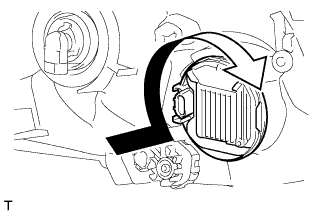
Turn the headlight control ECU sub-assembly LH in the direction indicated by the arrow in the illustration to install the headlight control ECU sub-assembly LH.
-
Connect the connector.
-
-
CONNECT CABLE TO NEGATIVE BATTERY TERMINAL
Note
When disconnecting the cable, some systems need to be initialized after the cable is reconnected Click here.
-
PERFORM INITIALIZATION