FRONT BRAKE INSTALLATION

Tech Tips
-
Use the same procedures for the LH side and RH side.
-
The procedures listed below are for the LH side.
-
INSTALL DISC BRAKE CYLINDER ASSEMBLY LH
-
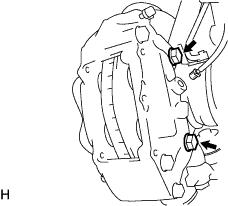
Install the cylinder with the 2 bolts.
- Torque:
- 122 N*m { 1244 kgf*cm, 90 ft.*lbf }
-
-
CONNECT FRONT NO. 1 WHEEL CYLINDER TUBE LH
-

Using a union nut wrench, connect the tube to the cylinder.
- Torque:
- 15 N*m { 155 kgf*cm, 11 ft.*lbf }
Note
Use the formula to calculate special torque values for situations where a union nut wrench is combined with a torque wrench Click here.
-
-
INSTALL FRONT ANTI-SQUEAL SHIM KIT
-
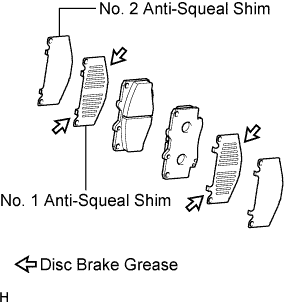
Apply disc brake grease to both sides of each No. 1 shim.
-
Install the No. 1 and No. 2 shims to each pad.
Note
-
When replacing worn pads, the shims must be replaced together with the pads.
-
Install the shims in the correct position and direction.
-
-
-
INSTALL FRONT DISC BRAKE PAD
-
Install the 2 disc brake pads to the cylinder.
Note
There should be no oil or grease on the friction surface of the pads and disc.
-
-
INSTALL FRONT DISC BRAKE ANTI-RATTLE SPRING
-
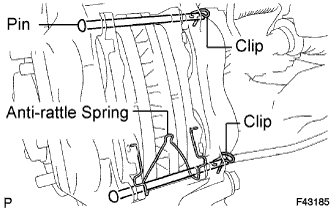
Install the 2 pins and spring.
Tech Tips
Install the spring together with the pin on the bottom side.
-
Install the 2 clips.
Note
When installing the clip, be sure to install the clip with the handle facing the center of the vehicle.
-
-
FILL RESERVOIR WITH BRAKE FLUID
Fluid SAE J1703 or FMVSS No. 116 DOT3 -
BLEED AIR FROM MASTER CYLINDER
Tech Tips
If the master cylinder has been disassembled or if the reservoir becomes empty, bleed air from the master cylinder.
-
Using a union nut wrench, disconnect the 2 brake lines from the master cylinder.
-
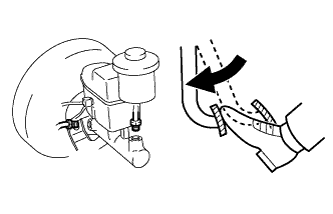
Slowly depress and hold the brake pedal.
-
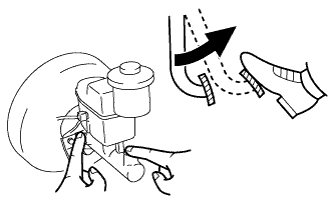
Cover the outer holes with your fingers, and release the pedal.
-
Repeat the 2 previous steps 3 or 4 times.
-
Using a union nut wrench, connect the 2 brake lines to the master cylinder.
- Torque:
- 15 N*m { 155 kgf*cm, 11 ft.*lbf }
Note
Use the formula to calculate special torque values for situations where a union nut wrench is combined with a torque wrench Click here.
-
-
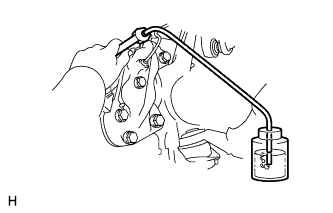
BLEED AIR FROM BRAKE LINE
-
Remove the bleeder plug cap.
-
Connect the vinyl tube to the bleeder plugs.
-
Depress the brake pedal several times, and then loosen the bleeder plug with the pedal depressed.
-
When fluid stops coming out, immediately tighten the bleeder plug. Then release the pedal.
-
Repeat the 2 previous steps until all the air in the brake fluid is gone.
-
Tighten the bleeder plug.
- Torque:
- 11 N*m { 110 kgf*cm, 8 ft.*lbf, for front brake }
- 10 N*m { 102 kgf*cm, 7 ft.*lbf, for rear brake }
-
Install the cap.
-
Bleed air from the brake line for each wheel by repeating the above procedures.
-
-
BLEED AIR FROM CLUTCH LINE (for Manual Transmission)
-
Remove the brake master cylinder reservoir filler cap assembly.
-
Add brake fluid to keep the level between the MIN and MAX lines of the reservoir while bleeding the clutch line.
Fluid SAE J1703 or FMVSS No. 116 DOT3 -
Remove the bleeder plug cap.
-
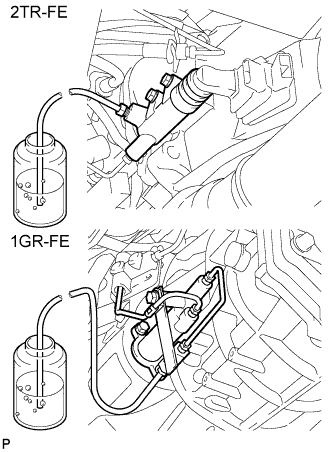
Connect a vinyl tube to the bleeder plug.
-
Depress the clutch pedal several times, and then loosen the bleeder plug with the pedal depressed.
-
At the point when fluid stops coming out, tighten the bleeder plug, and then release the clutch pedal.
-
Repeat the previous 2 steps until all the air in the fluid is completely bled out.
-
Tighten the bleeder plug.
- Torque:
- 11 N*m { 110 kgf*cm, 8 ft.*lbf }
-
Install the bleeder plug cap.
-
Check that all the air has been bled out of the clutch line.
-
Check for brake fluid leaks.
-
Check the brake fluid level in the reservoir Click here.
-
Install the brake master cylinder reservoir filler cap assembly.
-
-
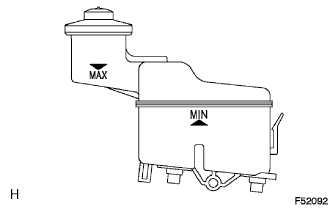
CHECK BRAKE FLUID LEVEL IN RESERVOIR
-
Check the fluid level and add fluid if necessary.
Fluid SAE J1703 or FMVSS No. 116 DOT3 Tech Tips
Add fluid to a level between the reservoir's MIN and MAX lines.
-
-
CHECK FOR BRAKE FLUID LEAKAGE
-
INSTALL FRONT WHEEL
- Torque:
- 105 N*m { 1,071 kgf*cm, 77 ft.*lbf }