POWER STEERING LINK INSTALLATION

-
INSTALL TIE ROD END SUB-ASSEMBLY LH
-
Screw the lock nut and tie rod end onto the rack end until the matchmarks are aligned.
-
After adjusting toe-in, torque the nut.
- Torque:
- 55.5 N*m { 566 kgf*cm, 41 ft.*lbf }
-
-
INSTALL TIE ROD END SUB-ASSEMBLY RH
Tech Tips
Use the same procedures described for the LH side.
-
INSTALL POWER STEERING LINK ASSEMBLY
-
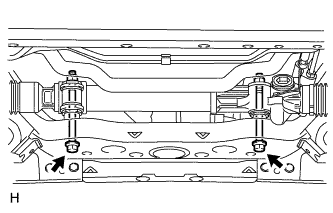
Install the steering link with the 2 bolts and 2 nuts.
- Torque:
- 95 N*m { 969 kgf*cm, 70 ft.*lbf }
Tech Tips
If necessary, return the differential to its original position and install the differential mount.
-
-
INSTALL STABILIZER BAR FRONT
-
Install the stabilizer bar front to the vehicle body.
-
-
STABILIZE SUSPENSION
-
CONNECT STEERING GEAR OUTLET RETURN TUBE
-

Using a union nut wrench, connect the outlet return tube.
- Torque:
- 44 N*m { 449 kgf*cm, 33 ft.*lbf }
Note
Use the formula to calculate special torque values for situations where a union nut wrench is combined with a torque wrench Click here.
-
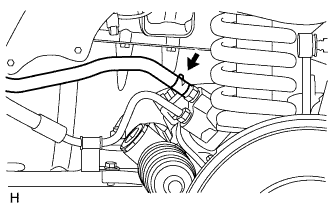
Install the hose with the clip.
-
-
CONNECT PRESSURE FEED TUBE ASSEMBLY
-

Install the pressure feed tube to the steering link with the bolt.
- Torque:
- 28 N*m { 286 kgf*cm, 21 ft.*lbf }
-
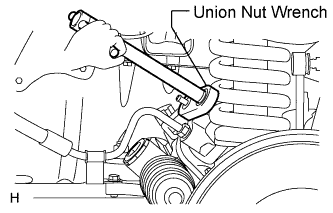
Using a union nut wrench, tighten the flare nut and connect the pressure feed tube.
- Torque:
- 44 N*m { 449 kgf*cm, 33 ft.*lbf }
Note
Use the formula to calculate special torque values for situations where a union nut wrench is combined with a torque wrench Click here.
-
-
CONNECT NO. 2 STEERING INTERMEDIATE SHAFT SUB-ASSEMBLY
-
Align the matchmarks on the steering intermediate shaft and steering link.
-
Install the bolt.
- Torque:
- 35 N*m { 357 kgf*cm, 26 ft.*lbf }
-
-
CONNECT STEERING SLIDING YOKE
-
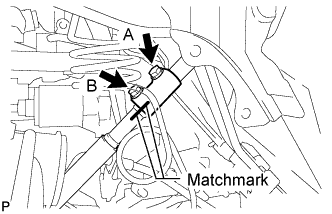
Align the matchmarks on the steering sliding yoke and steering intermediate shaft, and connect the steering sliding yoke to the steering intermediate shaft.
-
Install the bolt labeled B.
- Torque:
- 35 N*m { 357 kgf*cm, 26 ft.*lbf }
-
Tighten the bolt labeled A.
- Torque:
- 35 N*m { 357 kgf*cm, 26 ft.*lbf }
-
-
CONNECT TIE ROD END SUB-ASSEMBLY LH
-
Connect the tie rod end to the steering knuckle arm with the nut.
- Torque:
- 91 N*m { 928 kgf*cm, 67 ft.*lbf }
-
Install a new cotter pin.
-
-
CONNECT TIE ROD END SUB-ASSEMBLY RH
Tech Tips
Use the same procedures described for the LH side.
-
INSTALL FRONT STABILIZER BAR
-
Install the stabilizer bar front to the vehicle body.
-
-
INSTALL FRONT SIDE MEMBER TO FRONT SUSPENSION CROSSMEMBER BRACE
-
Install the crossmember brace with the 8 bolts.
- Torque:
- 50 N*m { 510 kgf*cm, 37 ft.*lbf }
-
-
INSTALL NO. 1 ENGINE UNDER COVER
-
Install the under cover with the 4 bolts.
- Torque:
- 28 N*m { 286 kgf*cm, 21 ft.*lbf }
-
-
INSTALL NO. 2 ENGINE UNDER COVER
-
Install the under cover with the 4 bolts.
- Torque:
- 28 N*m { 286 kgf*cm, 21 ft.*lbf }
-
-
INSTALL FRONT WHEEL
-
PLACE FRONT WHEELS FACING STRAIGHT AHEAD
-
INSTALL WINDSHIELD WIPER SWITCH ASSEMBLY
-
Attach the claw to install the windshield wiper switch.
Note
Do not push the claw with excessive force as damage may occur.
-
Connect the connectors.
-
-
INSTALL HEADLIGHT DIMMER SWITCH ASSEMBLY
-
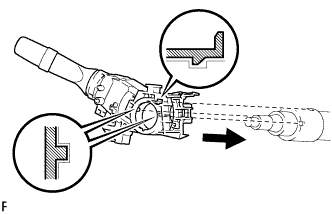
Install the headlight dimmer switch assembly to the steering column, making sure that the stopper protrusions and cutout parts align.
-
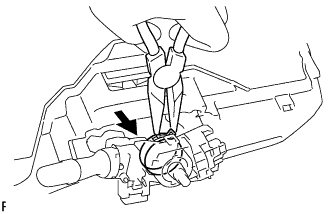
Using needle-nose pliers, install the band clamp as shown in the illustration.
-
Connect the connector.
-
-
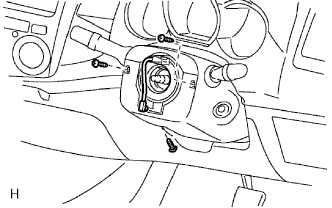
INSTALL SPIRAL CABLE SUB-ASSEMBLY
-
INSTALL STEERING COLUMN COVER UPPER
-
INSTALL STEERING COLUMN COVER LOWER
-
Install the lower cover with the 3 screws.
- Torque:
- 2.0 N*m { 20 kgf*cm, 18 in.*lbf }
-
-
INSTALL STEERING WHEEL ASSEMBLY
-

Align the matchmarks on the steering wheel and main shaft.
-
Install the steering set nut.
- Torque:
- 50 N*m { 510 kgf*cm, 37 ft.*lbf }
-
-
INSPECT STEERING WHEEL CENTER POINT
-
INSTALL STEERING PAD ASSEMBLY
-
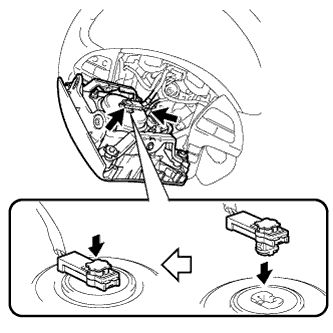
Support the steering pad with one hand.
-
Connect the connector to the steering pad.
Note
When handling the airbag connector, do not damage the airbag wire harness.
-
Connect the horn connector.
-
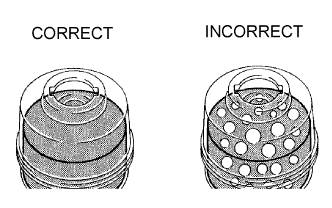
Confirm that the groove along the circumference of the "TORX" screw is attached to the screw case and place the steering pad onto the steering wheel.
-
Using a T30 "TORX" socket wrench, tighten the 2 screws.
- Torque:
- 8.8 N*m { 90 kgf*cm, 78 in.*lbf }
-
-
INSPECT STEERING PAD ASSEMBLY
-
With the steering pad installed on the vehicle, perform a visual check. If there are any defects as mentioned below, replace the steering pad with a new one:
Cuts, minute cracks or marked discoloration on the steering pad top surface or in the grooved portion.
-
Make sure that the horn sounds.
If the horn does not sound, inspect the horn system.
-
-
CONNECT CABLE TO NEGATIVE BATTERY TERMINAL
-
PERFORM INITIALIZATION
-
Perform initialization Click here.
Note
Certain systems need to be initialized after disconnecting and reconnecting the cable from the negative (-) battery terminal.
-
-
CHECK SRS WARNING LIGHT
-
Check the SRS warning light Click here.
-
-
ADD POWER STEERING FLUID
-
BLEED AIR FROM POWER STEERING SYSTEM
-
Check the fluid level.
-
Jack up the front of the vehicle and support it with stands.
-
Turn the steering wheel.
-
With the engine stopped, turn the steering wheel slowly from lock to lock several times.
-
-
Lower the vehicle.
-
Start the engine. Run the engine at idle for a few minutes.
-
Turn the steering wheel.
-
With the engine idling, turn the steering wheel to the left or right full lock position and hold it there for 2 to 3 seconds. Then turn the steering wheel to the opposite full lock position and hold it there for 2 to 3 seconds.
-
Repeat the step above several times.
-
-
Stop the engine.
-
Check for foaming or emulsification. If the system has to be bled twice because of foaming or emulsification, check for fluid leaks in the system.
-
Check the fluid level.
-
-
CHECK FOR POWER STEERING FLUID LEAKAGE
-
ADJUST FRONT WHEEL ALIGNMENT
-
Adjust front wheel alignment Click here.
-