FRONT SHOCK ABSORBER INSTALLATION

Tech Tips
-
Use the same procedures for the RH side and LH side.
-
The procedures listed below are for the LH side.
-
A bolt without a torque specification is shown in the standard bolt chart Click here.
-
TEMPORARILY INSTALL FRONT SHOCK ABSORBER WITH COIL SPRING
-
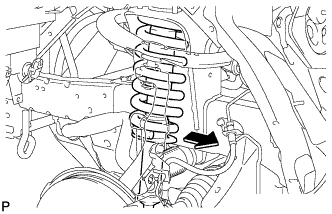
Install the shock absorber on the body so that the lower end of the coil spring faces the rear of the vehicle.
-
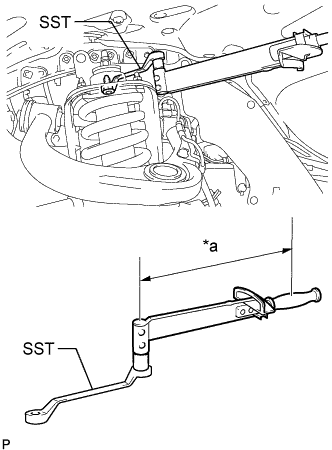
Text in Illustration *a Fulcrum Length Using SST, install the 3 nuts to the upper side of the front shock absorber with coil spring.
- SST
- 09249-B1010
- Torque:
- without SST
- 40 N*m { 408 kgf*cm, 30 ft.*lbf }
- with SST
- 28 N*m { 286 kgf*cm, 21 ft.*lbf }
Tech Tips
Use a torque wrench with a fulcrum length of 300 mm (11.8 in.).
-
for 4WD:
-
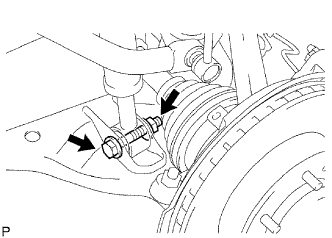
Temporarily install the bolt and nut as shown in the illustration.
Tech Tips
Fix the nut in place and temporarily install the bolt.
-
-

for Pre-Runner:
-
Temporarily install the bolt and nut as shown in the illustration.
Tech Tips
Fix the nut in place and temporarily install the bolt.
-
-
-
INSTALL FRONT STABILIZER LINK ASSEMBLY LH
-
Connect the stabilizer link to the steering knuckle with the nut.
- Torque:
- 70 N*m { 714 kgf*cm, 52 ft.*lbf }
Tech Tips
If the ball joint turns together with the nut, use a 6 mm hexagon wrench to hold the stud in place.
-
-
INSTALL FRONT STABILIZER LINK ASSEMBLY RH
Tech Tips
Use the same procedures described for the LH side.
-
INSTALL FRONT WHEEL
- Torque:
- 105 N*m { 1,071 kgf*cm, 77 ft.*lbf }
-
STABILIZE SUSPENSION
-
Lower the vehicle.
-
Press down on the vehicle several times to stabilize the suspension.
-
-
TIGHTEN FRONT SHOCK ABSORBER WITH COIL SPRING
-
Fix the nut in place and tighten the bolt.
- Torque:
- 95 N*m { 969 kgf*cm, 70 ft.*lbf }
Note
Do not tighten the nut.
-
-
INSPECT AND ADJUST FRONT WHEEL ALIGNMENT