TRANSFER CASE OIL SEAL REPLACEMENT

-
DRAIN TRANSFER OIL
-
REMOVE LOWER TRANSFER CASE PROTECTOR
-
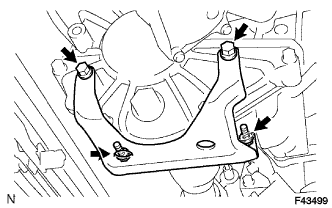
Remove the 4 bolts and protector.
-
-
REMOVE FRONT PROPELLER SHAFT ASSEMBLY
-
Remove the front propeller shaft Click here.
-
-
REMOVE OUTPUT SHAFT COMPANION FLANGE SUB-ASSEMBLY
-
Using a chisel and hammer, loosen the staked part of the lock nut.
-

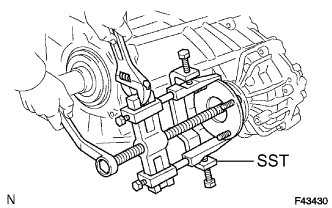
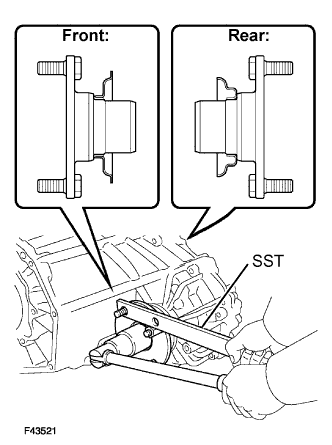
Using SST to hold the companion flange, remove the lock nut.
- SST
- 09330-00021
-
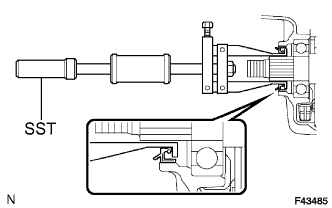
Using SST, remove the companion flange.
- SST
- 09950-40011 ( 09951-04020, 09952-04010, 09953-04030, 09954-04010, 09955-04051, 09957-04010, 09958-04011 )
-
-
REMOVE TRANSFER CASE OIL SEAL
-
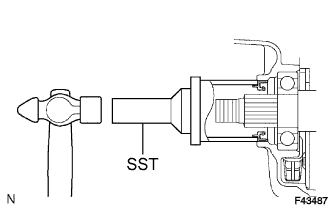
Using SST, tap out the oil seal.
- SST
- 09308-00010
Note
Be careful not to damage the oil seal and case front contact surface.
-
-
INSTALL TRANSFER CASE OIL SEAL
-
Coat the lip of a new oil seal with MP grease.
-
Using SST and a hammer, tap in the oil seal until its surface is flush with the case upper surface.
- SST
- 09316-60011 ( 09316-00011 )
-
-
INSTALL OUTPUT SHAFT COMPANION FLANGE SUB-ASSEMBLY
-
Apply gear oil to the connecting areas of the companion flange and driven sprocket.
-
Install the companion flange to the driven sprocket.
-
Using SST to hold the companion flange, install a new lock nut.
- SST
- 09330-00021
- 09950-40011 ( 09951-04020, 09952-04010, 09953-04030, 09955-04051, 09957-04010, 09958-04011 )
- Torque:
- 118 N*m { 1,203 kgf*cm, 87 ft.*lbf }
-
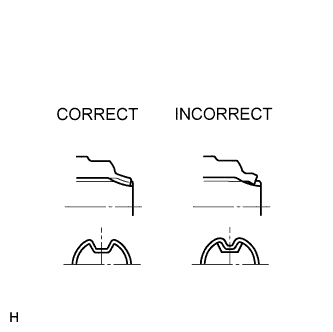
Using a chisel and hammer, stake the lock nut to the driven sprocket.
Note
-
Thoroughly stake the shaft to the lock nut's groove.
-
Be careful not to damage parts around the lock nut.
-
Do not apply excessive force to the shaft.
-
-
-
INSTALL FRONT PROPELLER SHAFT ASSEMBLY
-
Install the front propeller shaft Click here.
-
-
INSTALL LOWER TRANSFER CASE PROTECTOR
-
Install the protector with the 4 bolts.
- Torque:
- 18 N*m { 183 kgf*cm, 13 ft.*lbf }
-
-
ADD TRANSFER OIL
-
Remove the case plug (for filler) and gasket.
-
Pour oil so that the oil level is between 0 to 5.0 mm (0 to 0.197 in.) from the bottom lip of the case plug (for filler) hole.
Note
-
When adding oil, pour it slowly.
-
Add oil a little at a time, waiting several minutes between each addition of oil.
-
-
Wait approximately 5 minutes and check that the oil level has not changed.
-
Install a new gasket and the case plug (for filler).
- Torque:
- 37 N*m { 377 kgf*cm, 27 ft.*lbf }
-