FRONT DIFFERENTIAL SIDE GEAR SHAFT OIL SEAL REPLACEMENT

-
REMOVE NO. 1 ENGINE UNDER COVER
-
REMOVE NO. 2 ENGINE UNDER COVER
-
DRAIN DIFFERENTIAL OIL
-
for front differential:
-
Stop the vehicle on a level surface.
-
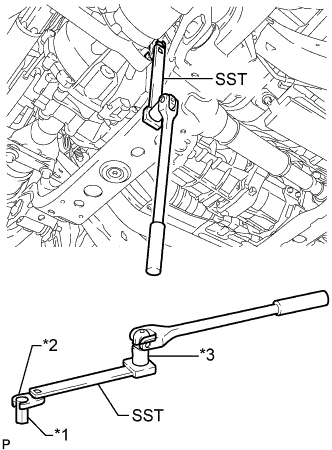
Text in Illustration *1 10 mm Straight Hexagon Wrench *2 10 mm Union Nut Wrench *3 Socket Adaptor Using SST and the 10 mm straight hexagon wrench, 10 mm union nut wrench and socket adaptor, remove the differential filler plug and gasket.
- SST
- 09961-00950
-
Remove the drain plug and gasket, and drain the oil.
-
Install a new gasket and the drain plug.
- Torque:
- 65 N*m { 660 kgf*cm, 48 ft.*lbf }
-
-
for rear differential:
-
Stop the vehicle on a level surface.
-
Remove the differential filler plug and gasket.
-
Remove the drain plug and gasket, and drain the oil.
-
Install a new gasket and the drain plug.
- Torque:
- 49 N*m { 500 kgf*cm, 36 ft.*lbf }
-
-
-
REMOVE FRONT DRIVE SHAFT ASSEMBLY LH
-
REMOVE FRONT DRIVE SHAFT ASSEMBLY RH
Tech Tips
Use the same procedure described for the LH side.
-
REMOVE DIFFERENTIAL SIDE GEAR SHAFT OIL SEAL
-
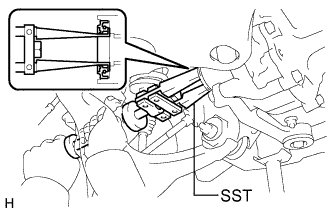
Using SST, tap out the 2 oil seals.
- SST
- 09308-00010
-
-
INSTALL DIFFERENTIAL SIDE GEAR SHAFT OIL SEAL
-
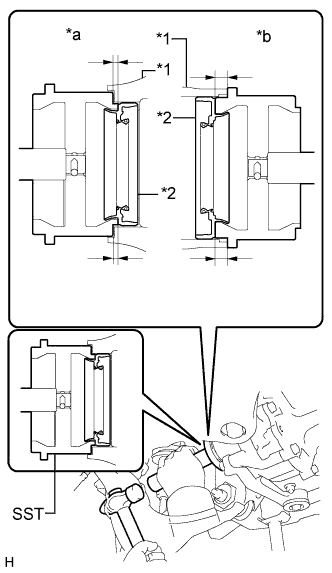
Text in Illustration *a for LH Side *b for RH Side *1 Differential *2 Seal Using SST and a hammer, tap in 2 new oil seals.
- SST
- 09554-47010
- 09950-70010 ( 09951-07100 )
Note
-
Make sure the LH and RH oil seals are installed to the proper locations.
-
As a different side of SST is used for each oil seal, be sure to confirm that the correct side of SST is being used before tapping in an oil seal.
-
Make sure that the lip of the oil seal is inserted into SST before tapping in the oil seal.
-
As each side of SST is designed to tap in the corresponding oil seal to the proper depth, be sure to fully tap in the oil seal.
-
Do not damage the oil seals.
Standard Oil Seal Depth Item Specified Condition for LH Side 2.9 +/-0.45 mm (0.114 +/-0.0177 in.) for RH Side 8.1 +/-0.45 mm (0.319 +/-0.0177 in.) -
Apply MP grease to the lip of each oil seal.
-
-
INSTALL FRONT DRIVE SHAFT ASSEMBLY LH
-
INSTALL FRONT DRIVE SHAFT ASSEMBLY RH
Tech Tips
Use the same procedure described for the LH side.
-
ADD DIFFERENTIAL OIL
-

Text in Illustration *a 0 to 5 mm (0 to 0.196 in.) Add differential oil so that the oil level is within 5 mm (0 to 0.196 in.) from the bottom lip of the differential filler plug hole.
Note
-
After changing the oil, drive the vehicle, and then check the oil level again.
-
Too much or too little oil will lead to differential problems.
If necessary, fill the differential carrier with hypoid gear oil.
Oil type Hypoid gear oil API GL-5 Recommended Viscosity Temperature Viscosity Above -18°C (0°F) SAE 90 Below -18°C (0°F) SAE 80W-90 or SAE 80W Standard Differential Oil Capacity Item Specified Condition Front Differential 1.40 to 1.50 liters (1.48 to 1.58 US qts., 1.23 to 1.32 Imp. qts.) Rear differential w/ Differential Lock 2.85 to 2.95 liters (3.01 to 3.12 US qts., 2.51 to 2.59 Imp. qts.) w/o Differential Lock 3.30 to 3.40 liters (3.49 to 3.59 US qts., 2.91 to 2.99 Imp. qts.) -
-
Check for oil leakage when the oil level is low.
-
for front differential:
-
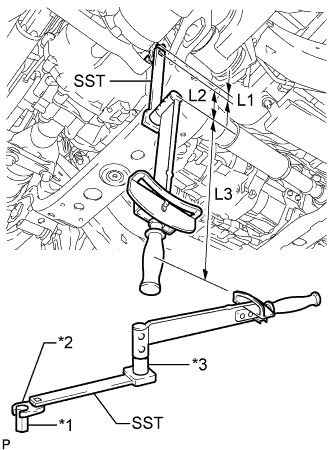
Text in Illustration *1 10 mm Straight Hexagon Wrench *2 10 mm Union Nut Wrench *3 Socket Adaptor Using SST and the 10 mm straight hexagon wrench, 10 mm union nut wrench and socket adaptor, install a new gasket and the differential filler plug.
- SST
- 09961-00950
- Torque:
- 39 N*m { 400 kgf*cm, 29 ft.*lbf }
Note
-
Make sure all the tools are connected in a straight line.
-
Use the formula to calculate special torque values for situations where a union nut wrench is combined with a torque wrench.
Formula T' = T x L3 / (L1 + L2 + L3) - T' = Spec. value of torque wrench - T = Value of specified tightening torque - L1 = Length of union nut wrench - L2 = Length of SST - L3 = Length of torque wrench
-
-
for rear differential:
-
Install a new gasket and the differential filler plug.
- Torque:
- 49 N*m { 500 kgf*cm, 36 ft.*lbf }
-
-
-
INSTALL NO. 2 ENGINE UNDER COVER
- Torque:
- 28 N*m { 286 kgf*cm, 21 ft.*lbf }
-
INSTALL NO. 1 ENGINE UNDER COVER
- Torque:
- 28 N*m { 286 kgf*cm, 21 ft.*lbf }