FUEL FILTER INSTALLATION

-
INSTALL FUEL FILTER
-
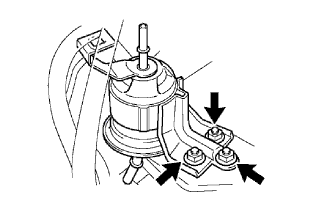
Install the fuel filter with the 3 nuts.
- Torque:
- 8.5 N*m { 87 kgf*cm, 75 in.*lbf }
-
-
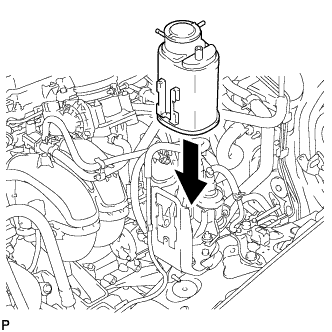
CONNECT FUEL MAIN TUBE
Note
Before installing the fuel main tube's connector to the fuel filter's lower pipe, check the connector for damage and foreign matter.
-
Connect the connector to the lower pipe. Push the two parts together firmly until a "click" sound is heard.
-
Check that the connector and lower pipe are securely connected by trying to pull them apart.
-
Install the fuel tube grommet.
-
-
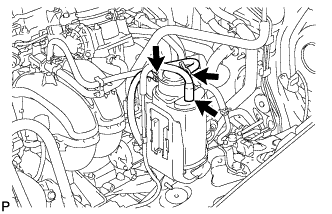
CONNECT FUEL HOSE
Note
Before installing the fuel main hose's connector to the fuel filter's upper pipe, check the connector for damage and foreign matter.
-
Connect the connector to the upper pipe. Push the two parts together firmly until a "click" sound is heard. Then attach the lock claws to the connector by pushing down on the connector cover.
-
Check that the connector and upper pipe are securely connected by trying to pull them apart.
-
Connect the hose to the clamp.
-
-
INSTALL CANISTER
-
Attach the canister to the stay.
-
Connect the 3 hoses to the canister.
-
-
CONNECT CABLE TO NEGATIVE BATTERY TERMINAL
-
PERFORM INITIALIZATION
-
Perform initialization Click here.
Note
Certain systems need to be initialized after disconnecting and reconnecting the cable from the negative (-) battery terminal.
-
-
CHECK FOR FUEL LEAKS
-
Connect the intelligent tester to the DLC3.
-
Turn the ignition switch ON.
Note
Do not start the engine.
-
Push the intelligent tester main switch ON.
-
Select the Active Test and enter the following menus: Powertrain / Engine and ECT / Active Test / Control the Fuel Pump / Speed.
-
-
Check for fuel leaks.
-
Check that there are no fuel leaks after performing maintenance anywhere on the fuel system.
If there are fuel leaks, repair or replace parts as necessary.
-
-