REAR SEAT OUTER BELT ASSEMBLY REMOVAL

CAUTION / NOTICE / HINT
CAUTION:
Some of these service operations affect the SRS airbag system. Read the precautionary notices concerning the SRS airbag system before servicing Click here.
Tech Tips
-
Use the same procedure for the RH and LH side.
-
The procedure listed below is for the LH side.
PROCEDURE
-
REMOVE REAR SEAT ASSEMBLY (for 60/40 Split Seat Type RH Side)
-
REMOVE REAR SEAT ASSEMBLY (for 60/40 Split Seat Type LH Side)
-
REMOVE FRONT FLOOR COVER RH (for Front Floor Cover Type A)
-
REMOVE FRONT FLOOR COVER LH (for Front Floor Cover Type A)
-
REMOVE CENTER FRONT FLOOR COVER (for Front Floor Cover Type B)
-
REMOVE FRONT FLOOR COVER RH (for Front Floor Cover Type B)
-
REMOVE FRONT FLOOR COVER LH (for Front Floor Cover Type B)
-
DISCONNECT CABLE FROM NEGATIVE AUXILIARY BATTERY TERMINAL
CAUTION:
Wait at least 90 seconds after disconnecting the cable to prevent the airbag from working.
Note
When disconnecting the cable, some systems need to be initialized after the cable is reconnected Click here.
-
REMOVE DECK BOARD ASSEMBLY (w/ Deck Board)
-
REMOVE SPARE WHEEL COVER (w/ Cover)
-
REMOVE REAR FLOOR FINISH PLATE
-
REMOVE NO. 1 LUGGAGE COMPARTMENT LIGHT ASSEMBLY (for LH Side)
-
REMOVE JACK HANDLE (for RH Side)
-
REMOVE REAR DOOR SCUFF PLATE
-
DISCONNECT REAR DOOR OPENING TRIM WEATHERSTRIP
-
Disconnect the rear door opening trim weatherstrip.
-
-
DISCONNECT REAR SEAT 3 POINT TYPE OUTER BELT ASSEMBLY
-
REMOVE DECK TRIM SIDE PANEL ASSEMBLY RH (for RH Side)
-
REMOVE DECK TRIM SIDE PANEL ASSEMBLY LH (for LH Side)
-
REMOVE ROOF SIDE INNER GARNISH
-
REMOVE REAR SEAT 3 POINT TYPE OUTER BELT ASSEMBLY
-
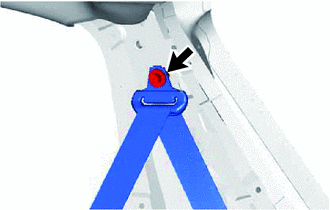
Remove the bolt to disconnect the shoulder anchor part of the rear seat 3 point type outer belt assembly.
-
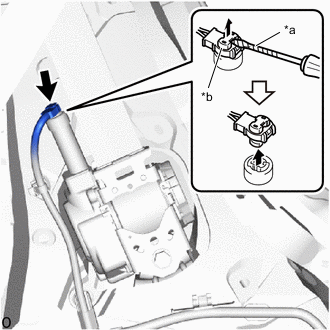
*a Protective Tape *b Locking Button Using a screwdriver with its tip wrapped in protective tape, release the locking button.
-
Disconnect the pretensioner connector.
-
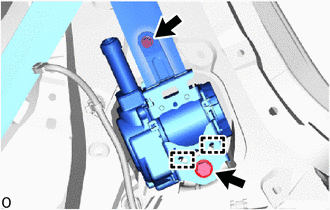
Remove the 2 bolts.
-
Disengage the 2 hooks to remove the rear seat 3 point type outer belt assembly.
-
-
REMOVE SEAT BELT HOLE SEAL
-
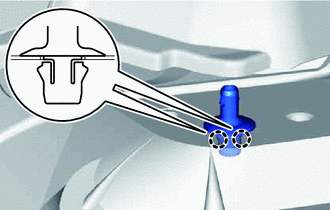
Disengage the 2 claws to remove the seat belt hole seal.
-