FRONT DOOR OUTSIDE MOULDING REASSEMBLY
CAUTION / NOTICE / HINT
Tech Tips
-
Use the same procedure for both the RH and LH side.
-
The procedure described is for the LH side.
PROCEDURE
-
INSTALL FRONT OUTSIDE MOULDING PROTECTOR
-
Clean the attachment surface.
-
Using a piece of cloth, rub the double-sided tape off the front door outside moulding.
Note
-
Installing the front outside moulding protector while old double-sided tape remains can cause adhesion failure.
-
Using a screwdriver or similar tool to remove the old tape can damage the surface and cause adhesion failure.
-
-
Using a non-residue solvent, clean the attachment surface.
-
-
Remove the peeling paper on a new front outside moulding protector.
Note
After removing the release paper, keep the exposed adhesive free from foreign matter.
-
Install the 2 front outside moulding protectors as shown in the illustration.
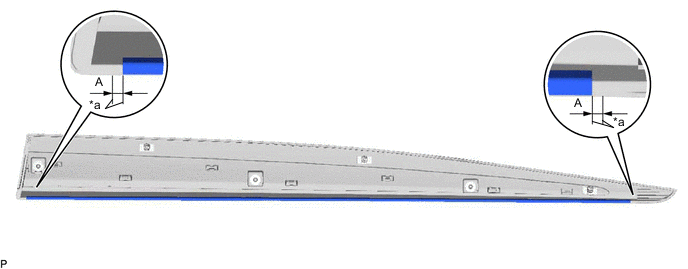
*a Mark-off Line - - Standard Measurement Area Measurement A -1 to 1 mm (-0.039 to 0.039 in.) Note
Press the double-sided tape on the front outside moulding protector firmly to attach.
-
-
INSTALL NO. 4 MOULDING TAPE
-
Clean the attachment surface.
-
Using a piece of cloth, rub the double-sided tape off the front door outside moulding.
Note
-
Installing the No. 4 moulding tape while old double-sided tape remains can cause adhesion failure.
-
Using a screwdriver or similar tool to remove the old tape can damage the surface and cause adhesion failure.
-
-
Using a non-residue solvent, clean the attachment surface.
-
-
Remove the peeling paper on a new No. 4 moulding tape.
Note
After removing the release paper, keep the exposed adhesive free from foreign matter.
-
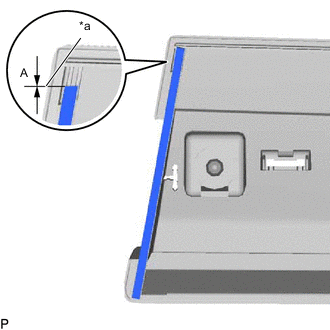
*a Mark-off Line Install the No. 4 moulding tape as shown in the illustration.
Note
Press the double-sided tape on the No. 4 moulding tape firmly to attach.
Standard Measurement Area Measurement A 0 to 1 mm (0 to 0.039 in.)
-
-
INSTALL NO. 2 MOULDING TAPE
-
Clean the attachment surface.
-
Using a piece of cloth, rub the double-sided tape off the front door outside moulding.
Note
-
Installing the No. 2 moulding tape while old double-sided tape remains can cause adhesion failure.
-
Using a screwdriver or similar tool to remove the old tape can damage the surface and cause adhesion failure.
-
-
Using a non-residue solvent, clean the attachment surface.
-
-
Remove the peeling paper on a new No. 2 moulding tape.
Note
After removing the release paper, keep the exposed adhesive free from foreign matter.
-
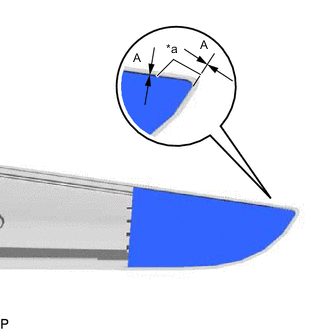
*a Mark-off Line Install the No. 2 moulding tape as shown in the illustration.
Note
Press the double-sided tape on the No. 2 moulding tape firmly to attach.
Standard Measurement Area Measurement A 0 to 1 mm (0 to 0.039 in.)
-
-
INSTALL NO. 3 MOULDING TAPE
-
Clean the attachment surface.
-
Using a piece of cloth, rub the double-sided tape off the front door outside moulding.
Note
-
Installing the No. 3 moulding tape while old double-sided tape remains can cause adhesion failure.
-
Using a screwdriver or similar tool to remove the old tape can damage the surface and cause adhesion failure.
-
-
Using a non-residue solvent, clean the attachment surface.
-
-
Remove the peeling paper on a new No. 3 moulding tape.
Note
After removing the release paper, keep the exposed adhesive free from foreign matter.
-
Install the No. 3 moulding tape as shown in the illustration.
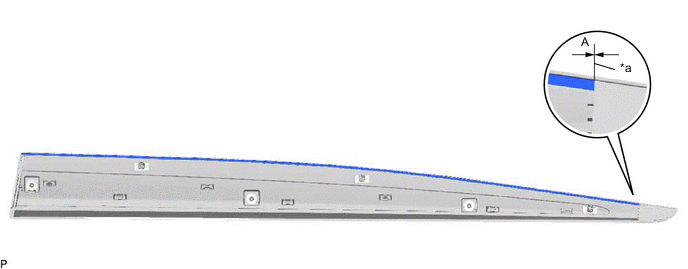
*a Mark-off Line - - Standard Measurement Area Measurement A 0 to 1 mm (0 to 0.039 in.) Note
Press the double-sided tape on the No. 3 moulding tape firmly to attach.
-
-
INSTALL FRONT DOOR REAR UPPER OUTSIDE MOULDING
-
Clean the attachment surface.
-
Using a heat light, heat the double-sided tape remaining on the front door outside moulding.
Heating Temperature Item Temperature Front Door Outside Moulding 40 to 60°C (104 to 140°F) -
Using a piece of cloth, rub the remaining double-sided tape off the front door outside moulding while it is hot from the infrared light.
Note
Installing the front door rear upper outside moulding with any double-sided tape remaining on the front door outside moulding may cause adhesion failure. Therefore, completely remove the double-sided tape.
-
Using a non-residue solvent, clean the attachment surface.
-
-
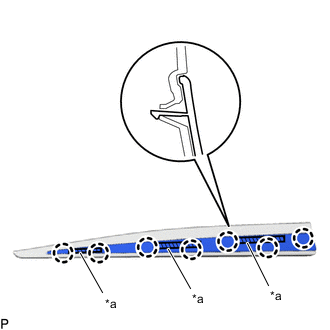
*a Double-sided Tape Engage the 7 claws to install a new front door rear upper outside moulding onto the front door outside moulding.
Note
Thoroughly press the front door rear upper outside moulding to ensure that it adheres.
-