FRONT BUMPER DISASSEMBLY
PROCEDURE
-
REMOVE HOOD TO FRONT END PANEL SEAL
-
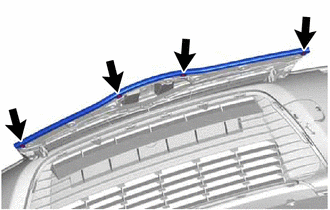
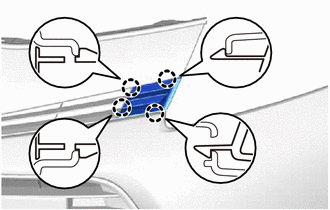
Remove the 4 clips.
-
While peeling off the double-sided adhesive tape, remove the hood to front end panel seal.
-
-
REMOVE RADIATOR GRILLE SIDE MOULDING LH
-
Disengage the 4 claws and remove radiator grille side moulding.
-
-
REMOVE RADIATOR GRILLE SIDE MOULDING RH
Tech Tips
Use the same procedure as for the LH side.
-
REMOVE RADIATOR GRILLE
-
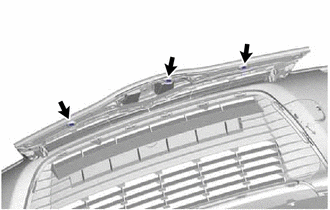
Remove the 3 clips.
-
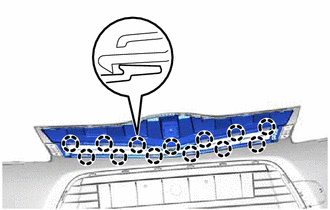
Disengage the 13 claws and remove the radiator grille.
-
-
REMOVE RADIATOR GRILLE (OR FRONT PANEL) EMBLEM
-
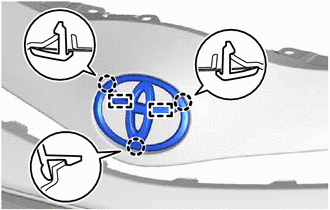
Disengage the 3 claws, 2 guides and remove the radiator grille (or front panel) emblem together radiator grille ornament plate.
-
-
REMOVE RADIATOR GRILLE ORNAMENT PLATE
-
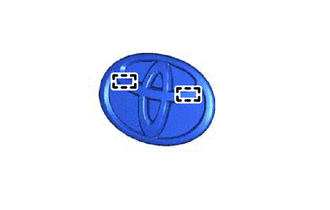
Disengage the 2 guides and remove the radiator grille ornament plate from the radiator grille (or front panel) emblem.
-
-
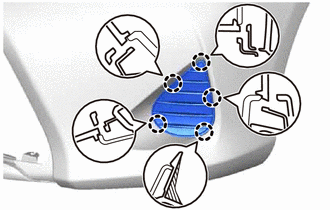
REMOVE FRONT BUMPER HOLE COVER
-
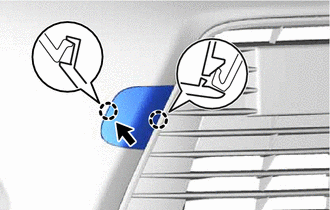
Using your finger, press the left end of the front bumper hole cover in the direction shown by the arrow in the illustration.
-
Disengage the 2 claws and remove the front bumper hole cover.
-
-
REMOVE LOWER NO. 1 RADIATOR GRILLE
-
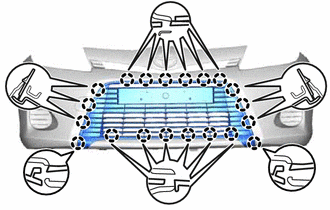
Disengage the 20 claws and remove the lower No. 1 radiator grille.
-
-
REMOVE FOG LIGHT ASSEMBLY LH (w/ Fog Light)
-
REMOVE FOG LIGHT ASSEMBLY RH (w/ Fog Light)
Tech Tips
Use the same procedure as for the LH side.
-
REMOVE FOG LIGHT COVER LH
-
Disengage the 5 claws and remove the fog light cover.
-
-
REMOVE FOG LIGHT COVER RH
Tech Tips
Use the same procedure as for the LH side.
-
REMOVE HEADLIGHT ASSEMBLY LH
-
REMOVE HEADLIGHT ASSEMBLY RH
Tech Tips
Use the same procedure as for the LH side.
-
REMOVE FRONT BUMPER SIDE RETAINER LH
-
Disengage the 2 claws and remove the front bumper side retainer.
-
-
REMOVE FRONT BUMPER SIDE RETAINER RH
Tech Tips
Use the same procedure as for the LH side.
-
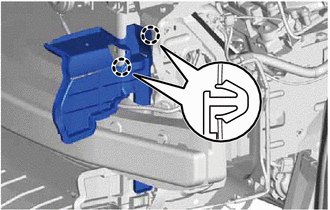
SEPARATE THERMISTOR ASSEMBLY
-
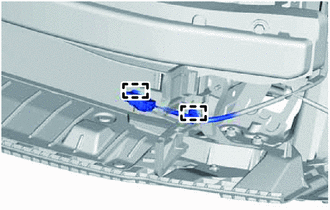
Disengage the 2 clamps and separate the thermistor.
-
-
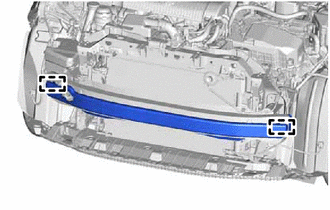
REMOVE RADIATOR SUPPORT OPENING COVER
-
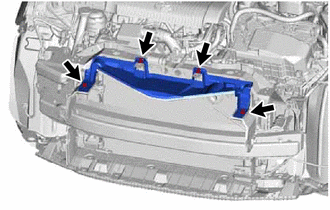
Remove the 4 clips and the radiator support opening cover.
-
-
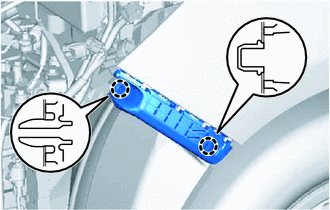
REMOVE NO. 2 RADIATOR SIDE AIR SEAL
-
Disengage the 2 claws and remove the radiator side air seal.
-
-
REMOVE NO. 1 RADIATOR SIDE AIR SEAL
Tech Tips
Use the same procedure as for the No. 2 side.
-
REMOVE RADIATOR SUPPORT EXTENSION LH
-
Disengage the 2 claws and remove the radiator support extension.
-
-
REMOVE RADIATOR SUPPORT EXTENSION RH
Tech Tips
Use the same procedure as for the LH side.
-
REMOVE FRONT BUMPER ENERGY ABSORBER
-
Disengage the 2 guides and remove the front bumper energy absorber.
-
-
REMOVE FRONT BUMPER REINFORCEMENT
-
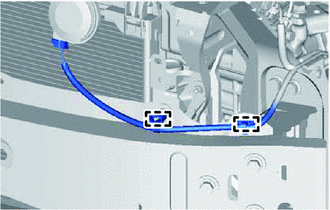
Disengage the 2 clamps and the disconnect the wire harness.
-
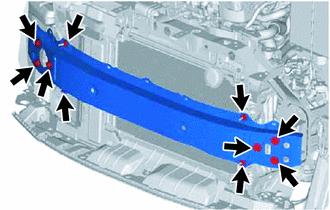
Remove the 6 bolts.
-
Remove the 4 nuts and the front bumper reinforcement.
-
-
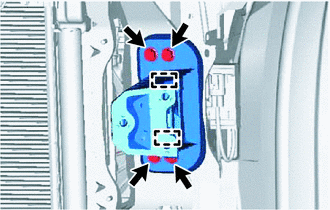
REMOVE FRONT NO. 1 BUMPER STONE DEFLECTOR BRACKET
-
Remove the 2 nuts and the front No. 1 bumper stone deflector bracket.
Tech Tips
Use the same procedure for both sides.
-
-
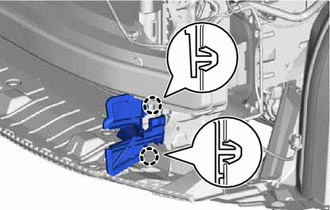
SEPARATE WINDSHIELD WASHER JAR ASSEMBLY
-
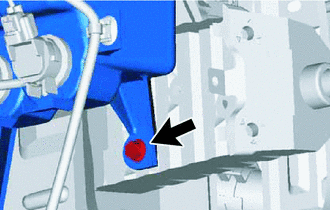
Remove the bolt and separate the windshield washer jar.
-
-
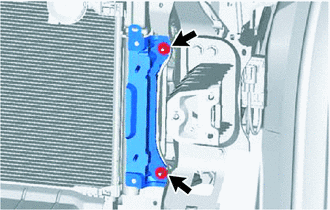
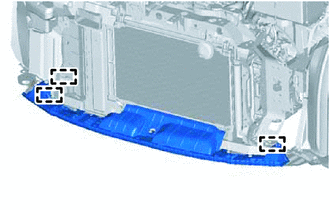
REMOVE FRONT SIDE MEMBER BRACKET SUB-ASSEMBLY LH
Note
When removing the front side member brackets, do not remove both the LH and RH sides at the same time. Remove and replace the LH and RH sides one at a time, making sure that at least one bracket is installed to the vehicle at all times.
If the front side member bracket LH and RH are both removed at the same time, the weight of the radiator and cooler condenser may cause the radiator support to fall forward, resulting in damage to components.
-
Remove the 4 bolts.
-
Disengage the 2 guides and front side member bracket.
-
-
REMOVE FRONT SIDE MEMBER BRACKET SUB-ASSEMBLY RH
Tech Tips
Use the same procedure as for the LH side.
-
REMOVE ENGINE UNDER COVER LH
-
REMOVE ENGINE UNDER COVER RH
-
REMOVE FRONT BUMPER ENERGY ABSORBER SUB-ASSEMBLY
-
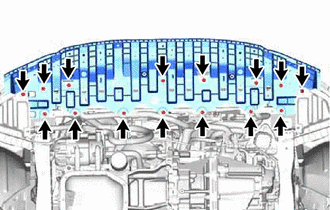
Remove the 8 screws, the 6 clips and the grommet.
-
Disengage the 3 hooks and remove the front bumper energy absorber.
-