ECM REMOVAL
PROCEDURE
-
PRECAUTION
Note
After turning the ignition switch off, waiting time may be required before disconnecting the cable from the negative (-) auxiliary battery terminal. Therefore, make sure to read the disconnecting the cable from the negative (-) auxiliary battery terminal notice before proceeding with work Click here.
-
DISCONNECT CABLE FROM NEGATIVE AUXILIARY BATTERY TERMINAL
-
REMOVE WINDSHIELD WIPER MOTOR AND LINK ASSEMBLY (for LHD)
-
REMOVE FRONT NO. 1 VENTILATOR SEAL (for LHD)
-
REMOVE FRONT AIR SHUTTER SEAL (for LHD)
-
REMOVE INNER COWL TOP TO COWL BRACE (for LHD)
-
REMOVE OUTER COWL TOP PANEL SUB-ASSEMBLY (for LHD)
-
REMOVE ECM (for LHD)
-
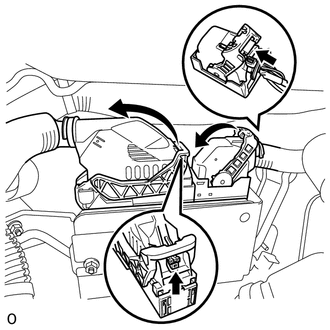
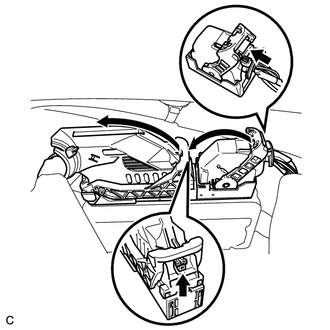
Push the locks on the 2 levers, then raise the levers, and disconnect the 2 ECM connectors.
Note
After disconnecting the connectors, make sure that dirt, water or other foreign matter does not contact the connecting parts of the connectors.
-
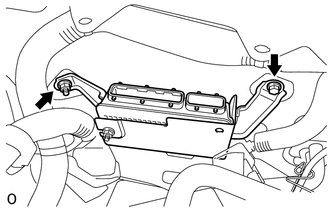
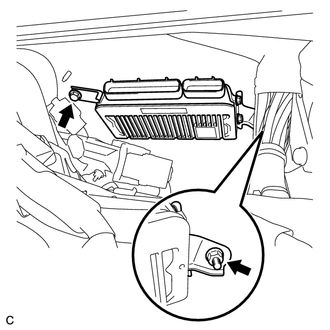
Remove the bolt and nut.
-
Remove the ECM.
-
-
REMOVE NO. 1 ECM BRACKET (for LHD)
-
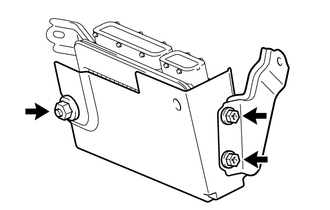
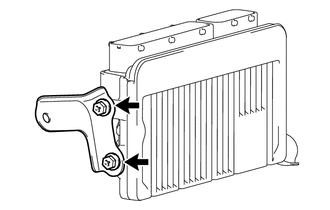
Remove the 2 screws, nut and the No. 1 ECM bracket from ECM.
-
-
REMOVE NO. 2 ECM BRACKET (for LHD)
-
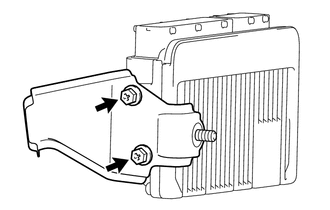
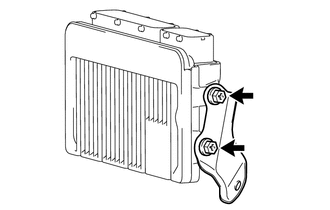
Remove the 2 screws and the No. 2 ECM bracket from the ECM.
-
-
REMOVE ECM (for RHD)
-
Push the locks on the 2 levers, then raise the levers, and disconnect the 2 ECM connectors.
Note
After disconnecting the connectors, make sure that dirt, water or other foreign matter does not contact the connecting parts of the connectors.
-
Remove the bolt and nut.
-
Remove the ECM.
-
-
REMOVE NO. 1 ECM BRACKET (for RHD)
-
Remove the 2 screws and the No. 1 ECM bracket from the ECM.
-
-
REMOVE NO. 2 ECM BRACKET (for RHD)
-
Remove the 2 screws and the No. 2 ECM bracket from the ECM.
-