SIDE MOULDING INSTALLATION

-
INSTALL REAR DOOR OUTSIDE MOULDING SUB-ASSEMBLY
Tech Tips
When installing the rear door outside moulding sub-assembly, heat the vehicle body and rear door outside moulding sub-assembly using a heat light.
Heating Temperature Item Temperature Vehicle Body 40 to 60°C (104 to 140°F) Moulding 20 to 30°C (68 to 86°F) Note
Do not heat the vehicle body or moulding excessively.
-
Clean the vehicle body surface.
-
Using a heat light, heat the vehicle body surface.
-
Remove the double-sided tape from the vehicle body.
-
Wipe off any tape adhesive residue with cleaner.
-
-
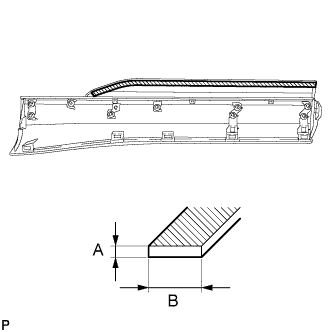
Clean the rear door outside moulding sub-assembly.
Standard Measurement Dimension Measurement A 1.2 mm (0.0472 in.) B for TMK Made: 12.0 mm (0.472 in.)
for TMMC Made: 10.0 mm (0.394 in.)
-
Using a heat light, heat the rear door outside moulding sub-assembly.
-
Remove the double-sided tape from the rear door outside moulding sub-assembly.
-
Wipe off any tape adhesive residue with cleaner.
-
Apply new double-sided tape to the rear door outside moulding sub-assembly.
-
-
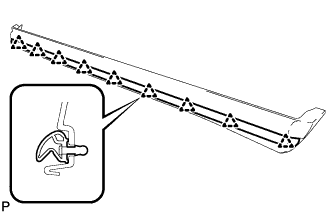
Install 8 new clips (quarter vent louver retainer) to the rear door outside moulding sub-assembly.
-
Install the bolt to the rear door outside moulding sub-assembly.
-
Install a new gasket to the bolt.
-
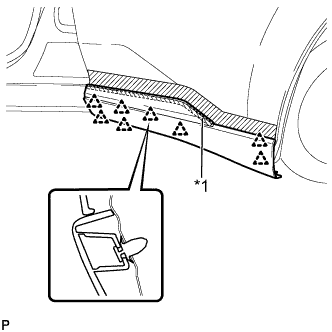
Text in Illustration *1 Double-sided Tape Install the rear door outside moulding sub-assembly.
-
Using a heat light, heat the vehicle body and rear door outside moulding sub-assembly.
-
Remove the release paper from the rear door outside moulding sub-assembly.
Tech Tips
After removing the release paper, keep the exposed adhesive free from foreign matter.
-
Engage the 8 clips and install the rear door outside moulding sub-assembly.
-
-
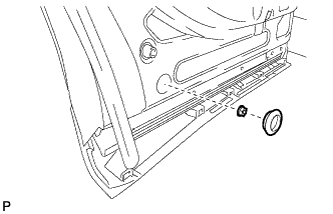
Install the nut and hole plug.
-
-
INSTALL REAR DOOR NO. 3 WEATHERSTRIP
-
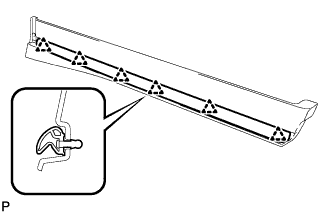
Engage the 6 clips and install the rear door No. 3 weatherstrip.
-
-
INSTALL REAR DOOR LOWER OUTSIDE MOULDING
-
Install 4 new clips (quarter vent louver retainer) to the rear door lower outside moulding.
-
Engage the 4 clips and 5 claws to install the rear door lower outside moulding.
-
Engage the clip and connect the No. 2 access panel weatherstrip.
-
-
INSTALL FRONT DOOR OUTSIDE MOULDING SUB-ASSEMBLY
Tech Tips
When installing the front door outside moulding sub-assembly, heat the vehicle body and front door outside moulding sub-assembly using a heat light.
Heating Temperature Item Temperature Vehicle Body 40 to 60°C (104 to 140°F) Moulding 20 to 30°C (68 to 86°F)
-
Clean the vehicle body surface.
-
Using a heat light, heat the vehicle body surface.
-
Remove the double-sided tape from the vehicle body.
-
Wipe off any tape adhesive residue with cleaner.
-
-
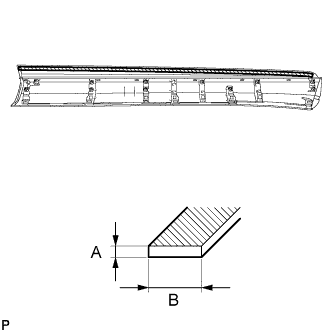
Clean the front door outside moulding sub-assembly.
Standard Measurement Dimension Measurement A 1.2 mm (0.0472 in.) B 10.0 mm (0.394 in.)
-
Using a heat light, heat the front door outside moulding sub-assembly.
-
Remove the double-sided tape from the front door outside moulding sub-assembly.
-
Wipe off any tape adhesive residue with cleaner.
-
Apply new double-sided tape to the front door outside moulding sub-assembly.
-
-
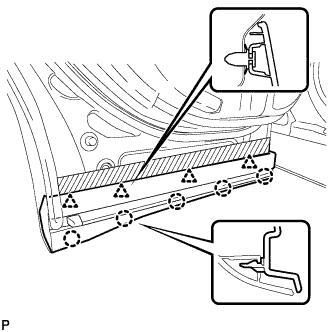
Install 10 new clips (quarter vent louver retainer) to the front door outside moulding sub-assembly.
-
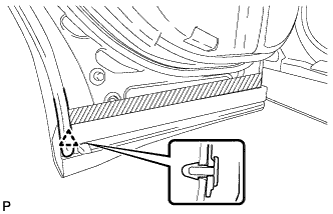
Install the bolt to the front door outside moulding sub-assembly.
-
Install a new gasket to the bolt.
-

Text in Illustration *1 Double-sided Tape Install the front door outside moulding sub-assembly.
-
Using a heat light, heat the vehicle body and front door outside moulding sub-assembly.
-
Remove the release paper from the front door outside moulding sub-assembly.
Tech Tips
After removing the release paper, keep the exposed adhesive free from foreign matter.
-
Engage the 10 clips and guide to install the front door outside moulding sub-assembly.
-
-
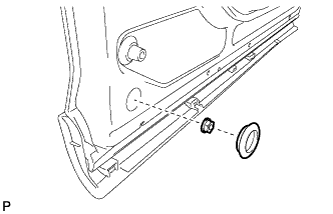
Install the nut and hole plug.
-
-
INSTALL FRONT DOOR NO. 3 WEATHERSTRIP
-
Engage the 9 clips and install the front door No. 3 weatherstrip.
-
-
INSTALL FRONT DOOR LOWER OUTSIDE MOULDING
-
Install 5 new clips (quarter vent louver retainer) to the front door lower outside moulding.
-
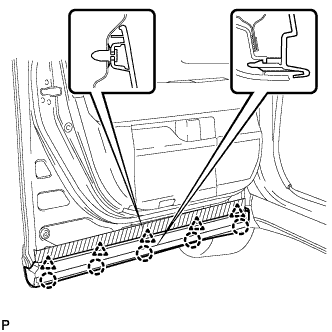
Engage the 5 clips and 5 claws to install the front door lower outside moulding.
-