ROOF DRIP SIDE FINISH MOULDING INSTALLATION

-
INSTALL ROOF DRIP SIDE FINISH MOULDING CLIP (except Glass Roof)
Note
-
If reusing the clips, do not remove the double-sided tape remaining on the clips and where the clips will be installed on the body.
-
If installing new clips, remove the double-sided tape remaining where the clips will be installed on the body and clean the body with a non-residue solvent.
-

Apply a 2 to 3 mm (0.0787 to 0.118 in.) bead of adhesive (3M DP-105 or equivalent) to new roof drip side finish moulding clips.
Tech Tips
Adhesive strength (tensile strength): 13.7 MPa (140 kgf/cm2) or more (when the temperature is 23°C (73°F))
-
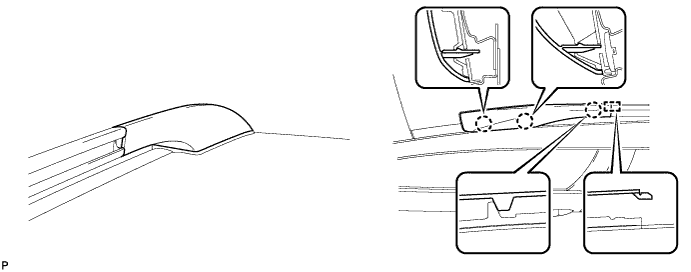
Press and install the 3 roof drip side finish moulding clips.
-
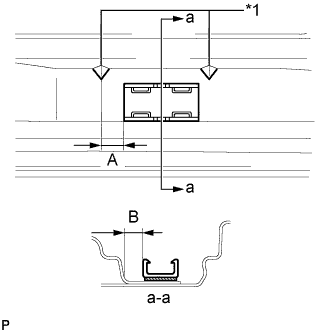
Text in Illustration *1 Protruding Part Install the clips to the positions on the roof panel shown in the illustration. Determine the locations and firmly press and install the 3 roof drip side finish moulding clips after lightly applying adhesive (3M DP-105 or equivalent).
Standard Dimension Installation Area Dimension Measurement for Front Side A 5.0 mm (0.197 in.) B 5.7mm (0.224 in.) for Center Side A 5.2 mm (0.205 in.) B 7.0 mm (0.276 in.) for Rear Side A 5.0 mm (0.197 in.) B 5.8 mm (0.228 in.) -
Install the roof drip center side finish moulding when 20 minutes or more have elapsed after pressing and installing the 3 roof drip side finish moulding clips.
Tech Tips
-
Initial hardening time: 20 minutes
-
Complete hardening time: 48 hours
-
-
-
INSTALL ROOF DRIP SIDE FINISH MOULDING CLIP (for Glass Roof)
Note
-
If reusing the clips, do not remove the double-sided tape remaining on the clips and where the clips will be installed on the body.
-
If installing new clips, remove the double-sided tape remaining where the clips will be installed on the body and clean the body with a non-residue solvent.
-
Apply a 2 to 3 mm (0.0787 to 0.118 in.) bead of adhesive (3M DP-105 or equivalent) to new roof drip side finish moulding clips.
Tech Tips
Adhesive strength (tensile strength): 13.7 MPa (140 kgf/cm2) or more (when the temperature is 23°C (73°F))
-
Press and install the 2 roof drip side finish moulding clips.
-
Text in Illustration *1 Protruding Part Install the clips to the positions on the roof panel shown in the illustration. Determine the locations and firmly press and install the 2 roof drip side finish moulding clips after lightly applying adhesive (3M DP-105 or equivalent).
Standard Dimension Installation Area Dimension Measurement for Front Side A 8.0 mm (0.315 in.) B 6.0mm (0.236 in.) for Rear Side A 5.0 mm (0.197 in.) B 5.8 mm (0.228 in.) -
Install the roof drip center side finish moulding when 20 minutes or more have elapsed after pressing and installing the 2 roof drip side finish moulding clips.
Tech Tips
-
Initial hardening time: 20 minutes
-
Complete hardening time: 48 hours
-
-
-
INSTALL REAR ROOF RACK BRACKET (w/o Roof Rack)
-

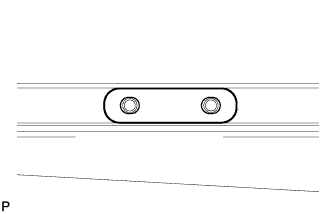
Install a new center rear roof rack bracket with 2 new bolts as shown in the illustration.
- Torque:
- 10 N*m { 102 kgf*cm, 7 ft.*lbf }
-
-
INSTALL FRONT ROOF RACK BRACKET (w/o Roof Rack)
Tech Tips
Use the same procedure for the front side and rear side.
-
INSTALL ROOF DRIP SIDE FINISH MOULDING (except Glass Roof)
-

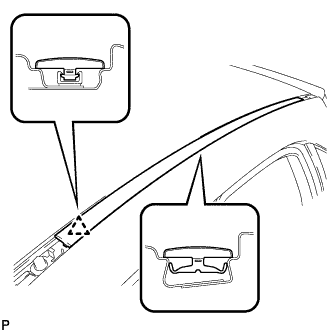
Engage the clip and install the roof drip side finish moulding.
-
-
INSTALL CENTER ROOF DRIP SIDE FINISH MOULDING (except Glass Roof)
-
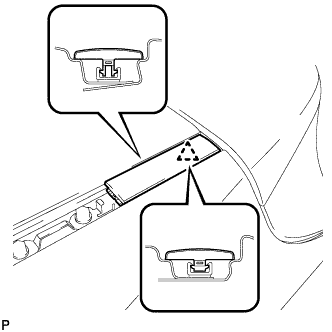
Engage the clip and install the center roof drip side finish moulding.
-
-
INSTALL REAR ROOF DRIP SIDE FINISH MOULDING
-
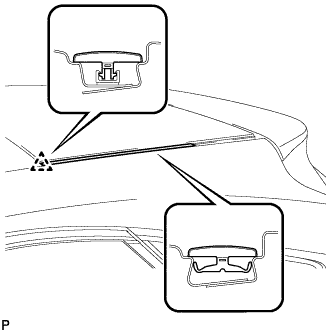
Engage the clip and install the rear roof drip side finish moulding.
-
-
INSTALL ROOF DRIP SIDE FINISH MOULDING (for Glass Roof)
-
Engage the clip and install the roof drip side finish moulding.
-
-
INSTALL REAR ROOF DRIP SIDE MOULDING COVER (w/o Roof Rack)
-
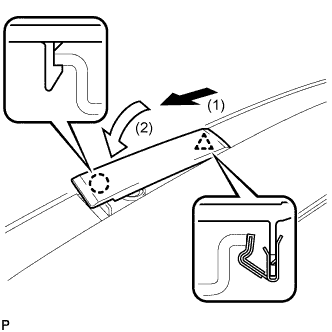
Engage the clip and claw, and install the rear roof drip side moulding cover as shown in the illustration.
-
-
INSTALL FRONT ROOF DRIP SIDE MOULDING COVER (w/o Roof Rack)
Tech Tips
Use the same procedure for the front side and rear side.
-
INSTALL ROOF CARRIER SEAL (w/ Roof Rack)
-
Install a new roof carrier seal.
Tech Tips
Use the same procedure for the front side and rear side.
-
-
INSTALL ROOF RACK ASSEMBLY (w/ Roof Rack)
-
Install the roof rack assembly with 4 new bolts.
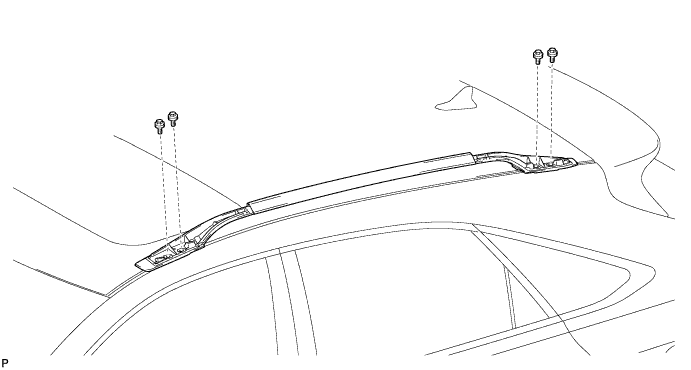
- Torque:
- 34 N*m { 347 kgf*cm, 25 ft.*lbf }
-
-
INSTALL REAR ROOF RACK LEG COVER (w/ Roof Rack)
-
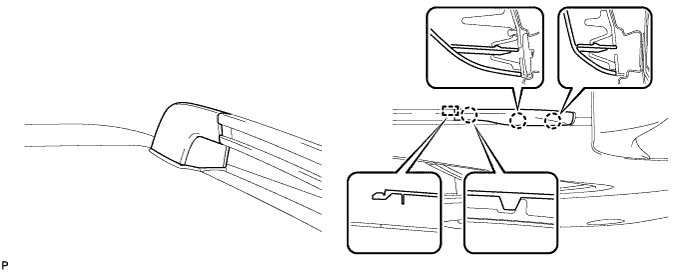
Engage the guide and 3 claws, and install the rear roof rack leg cover.
-
-
INSTALL FRONT ROOF RACK LEG COVER (w/ Roof Rack)
-
Engage the guide and 3 claws, and install the front roof rack leg cover.
-