FRONT SIDE FIX WINDOW GLASS REMOVAL

Tech Tips
-
The front side fix window assembly can be reused. If any clip of the front side fix window assembly is broken, use butyl tape to support the glass until the applied adhesive hardens when reinstalling the front side fix window assembly.
-
Use the same procedure for the RH side and LH side.
-
The procedure listed below is for the LH side.
-
REMOVE INSTRUMENT SIDE PANEL
-
Using moulding remover A, disengage the claw and 2 clips.
-
Disengage the guide and remove the instrument side panel LH.
-
-
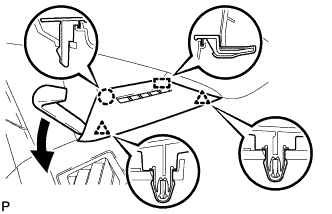
REMOVE FRONT PILLAR GARNISH
-
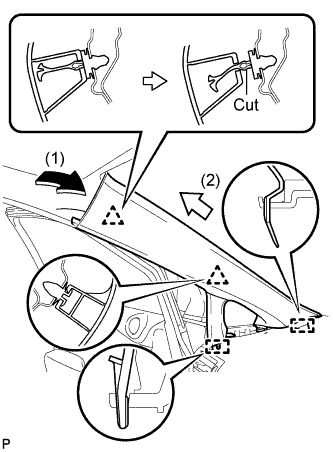
Pull the upper part of the garnish toward the inside of the cabin and disengage the 2 clips.
Tech Tips
Perform this step as shown by the arrow (1) in the illustration.
-
Cut off the clip <A>.
-
Disengage the 2 guides and remove the front pillar garnish LH.
Tech Tips
Perform this step as shown by the arrow (2) in the illustration.
-
Remove the clip <A>.
-
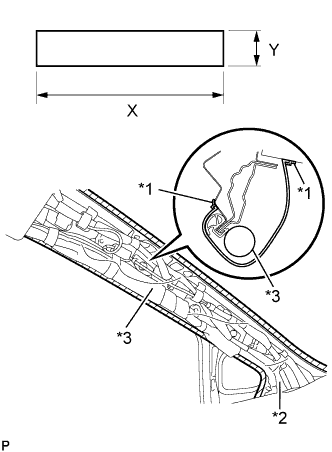
Text in Illustration *1 Adhesive Tape *2 Protective Cover *3 Curtain Shield Airbag Assembly Protect the curtain shield airbag assembly.
-
Cover the airbag with a cloth or piece of nylon and secure the ends of the cover with tape, as shown in the illustration.
Protective Cover size X 700 mm (2.30 ft.) Y 120 mm (4.72 in.) Note
Cover the curtain shield airbag with a protective cover as soon as the front pillar garnish is removed.
-
-
-
REMOVE FRONT SIDE FIX WINDOW ASSEMBLY
-
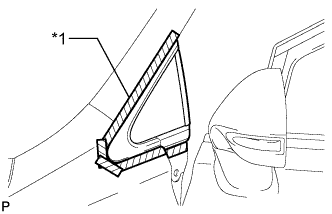
Text in Illustration *1 Protective Tape Apply protective tape to the installation position of the front side fix window assembly on the vehicle body.
-
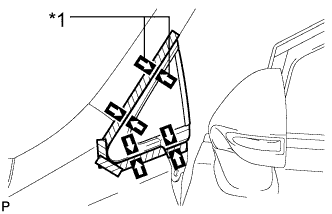
Text in Illustration *1 Matchmark Place matchmarks on the front side fix window assembly and vehicle body on the locations indicated in the illustration.
Tech Tips
Matchmarks are not necessary if the front side fix window assembly is not going to be reused.
-
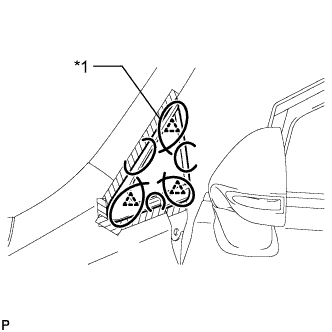
Text in Illustration *1 Piano Wire Pass a piano wire between the interior vehicle body and glass from the interior as shown in the illustration.
-
Tie both wire ends to wooden blocks or similar objects that can serve as handles.
Note
When separating the front side fix window assembly from the vehicle, be careful not to damage the paint or interior and exterior ornaments.
-
Cut off the adhesive by pulling the piano wire around the front side fix window assembly.
Note
Leave as much adhesive on the vehicle body as possible when cutting through the adhesive.
-
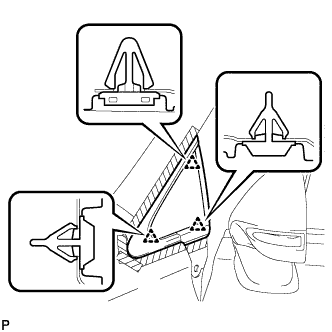
Disengage the 3 clips.
-
Using suction cups, remove the glass.
Note
Be careful not to drop the glass.
-
-
CLEAN VEHICLE BODY
-
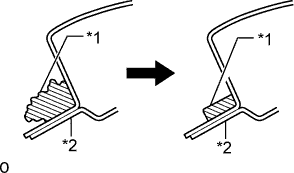
Text in Illustration *1 Adhesive *2 Vehicle Body Clean and shape the contact surfaces of the vehicle body.
-
Using a knife, cut away excess adhesive on the contact surfaces of the vehicle body as shown in the illustration.
Note
Be careful not to damage the vehicle body.
Tech Tips
Leave as much adhesive on the vehicle body as possible.
-
-
Clean the contact surfaces of the vehicle body with a piece of cloth saturated with cleaner.
Tech Tips
Even if all the adhesive has been removed, clean the vehicle body.
-