REAR COIL SPRING REMOVAL

Tech Tips
-
Use the same procedure for the RH side and LH side.
-
The procedure listed below is for the LH side.
-
REMOVE REAR WHEEL
-
REMOVE REAR SUSPENSION ARM COVER
-
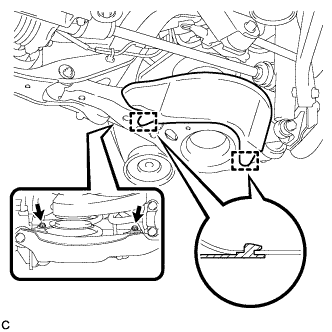
Remove the 2 bolts.
-
Disengage the 2 guides and remove the rear suspension arm cover from the rear No. 2 suspension arm assembly.
-
-
REMOVE REAR STABILIZER LINK SUB-ASSEMBLY
-
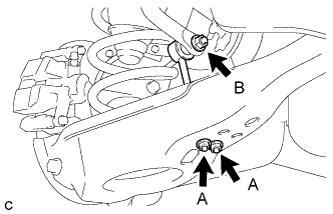
Remove the 2 nuts (A) and rear stabilizer link sub-assembly from the rear No. 2 suspension arm assembly.
-
Remove the nut (B) and separate the rear stabilizer link sub-assembly from the rear stabilizer bar.
Tech Tips
If the ball joint turns together with the nut (B), use a hexagon wrench (6 mm) to hold the stud bolt.
-
-
REMOVE REAR COIL SPRING
-
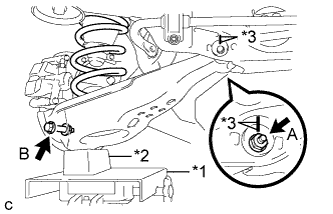
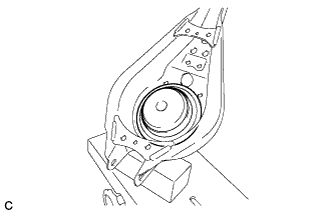
Text in Illustration *1 Jack *2 Wooden Block *3 Matchmark Put matchmarks on the adjust cams and the rear suspension member sub-assembly.
-
Using a jack and wooden block, jack up the rear No. 2 suspension arm assembly to replicate standard vehicle height conditions.
CAUTION:
Do not jack up the rear No. 2 suspension arm assembly too high as the vehicle may fall.
-
Loosen the nut (A).
Note
When loosening the nut (A), keep the toe adjust cam from rotating.
-
Remove the bolt (B) and nut, and separate the rear No. 2 suspension arm assembly from the rear axle carrier sub-assembly.
Note
Since the stopper nut is used, loosen the bolt (B).
-
Slowly lower the rear No. 2 suspension arm assembly, and remove the rear coil spring.
-
-
REMOVE REAR UPPER COIL SPRING INSULATOR
-
Remove the rear upper coil spring insulator from the spring seat sub-assembly.
-
-
REMOVE REAR LOWER COIL SPRING INSULATOR
-
Remove the rear lower coil spring insulator from the rear No. 2 suspension arm assembly.
-