HEIGHT CONTROL SENSOR (for Front Side) INSPECTION

-
INSPECT FRONT HEIGHT CONTROL SENSOR SUB-ASSEMBLY
-
Check the front height control sensor:
-
Connect 3 dry batteries of 1.5 V in series.
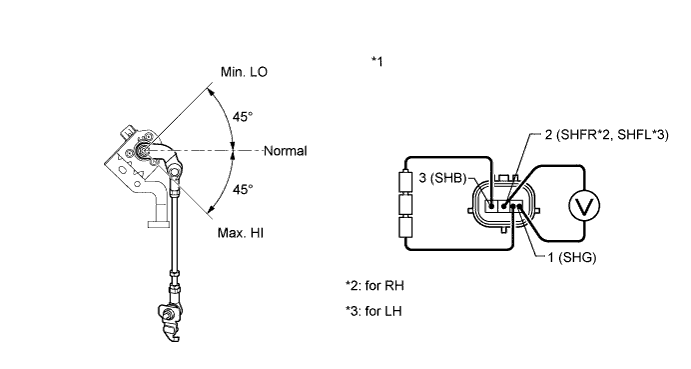
Text in Illustration *1 Component without harness connected
(Front height control sensor)
-
Connect a positive (+) lead from the battery to terminal 3 (SHB) of the height control sensor and a negative (-) lead to terminal 1 (SHG). While applying 4.5 V, slowly moving the sensor's link up and down, and measure the voltage between terminal 2 (SHFR*2 or SHFL*3) and terminal 1 (SHG).
Tech Tips
-
*2: for RH
-
*3: for LH
Standard Voltage for RH Tester Connection Condition Specified Condition 2 (SHFR) - 1 (SHG) Max. HI 3.95 to 4.15 V Normal 2.15 to 2.35 V Min. LO 0.35 to 0.55 V for LH Tester Connection Condition Specified Condition 2 (SHFL) - 1 (SHG) Max. HI 3.95 to 4.15 V Normal 2.15 to 2.35 V Min. LO 0.35 to 0.55 V Note
-
Do not apply more than 6 V.
-
Do not drop the height control sensor. If the sensor is dropped, replace it with a new one.
If the value is not as specified, replace the front height control sensor sub-assembly.
-
-
-