CONTROL VALVE ASSEMBLY (for Front Side) INSPECTION

-
INSPECT NO. 1 HEIGHT CONTROL VALVE SUB-ASSEMBLY
-
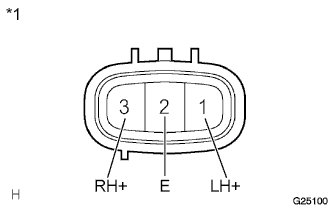
Text in Illustration *1 Component without harness connected
(Front height control valve)
Measure the resistance according to the value(s) in the table below.
Standard Resistance Tester Connection Condition Specified Condition 3 (RH+) - 2 (E) 15 to 25°C (59 to 77°F) 10 to 14 Ω 1 (LH+) - 2 (E) -
Check the rear RH valve.
-
Connect a positive (+) lead from the battery to terminal 3 (RH+) and a negative (-) lead to terminal 2 (E).
-
Check the operating sound of the No. 1 height control valve.
OK It makes an operating sound. If the value is not as specified, replace the No. 1 height control valve sub-assembly.
-
-
Check the rear LH valve.
-
Connect a positive (+) lead from the battery to terminal 1 (LH+) and a negative (-) lead to terminal 2 (E).
-
Check the operating sound of the No. 1 height control valve.
OK It makes an operating sound. If the value is not as specified, replace the No. 1 height control valve sub-assembly.
-
-