BRAKE ACTUATOR INSTALLATION

Note
While the battery is connected, even if the power switch is off, the brake control system activates when the brake pedal is depressed or any door courtesy switch is turned on. Therefore, when servicing the brake system components, do not depress the brake pedal or open/close the doors while the battery is connected.
-
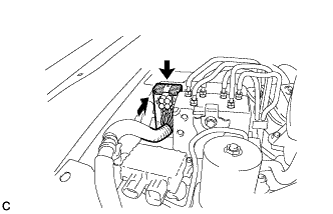
INSTALL NO. 2 BRAKE ACTUATOR HOSE
Note
When inserting the hose, be careful that there is no excessive weight applied to the union of the brake accumulator (especially in the vertical direction).
-
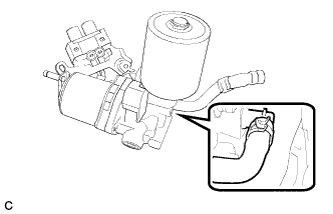
Install the No. 2 brake actuator hose with the clip.
-
-
INSTALL BRAKE BOOSTER PUMP
-
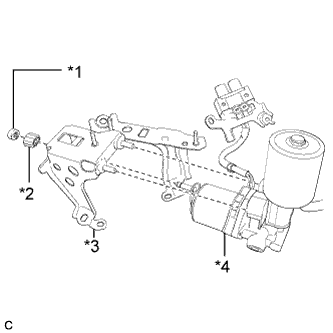
Text in Illustration *1 Brake Actuator Bracket Clamp *2 Brake Booster Pump Bushing *3 Brake Actuator Bracket *4 Brake Booster Pump Install the brake booster pump to the brake actuator bracket.
-
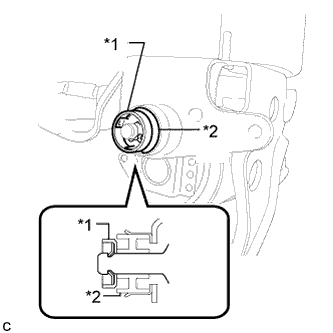
Text in Illustration *1 Brake Actuator Bracket Collar *2 Brake Booster Pump Bushing *3 Brake Actuator Bracket Ensure that the brake booster pump collar is positioned as shown in the illustration.
Note
After installing the brake booster pump, make sure that the collar dose not fall off.
-
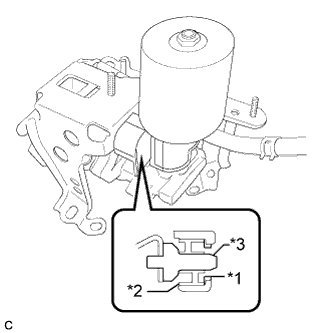
Text in Illustration *1 Brake Actuator Bracket Clamp *2 Brake Booster Pump Bushing Install the brake booster pump bushing and a new brake actuator bracket clamp to the brake booster pump.
Note
Make sure to securely insert the brake booster pump until the claws of the clamp are engaged.
-
Install the the brake booster pump clamp.
-
-
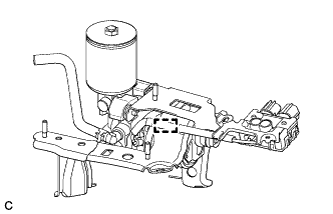
INSTALL BRAKE ACTUATOR
Note
If installing a new brake actuator, do not remove the hole plugs before connecting the brake lines because the brake actuator assembly is filled with brake fluid.
-
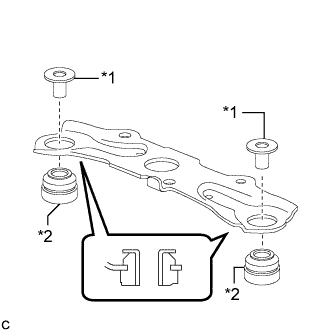
Text in Illustration *1 Spacer *2 Cushion Install the 2 cushions and 2 spacers to the No. 1 brake actuator bracket.
-
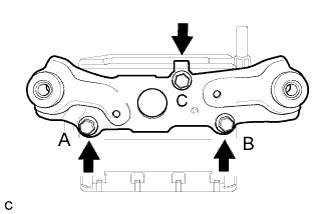
Temporally install the No. 1 brake actuator bracket to the brake actuator with the bolt A and bolt B.
-
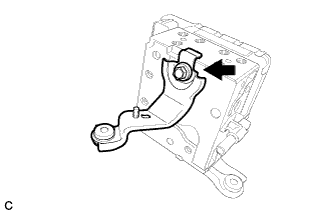
Install the bolt C.
-
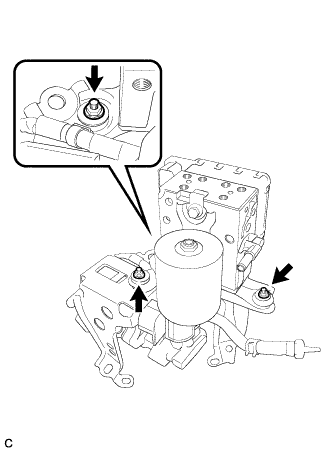
Fully tighten the No. 1 brake actuator bracket to the brake actuator with the 3 bolts.
- Torque:
- 9.3 N*m { 95 kgf*cm, 82 in.*lbf }
-
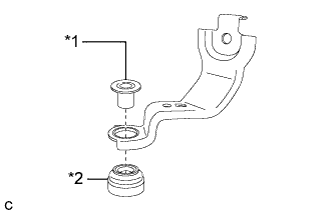
Text in Illustration *1 Spacer *2 Cushion Install the cushion and spacer to the No. 2 brake actuator bracket.
-
Install the No. 2 brake actuator bracket to the brake actuator with the bolt.
- Torque:
- 19 N*m { 194 kgf*cm, 14 ft.*lbf }
-
Install the brake actuator with brackets to the brake actuator bracket with the 3 nuts.
- Torque:
- 8.0 N*m { 82 kgf*cm, 71 in.*lbf }
-
-
INSTALL NO. 3 BRAKE ACTUATOR TUBE
Note
-
Do not damage the No. 3 brake actuator tube or brake actuator and brake booster pump.
-
When installing the No. 3 brake actuator tube, hold the tube and brake actuator and brake booster pump securely.
-
When tightening the nut, make sure that other parts do not move with the nut.
-
Using a union nut wrench, connect the No. 3 brake actuator tube.
- Torque:
- 15 N*m { 155 kgf*cm, 11 ft.*lbf }
Note
Use the formula to calculate special torque values for situations where the union nut wrench is combined with a torque wrench Click here.
-
-
INSTALL CONNECTOR BOX
-

Install the connector box.
-
Install the connector box with the nut.
- Torque:
- 8.0 N*m { 82 kgf*cm, 71 in.*lbf }
-
Attach the wiring harness clamp.
-
-
-
INSTALL BRAKE ACTUATOR HOSE
-

With the paint mark on the hose end facing downward, install the brake actuator hose to the brake actuator with the hose clip.
Note
When inserting the brake actuator hose, be careful that there is no excessive weight applied to the union of the brake actuator (especially in the vertical direction).
-
-
INSTALL BRAKE ACTUATOR AND BRAKE BOOSTER PUMP
-
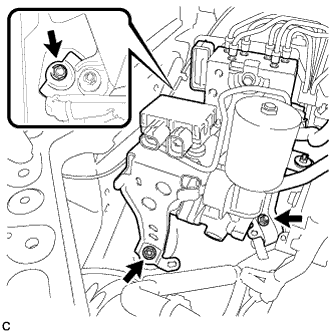
Install the brake actuator and brake booster pump to the body with the 3 nuts.
Note
-
Do not damage the brake lines.
-
When installing the brake actuator and brake booster pump to the vehicle, do not hold it by the connectors, harnesses, hoses or brake lines.
-
Do not drop the brake actuator and brake booster pump. Do not use parts that have been dropped.
- Torque:
- 19 N*m { 194 kgf*cm, 14 ft.*lbf }
-
-
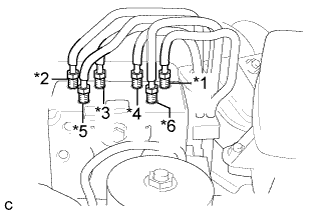
Text in Illustration *1 To front wheel cylinder RH *2 To front wheel cylinder LH *3 To rear wheel cylinder RH *4 To rear wheel cylinder LH *5 From stroke simulator *6 From master cylinder Set each brake line to the correct positions on the brake actuator as shown in the illustration.
-
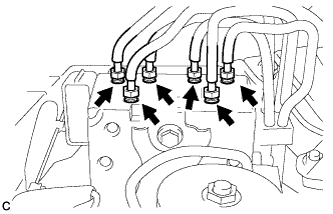
Using a union nut wrench, connect the 6 brake lines.
- Torque:
- 15 N*m { 155 kgf*cm, 11 ft.*lbf }
Note
Use the formula to calculate special torque values for situations where the union nut wrench is combined with a torque wrench Click here.
-
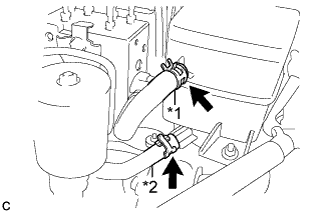
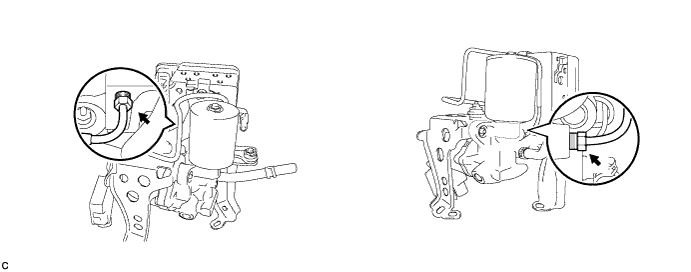
Text in Illustration *1 Brake Actuator Hose *2 No. 2 Brake Actuator Hose Connect the brake actuator hose and No. 2 brake actuator hose with the 2 clips.
-
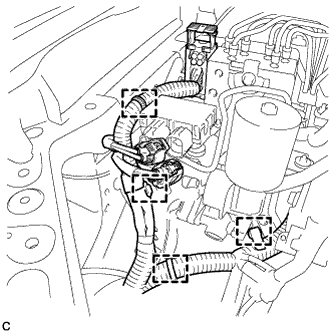
Install the 4 clamps.
-
Connect the connector.
Note
-
Before connecting the connector, make sure that the connector faces are free of foreign matter.
-
Make sure that the connector is locked securely.
-
-
-
INSTALL FRONT WHEEL
- Torque:
- 103 N*m { 1050 kgf*cm, 76 ft.*lbf }
-
INSTALL ECM
Tech Tips
Refer to the instructions for Installation of the ECM Click here.
-
BLEED BRAKE SYSTEM
-
Bleed brake line Click here.
-
-
PERFORM LINEAR VALVE OFFSET LEARNING
-
When the brake actuator is replaced, perform linear valve offset learning Click here.
-
-
CHECK BRAKE ACTUATOR USING INTELLIGENT TESTER
Tech Tips
-
CHECK FOR DTC
-
Check for DTCs. If any DTC is output, perform troubleshooting for that DTC Click here.
-