TRANSMISSION CONTROL CABLE INSTALLATION

-
INSTALL TRANSMISSION CONTROL CABLE ASSEMBLY
-
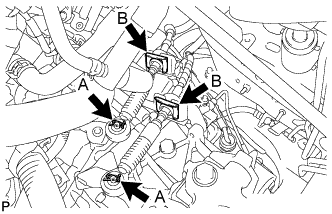
Install the 2 new clips <B> onto the transmission control cable.
-
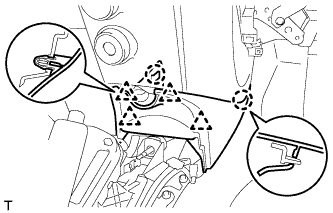
Connect the transmission control cable with the 2 clips <A> onto the transaxle.
-
Install the control cable with the 3 bolts.
- Torque:
- 5.0 N*m { 51 kgf*cm, 44 in.*lbf }
-
-
CONNECT TRANSMISSION CONTROL CABLE ASSEMBLY
-
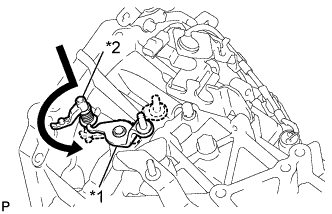
Text in Illustration *1 Outer lever *2 Low fixture lever Hook the outer lever to the low fixture lever.
-
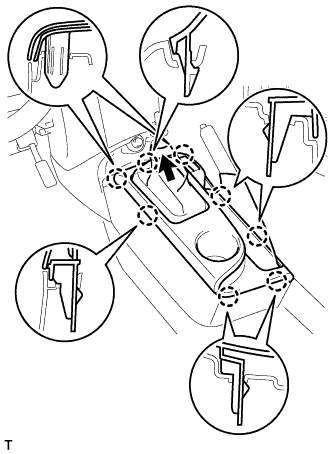
Turn the socket and install the control shift cable onto the shift lever retainer.
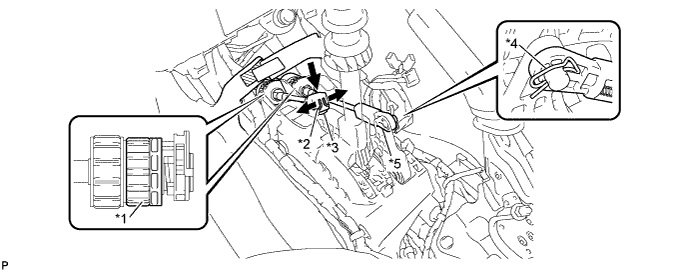
Text in Illustration *1 Socket *2 Clip A *3 Control shift cable *4 Clip B *5 Control select cable - - -
Connect the control shift cable to the shift lever with the clip A.
-
Turn the socket and install the control select cable onto the shift lever retainer.
-
Connect the control select cable with clip B to the shift lever.
Note
-
Connect the control select cable so that the adjusting mechanism lock of the control select cable is installed on the right side of the vehicle.
-
Insert the clip in the direction shown in the illustration.
-
-
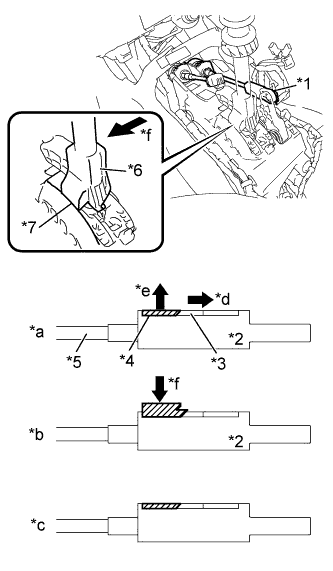
Text in Illustration *1 Control select cable *2 Adjuster case *3 Slider *4 Lock piece *5 Cable rod *6 Slider shaft *7 Cam wall *a Before lock release condition *b Lock release condition *c Lock condition *d Slide *e Pry out *f Push Adjust the length of the control select cable.
Tech Tips
After the shift lever or the shift cable is replaced, be sure to adjust the transaxle control cable assembly.
-
While pulling back the slider of the adjuster case, use a small screwdriver to gently pry out the lock piece.
-
Pushing the slider shaft until it contacts the cam wall.
Note
-
Do not pull up the slider shaft.
-
When adjusting the cable, make sure than the shift lever is not in the 1st or 2nd gear position.
-
Do not push the slider shaft strongly.
-
-
Push the lock piece toward the inside of the case.
Note
Gently pull the cable rod toward the rear of the vehicle by hand to pull the cable taut.
Tech Tips
Make sure that the lock piece is locked by the slider.
-
-
Put the shift lever in the reverse position and release the low fixture lever.
-
-
INSTALL FRONT CONSOLE BOX COVER
-
Engage the 2 claws and 4 clips and install the front console box cover.
-
-
INSTALL REAR CONSOLE BOX ASSEMBLY

-
Engage the 2 front clips.
-
Rotate the 2 rear clips in the direction indicated by the arrows to engage them and install the console box assembly RR.
-
-
INSTALL UPPER CONSOLE PANEL SUB-ASSEMBLY
-
Install the shifting hole cover onto the shift lever.
-
Engage the 8 claws and install the console upper panel.
-
-
INSTALL SHIFT LEVER KNOB SUB-ASSEMBLY
-
Turn the shift lever knob clockwise and install the shift lever knob onto the shift lever.
-