STARTER (w/ Stop And Start System) INSTALLATION

-
INSTALL STARTER ASSEMBLY
-
Install the starter assembly with the 2 bolts.
- Torque:
- 37 N*m { 377 kgf*cm, 27 ft.*lbf }
-
Connect the connector.
-
Connect terminal 30 with the nut.
- Torque:
- 9.8 N*m { 100 kgf*cm, 87 in.*lbf }
-
Close the terminal cap.
-
-
INSTALL FLYWHEEL HOUSING SIDE COVER
-
Insert the protruding portion into the end of the cylinder block and while pushing it along the cylinder block, fit the claw into the cylinder block.
Note
-
Make sure that the claw makes a click sound, indicating that it fits tightly.
-
Replace the claw with a new one if it does not fit tightly or is deformed.
-
-
-
INSTALL FRONT EXHAUST PIPE ASSEMBLY
-

Using a vernier caliper, measure the free length of the compression springs.
Minimum Length Item Length Front 41.5 mm (1.634 in.) Tech Tips
If the length is not as specified, replace the compression spring.
-
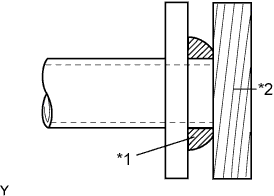
Text in Illustration *1 Gasket *2 Wooden Block Using a plastic hammer and a wooden block, tap in a new exhaust pipe gasket until its surface is flush with the exhaust manifold.
Note
-
Install the gasket in the correct direction.
-
Do not reuse the gasket.
-
Do not damage the gasket by dropping it, etc.
-
Do not damage the outer surface of the gasket.
-
Do not push in the gasket with the exhaust pipe when connecting it.
-
After the installation, check that the gaps between the flanges of the exhaust manifold and front exhaust pipe assembly are consistent front-to-rear and left-to-right.
-
-
Install the front exhaust pipe assembly to the exhaust manifold with the 2 bolts and the 2 compression springs.
- Torque:
- 43 N*m { 438 kgf*cm, 32 ft.*lbf }
-
Using a vernier caliper, measure the free length of the compression springs.
Minimum Length Item Length Rear 38.5 mm (1.594 in.) Tech Tips
If the length is not as specified, replace the compression spring.
-
Fully push a new exhaust pipe gasket onto the front exhaust pipe assembly.
Note
-
Install the gasket in the correct direction.
-
Do not reuse the gasket.
-
Do not damage the gasket by dropping it, etc.
-
Do not damage the outer surface of the gasket.
-
Do not push in the gasket with the exhaust pipe when connecting it.
-
After the installation, check that the gaps between the flanges of the exhaust manifold and front exhaust pipe assembly are consistent front-to-rear and left-to-right.
-
-
Install the front exhaust pipe assembly to the tail exhaust pipe assembly with the 2 bolts and the 2 compression springs.
- Torque:
- 43 N*m { 438 kgf*cm, 32 ft.*lbf }
-
-
INSTALL CONTROL CABLE BRACKET
-
Install the control cable bracket with the 2 bolts.
- Torque:
- 17 N*m { 173 kgf*cm, 13 ft.*lbf }
-
Connect the 2 wire harness clamps.
-
-
INSTALL TRANSMISSION CONTROL CABLE ASSEMBLY
-
Install the 2 new clips <B> onto the transmission control cable.
-
Connect the transmission control cable with the 2 clips <A> onto the transaxle.
-
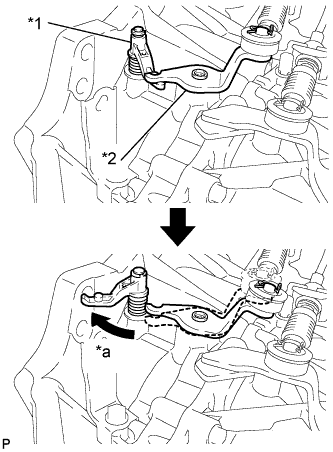
Text in Illustration *1 Reverse Restrict Pin Assembly *2 Outer Lever *a Release Put the shift lever in the reverse position and release the fixture lever.
-
-
CONNECT CABLE TO NEGATIVE BATTERY TERMINAL
- Torque:
- 5.4 N*m { 55 kgf*cm, 48 in.*lbf }
-
INSPECT FOR EXHAUST GAS LEAK