CANISTER ON-VEHICLE INSPECTION

-
CHECK CHARCOAL CANISTER
-
Inspect the ventilation of the canister.
-
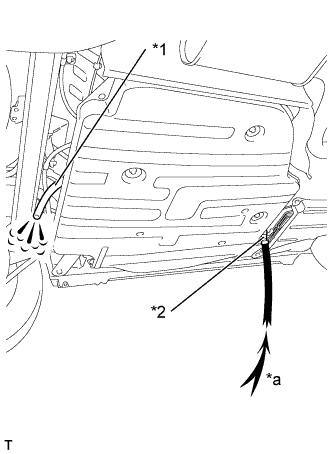
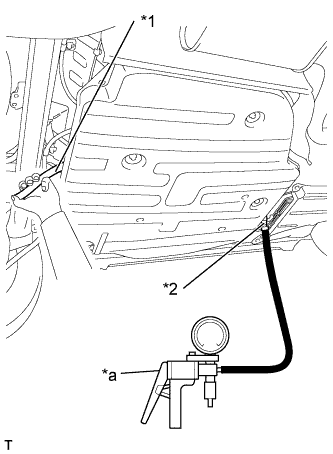
Text in Illustration *1 No. 1 charcoal canister outlet hose *2 Rear fuel emission tube sub-assembly *a Air Open the fuel tank cap and apply compressed air into the rear fuel emission tube sub-assembly.
OK The air flows out from the No. 1 charcoal canister outlet hose. -
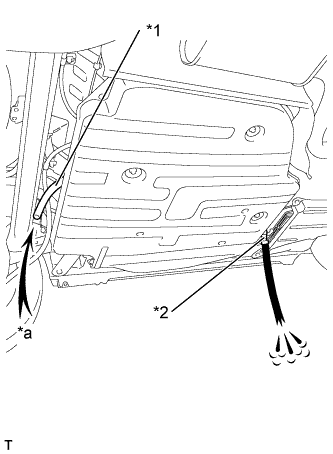
Text in Illustration *1 No. 1 charcoal canister outlet hose *2 Rear fuel emission tube sub-assembly *a Air Open the fuel tank cap and apply compressed air into the No. 1 charcoal canister outlet hose.
OK The air flows out from the rear fuel emission tube sub-assembly.
-
-
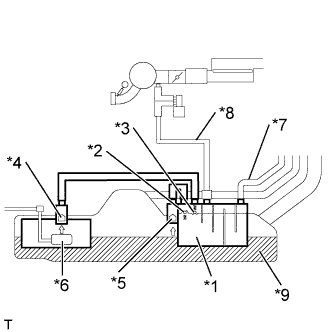
Text in Illustration *1 Fuel tank vent tube assembly (Canister) *2 No. 1 check valve *3 No. 2 check valve *4 Cutoff valve (Fuel suction tube assembly) *5 Cutoff valve (Fuel tank vent tube assembly) *6 Fuel pump *7 No. 1 charcoal canister outlet hose *8 Rear fuel emission tube sub-assembly *9 Fuel tank Inspect the check valve.
-
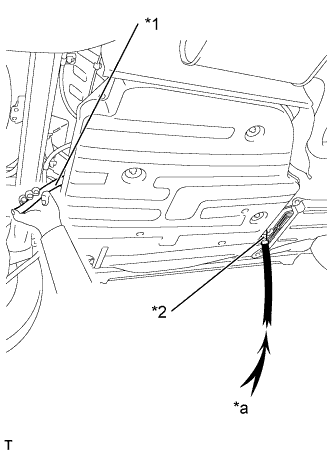
Text in Illustration *1 No. 1 charcoal canister outlet hose *2 Rear fuel emission tube sub-assembly *a Air Open the fuel tank cap, close the No. 1 charcoal canister outlet hose, and apply the compressed air from the rear fuel emission tube sub-assembly.
OK Air does not flow at first. By gradually increasing the pressure, air flows when the pressure in the port reaches the specified level. -
Text in Illustration *1 No. 1 charcoal canister outlet hose *2 Rear fuel emission tube sub-assembly *a Vacuum Pump Open the fuel tank cap, close the No. 1 charcoal canister outlet hose, and apply a vacuum from the rear fuel emission tube sub-assembly, using a vacuum pump.
OK The vacuum is maintained at first. By gradually increasing the vacuum, air flows and the vacuum decreases after the vacuum reaches the specified level.
-
-
Check for clogs in the air filter (when not using the intelligent tester).
-
Start the engine.
-
Warm up the engine.
-
Allow the engine to idle after the engine has warmed up.
-
After 15 minutes, open the fuel tank cap to discharge the pressure in the fuel tank.
-
Close the fuel tank cap and allow the engine to idle for 30 seconds.
-
Open the fuel tank cap again and check for inhalation sounds.
OK No whooshing sounds (inhalation sound) are heard. Tech Tips
If the smell of gasoline and a whooshing sound (exhalation sound) are heard, positive pressure in the fuel tank is being discharged. This does not indicate a malfunction.
-
-
Check for clogs in the air filter (when using the intelligent tester).
-
Connect the intelligent tester to the DLC3.
-
Start the engine.
-
Turn the tester on.
-
Enter the following menus: Powertrain / Engine / Active Test / Activate the VSV for Evap Control.
-
Open the fuel tank cap to discharge the pressure in the fuel tank.
-
Perform the "Activate the VSV for Evap Control" Active Test while the engine is idling.
-
Close the fuel tank cap and allow the engine to idle for 30 seconds.
-
Open the fuel tank cap again and check for inhalation sounds.
Standard No whooshing sounds (inhalation sound) are heard. Tech Tips
If the smell of gasoline and a whooshing sound (exhalation sound) are heard, positive pressure in the fuel tank is being discharged. This does not indicate a malfunction.
-
-