FUEL PUMP REMOVAL

-
SEPARATE FUEL TANK WIRE
-
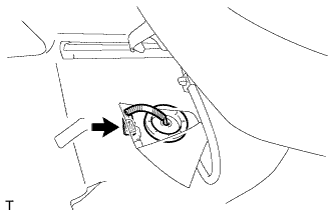
Peel back the floor carpet under the front left seat, disconnect the fuel tank wire connector, and pass the grommet through the floor.
-
-
REMOVE NO. 1 FUEL TANK PROTECTOR SUB-ASSEMBLY
-
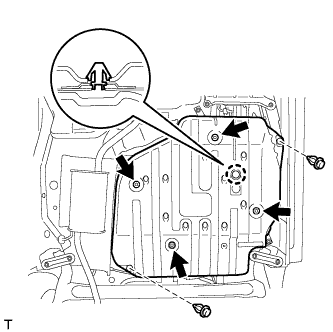
Remove the 2 clips and 4 nuts.
-
Disengage the claw and remove the No. 1 fuel tank protector.
-
-
SEPARATE NO. 1 CHARCOAL CANISTER OUTLET HOSE
-
Separate the No. 1 charcoal canister outlet hose.
-
-
SEPARATE FUEL TANK FILLER PIPE SUB-ASSEMBLY
-
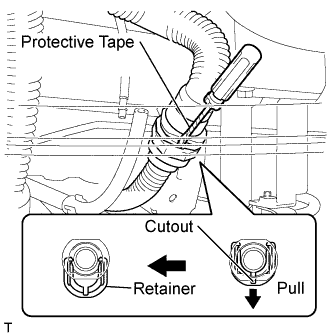
Insert a screwdriver with its tip wrapped in protective tape in the quick connector cutout as shown in the illustration, push the quick connector lock forward, and disconnect the breather tube.
Note
-
Check for dirt or other foreign matter on the parts to be disconnected and clean them if necessary.
-
The quick connector seals with an O-ring. Ensure that there is no damage or foreign matter on the contact surface.
-
Do not use any tools.
-
Do not bend or twist the tubes.
-
Protect the contact surface by covering it with a plastic bag.
-
If the connector is stuck, push and pull on the parts to separate them.
-
-
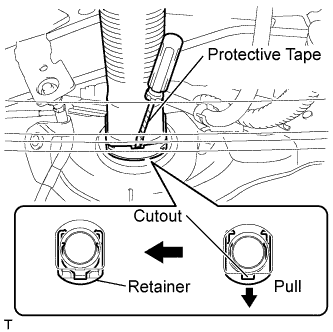
Insert a screwdriver with its tip wrapped in protective tape in the quick connector cutout as shown in the illustration, push the quick connector lock forward and disconnect the inlet tube.
Note
-
Check for dirt or other foreign matter on the parts to be disconnected and clean them if necessary.
-
The quick connector seals with an O-ring. Ensure that there is no damage or foreign matter on the contact surface.
-
Do not use any tools.
-
Do not bend or twist the tubes.
-
Protect the contact surface by covering it with a plastic bag.
-
If the connector is stuck, push and pull on the parts to separate them.
-
-
-
DRAIN FUEL
-
Drain the fuel from the inlet tube installation position.
-
-
SEPARATE FUEL TANK MAIN TUBE SUB-ASSEMBLY
-
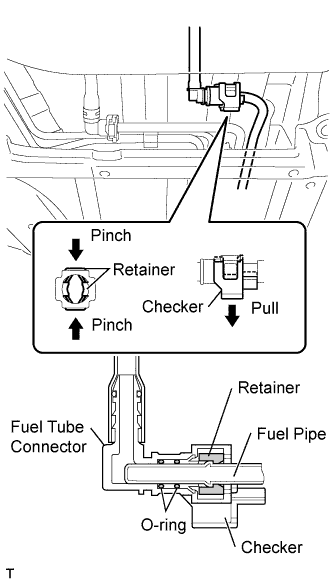
Release the checker as shown in the illustration.
-
Pinch the retainer to release it as shown in the illustration and separate the fuel tank main tube.
Note
-
Check for dirt or other foreign matter on the parts to be disconnected and clean them if necessary.
-
The quick connector seals with an O-ring. Ensure that there is no damage or foreign matter on the contact surface.
-
Do not use any tools.
-
Do not bend or twist the tubes.
-
Protect the contact surface by covering it with a plastic bag.
-
If the connector is stuck, push and pull on the parts to separate them.
-
-
-
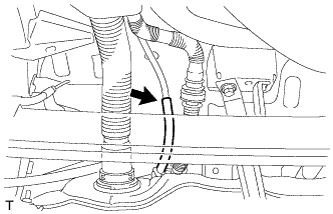
SEPARATE REAR FUEL EMISSION TUBE SUB-ASSEMBLY
-
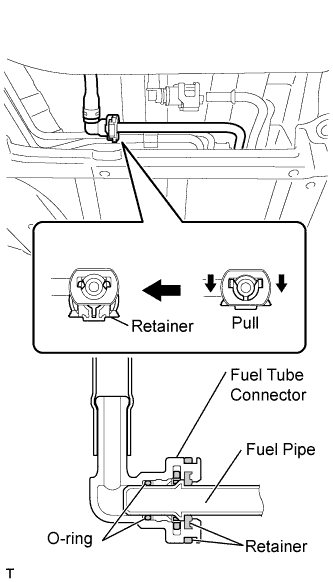
Release the retainer as shown in the illustration and separate the fuel emission tube.
Note
-
Check for dirt or other foreign matter on the parts to be disconnected and clean them if necessary.
-
The quick connector seals with an O-ring. Ensure that there is no damage or foreign matter on the contact surface.
-
Do not use any tools.
-
Do not bend or twist the tubes.
-
Protect the contact surface by covering it with a plastic bag.
-
If the connector is stuck, push and pull on the parts to separate them.
-
-
-
REMOVE FUEL TANK ASSEMBLY
-
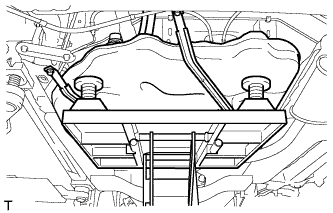
Using an engine lifter, support the fuel tank.
-
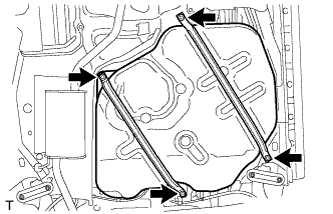
Remove the 4 bolts and the fuel tank.
Note
Make sure that the fuel tank does not fall.
-
-
SEPARATE FUEL TANK MAIN TUBE SUB-ASSEMBLY
-
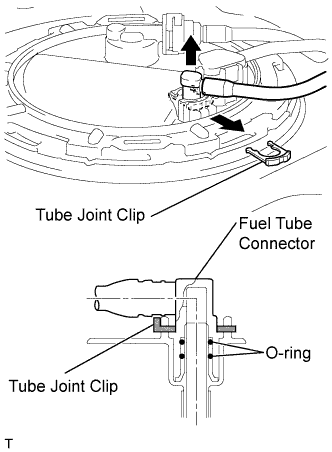
Widen the tip of the tube joint clip and pull out the clip in the direction indicated by the arrow.
-
Pull the fuel tank main tube out of the fuel suction tube assembly to disconnect it.
Note
-
Check for dirt or other foreign matter on the parts to be disconnected and clean them if necessary.
-
The fuel tube connector seals with an O-ring. Ensure that there is no damage or foreign matter on the contact surface.
-
Do not use any tools.
-
Do not bend or twist the tubes.
-
Protect the contact surface by covering it with a plastic bag.
-
If the connector is stuck, push and pull on the parts to separate them.
-
-
-
SEPARATE FUEL TANK WIRE
-
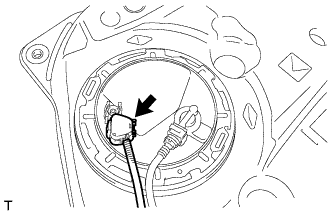
Disconnect the fuel tank wire connector from the fuel suction tube assembly.
-
-
SEPARATE NO. 1 FUEL EVAPORATION TUBE SUB-ASSEMBLY
-
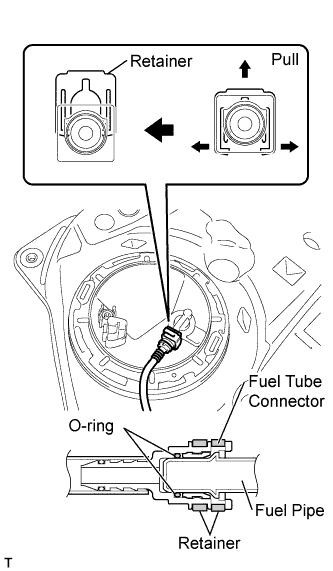
Release the retainer as shown in the illustration and disconnect the No. 1 fuel evaporation tube from the fuel suction tube assembly.
Note
-
Check for dirt or other foreign matter on the parts to be disconnected and clean them if necessary.
-
The fuel tube connector seals with an O-ring. Ensure that there is no damage or foreign matter on the contact surface.
-
Do not use any tools.
-
Do not bend or twist the tubes.
-
Protect the contact surface by covering it with a plastic bag.
-
If the connector is stuck, push and pull on the parts to separate them.
-
-
-
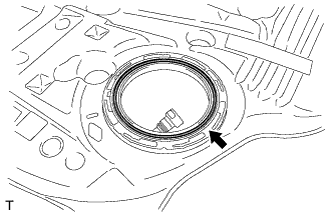
REMOVE FUEL PUMP GAUGE RETAINER
-
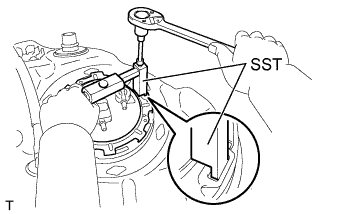
Using a 6 mm socket hexagon wrench, set SST to the fuel pump gauge retainer.
- SST
- 09808-14020 ( 09808-01410, 09808-01420, 09808-01430 )
Tech Tips
Align the ribs of the fuel pump gauge retainer with the tips of SST.
-
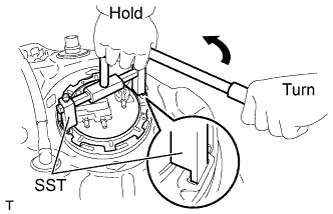
Using SST, loosen the fuel pump gauge retainer.
- SST
- 09808-14020 ( 09808-01410, 09808-01420, 09808-01430 )
Note
Do not use any tools other than SST.
Tech Tips
Align the ribs of the fuel pump gauge retainer with the tips of SST.
-
Remove the fuel pump gauge retainer while holding the fuel suction tube assembly by hand.
-
-
REMOVE FUEL SUCTION TUBE ASSEMBLY
-
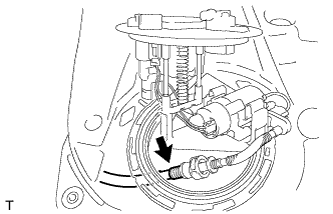
Remove the fuel suction tube assembly from the fuel tank.
Note
Do not disconnect the tube shown in the illustration.
-
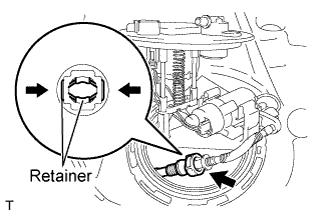
Pinch the fuel tank bent tube retainer to release it as shown in the illustration, disconnect the fuel tank bent tube, and then remove fuel suction tube assembly.
-
-
REMOVE FUEL TANK SUCTION TUBE GASKET
-
Remove the gasket from the fuel tank.
-