REAR CRANKSHAFT OIL SEAL INSTALLATION

-
INSTALL REAR ENGINE OIL SEAL

-
Remove any old packing material and be careful not to drop any oil on the contact surfaces of the oil pan and cylinder block.
-
Apply seal packing in a continuous bead as shown in the illustration.
Seal packing Toyota Genuine Seal Packing Black, Three Bond 1207B or equivalent Note
-
Remove any oil from the contact surfaces.
-
Install a new rear engine oil seal within 3 minutes after applying seal packing.
-
Do not start the engine for at least 2 hours after installing.
-
-
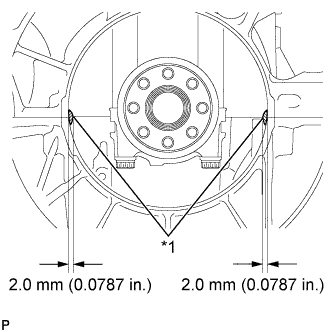
Text in Illustration *1 Seal Packing Wipe off the excess seal packing, leaving only the specified amount in the areas shown in the illustration.
-
Apply MP grease to the lip of a new rear engine oil seal.
Note
Keep the lip tree from foreign matter.
-
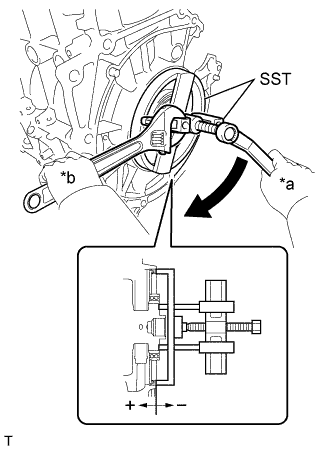
Text in Illustration *a Turn *b Hold Using SST, press in a new rear engine oil seal until its surface is flush with the cylinder block sub-assembly and oil pan sub-assembly.
- SST
- 09223-47020
- 09950-50013 ( 09951-05010, 09952-05010, 09953-05020, 09954-05021, 09955-05010, 09957-04010 )
Oil seal standard depth -0.2 to 1.2 mm (-0.0079 to 0.0472 in.) Note
-
Make sure there is no foreign matter on the lip of the rear engine oil seal.
-
Make sure there is no oil or grease on the outer circumference of the rear engine oil seal.
-
Do not press in the rear engine oil seal at an angle.
-
Wipe off extra grease from the crankshaft.
-
Apply a small amount of molybdenum grease to the threaded portion and tip of SST center bolt (09953-05020) before using.
Tech Tips
If necessary, lightly tap SST using a plastic-faced hammer to insert the rear engine oil seal evenly.
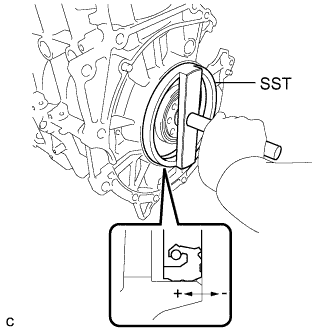
- SST
- 09950-70010 ( 09951-07150 )
- 09223-47020
-
-
INSTALL INNER OIL SEAL (for Manual Transaxle)
-
Apply MP grease to the lip of a new inner oil seal.
Note
Keep the lip free from foreign matter.
-
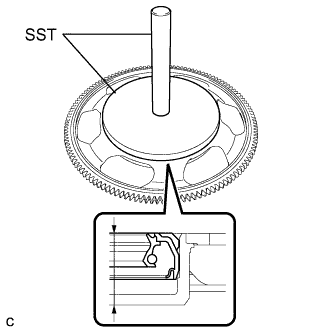
Using SST and a hammer, tap in the inner oil seal until its surface is flush with the ring gear sub-assembly.
- SST
- 09950-70010 ( 09951-07150 )
- 09951-01600
Oil seal tap in depth 14.7 to 15.7 mm (0.5787 to 0.6181 in.) Note
-
Uniformly tap in the oil seal.
-
Do not tap the oil seal at an angle.
-
-
INSTALL RING GEAR SUB-ASSEMBLY (for Manual Transaxle)
-

Install the ring gear sub-assembly.
Note
-
Do not apply excessive force to the ring gear sub-assembly.
-
Be sure not to allow any foreign matter, oil or grease to adhere to the sliding part of the engine rear oil seal.
-
Be sure not to allow any foreign matter to adhere to the lip of the engine rear oil seal.
-
-
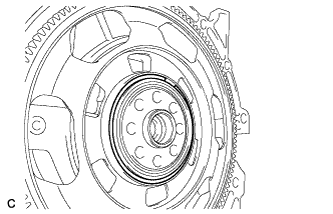
Using a screwdriver, install a new snap ring.
Note
Confirm that the snap ring is correctly located in the groove of the crankshaft bearing.
-
-
INSTALL ONE-WAY CLUTCH ASSEMBLY (for Manual Transaxle)
-
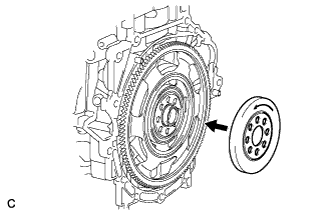
Turn the one-way clutch assembly counterclockwise while installing it.
Note
-
Be sure not to allow any foreign matter, oil or grease to adhere to the installation surfaces of the crankshaft and the one-way clutch.
-
Be sure not to allow any foreign matter, oil or grease to adhere to the sliding surface of the inner oil seal.
-
Be sure not to allow any foreign matter to adhere to the lip of the inner oil seal.
-
-
-
INSTALL FLYWHEEL SUB-ASSEMBLY (for Manual Transaxle)
-
Using SST, hold the crankshaft.
- SST
- 09960-10010 ( 09962-01000, 09963-01000 )
-
Clean the 8 bolts and their holes.
-
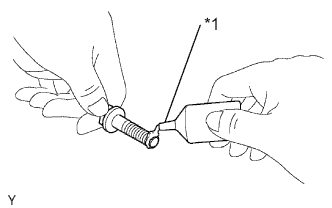
Text in Illustration *1 Adhesive Apply adhesive to 2 or 3 end threads of each bolt tip.
Adhesive Toyota Genuine Adhesive 1324, Three bond 1324 or equivalent -
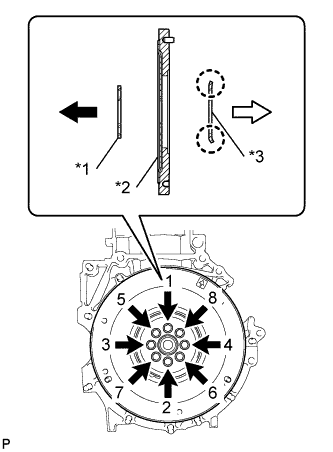
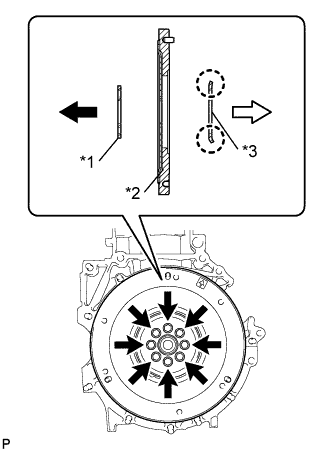
Text in Illustration *1 Front Flywheel Plate Spacer *2 Flywheel *3 Rear Flywheel Plate Spacer 
Engine 
Transaxle Temporarily install the front flywheel plate spacer, the flywheel and the rear flywheel plate spacer with the 8 bolts.
Tech Tips
-
The front spacer is reversible.
-
As the rear flywheel plate spacer and the flywheel are not reversible, be sure to install them in the direction shown in the illustration.
-
-
Fully tighten the 8 bolts in the order shown in the illustration.
- Torque:
- 78 N*m { 795 kgf*cm, 57 ft.*lbf }
Note
Do not start the engine for at least an hour after installing the flywheel.
-
-
INSTALL DRIVE PLATE AND RING GEAR SUB-ASSEMBLY (for CVT)
-
Using SST, hold the crankshaft.
- SST
- 09960-10010 ( 09962-01000, 09963-01000 )
-
Clean the 8 bolts and their holes.
-
Text in Illustration *1 Adhesive Apply adhesive to 2 or 3 end threads of each bolt tip.
Adhesive Toyota Genuine Adhesive 1324, Three bond 1324 or equivalent -
Text in Illustration *1 Front Drive Plate Spacer *2 Drive Plate *3 Rear Drive Plate Spacer Engine Transaxle Temporarily install the front drive plate spacer, the drive plate and the rear drive plate spacer with the 8 bolts.
Tech Tips
-
The front spacer is reversible.
-
As the rear drive plate spacer and the drive plate are not reversible, be sure to install them in the direction shown in the illustration.
-
-

Fully tighten the 8 bolts in the order shown in the illustration.
- Torque:
- 88 N*m { 897 kgf*cm, 65 ft.*lbf }
Note
Do not start the engine for at least an hour after installing the drive plate.
-
-
INSTALL CLUTCH DISC ASSEMBLY (for Manual Transaxle)
-
Install the clutch disc assembly Click here.
-
-
INSTALL CONTINUOUSLY VARIABLE TRANSAXLE ASSEMBLY (for CVT)
-
Install the continuously variable transaxle assembly Click here.
-