ECD SYSTEM, Diagnostic DTC:P252F

| DTC Code | DTC Name |
|---|---|
| P252F | Engine Oil Level High |
DESCRIPTION
In the DPF system, after the main injection and at the end of expansion stroke, the injectors spray a small amount of fuel to control PM regeneration; this is called "post injection".
Because the temperature and pressure of the sprayed fuel are low, it arrives at the catalytic converter unburned. The fuel is then oxidized by the catalytic action and the temperature of the DPF catalyst bed increases to burn the accumulated soot.
However, some of the unburned fuel goes down to the oil pan through clearances in the cylinder walls. Thus, this fuel is mixed into the engine oil, causing the engine oil volume to increase.
Tech Tips
DTC P252F is available only for the vehicles with DPF system.
| DTC Detection Drive Pattern | DTC Detection Condition | Trouble Area |
|---|---|---|
| All of the following conditions are met:
|
All of the following conditions are met:
|
|
WIRING DIAGRAM
Refer to DTC P250D Click here.
INSPECTION PROCEDURE
Tech Tips
Read freeze frame data using the intelligent tester. Freeze frame data records the engine condition when malfunctions are detected. When troubleshooting, freeze frame data can help determine if the vehicle was moving or stationary, if the engine was warmed up or not, and other data from the time the malfunction occurred.
PROCEDURE
-
CHECK ANY OTHER DTCS OUTPUT (IN ADDITION TO DTC P252F)
-
Connect the intelligent tester to the DLC3.
-
Turn the ignition switch to ON and turn the tester on.
-
Enter the following menus: Powertrain / Engine and ECT / DTC.
-
Read DTCs.
Result Result Proceed to DTC P252F A DTC P252F and P250D B DTC P252F and P2463 C DTC P252F and other DTCs D Tech Tips
If any DTCs other than P252F are output, troubleshoot those DTCs first.
B 
GO TO DTC P250D INSPECTION PROCEDURE Click here
C
GO TO DTC P2463 INSPECTION PROCEDURE Click here
D
GO TO DTC CHART Click here
A 
-
-
CHANGE ENGINE OIL
-
Change the engine oil Click here.
Tech Tips
-
Toyota recommends the use of approved "Toyota genuine motor oil". Another oil of matching quality can also be used.
Oil grade: ACEA C2
-
Using engine oil other than ACEA C2 may damage the catalytic converter.
-
ACEA C2 is best choice for prevention of increasing the DPF differential pressure.
-
-
Reset the oil maintenance indicator Click here.
-
Start the engine and warm it up until the engine coolant temperature reaches at 75 to 86°C (167 to 187°F).
-
Drive the vehicle for 2 minutes or more at an engine speed of 1400 to 2600 rpm and a vehicle speed of 15 km/h (9.3 mph) or more.
Tech Tips
Performing this drive pattern resets the engine oil level error detection and completes PM regeneration deactivation (it means fail-safe operation).
NEXT
-
-
CHECK WHETHER DTC OUTPUT RECURS (DTC P252F)
-
Connect the intelligent tester to the DLC3.
-
Clear the DTCs Click here.
-
Start the engine and warm it up until the engine coolant temperature reaches at 75 to 86°C (187 to 194°F).
-
Drive the vehicle at steady vehicle speed of 15 km/h or more (at an engine speed between 1400 and 2600 rpm or more).
-
Enter the following menus: Powertrain / Engine and ECT / DTC / Pending.
-
Read the pending DTCs.
Result Result Proceed to DTC P252F A No DTC output B
B 
PERFORM ACTIVE TEST USING INTELLIGENT TESTER (ACTIVATE THE DPF REJUVENATE (PM) Click here
A
-
-
INSPECT ENGINE OIL LEVEL SENSOR
-
Remove the engine oil level sensor.
-
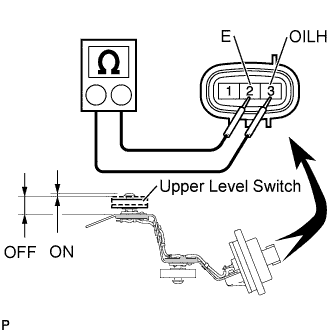
Measure the resistance according to the value(s) in the table below.
Standard Resistance Tester Connection Switch Condition Specified Condition 3 (OILH) - 2 (E) Oil Level Switch on Below 1 Ω Oil Level Switch off 1350 to 1650 Ω
NG
REPLACE ENGINE OIL LEVEL SENSOR Click here
OK
-
-
CHECK HARNESS AND CONNECTOR (ENGINE OIL LEVEL SENSOR - ECM)
-
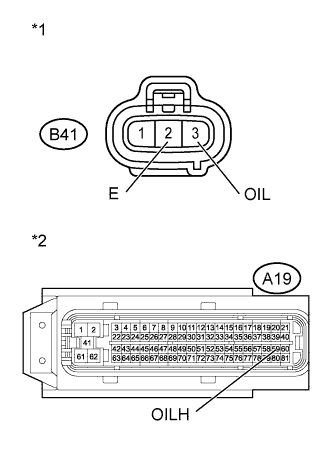
Text in Illustration *1 Front view of wire harness connector
(to Engine Oil Level Sensor)
*2 Front view of wire harness connector
(to ECM)
Disconnect the engine oil level sensor connector.
-
Disconnect the ECM connector.
-
Measure the resistance according to the value(s) in the table below.
Standard Resistance (Check for Open) Tester Connection Condition Specified Condition B41-3 - A19-59 (OILH) Always Below 1 Ω Standard Resistance (Check for Short) Tester Connection Condition Specified Condition B41-3 or A19-59 (OILH) - Body ground Always 10 kΩ or higher -
Reconnect the engine oil level sensor connector.
-
Reconnect the ECM connector.
OK
CONFIRM WHETHER MALFUNCTION HAS BEEN SUCCESSFULLY REPAIRED Click here
NG
REPAIR OR REPLACE HARNESS OR CONNECTOR Click here
-
-
REPLACE ENGINE OIL LEVEL SENSOR
-
Replace the engine oil level sensor Click here.
NEXT
CONFIRM WHETHER MALFUNCTION HAS BEEN SUCCESSFULLY REPAIRED Click here
-
-
REPAIR OR REPLACE HARNESS OR CONNECTOR
NEXT
-
CONFIRM WHETHER MALFUNCTION HAS BEEN SUCCESSFULLY REPAIRED
-
Connect the intelligent tester to the DLC3.
-
Clear the DTCs Click here.
-
Start the engine and warm it up until the engine coolant temperature reaches at 75 to 86°C (167 to 187°F).
-
Drive the vehicle at steady vehicle speed of 15 km/h (9.3 mph) or more (at an engine speed between 1400 and 2600 rpm or more).
-
Enter the following menus: Powertrain / Engine and ECT / DTC / Pending.
-
Confirm that the DTC is not output again.
NEXT
-
-
PERFORM ACTIVE TEST USING INTELLIGENT TESTER (ACTIVATE THE DPF REJUVENATE (PM)
-
Connect the intelligent tester to the DLC3.
-
Start the engine and turn the tester on.
-
Clear the DTCs Click here.
-
Enter the following menus: Powertrain / Engine and ECT / Active Test / Activate the DPF Rejuvenate (PM) / Data List / Exhaust Temperature B1S1, Exhaust Temperature B1S2 and DPNR/DPF Status Reju(PM).
Tech Tips
After clearing DTCs, immediately enter the Active Test / Activate the DPF Rejuvenate (PM), and then drive the vehicle.
-
Perform the Active Test then drive the vehicle at a constant engine speed of 2000 rpm or more (shift position: 3rd) and a vehicle speed within 60 to 100 km/h (37 to 62 mph).
Tech Tips
While the Active Test / Activate the DPF Rejuvenate (PM) is performing, the accelerator pedal opening angle should be kept as constant as possible.
-
Confirm that both Exhaust Temperature B1S1 and Exhaust Temperature B1S2 reach 250°C (482°F) or more and the DPNR/DPF Status Reju(PM) turns from "Ready" to "Operate".
Tech Tips
-
If the exhaust gas temperature does not reach the specified value, drive the vehicle again with a constant engine speed of 2000 rpm or more (shift position: 3rd) and a vehicle speed within 60 to 100 km/h (37 to 62 mph).
-
Perform Active Test / Activate the DPF Rejuvenate(PM) until one of the following conditions is met:
-
DPNR/DPF Status Reju(PM) displays "Compl".
-
DPNR/DPF Status Reju(PM) turns from "Operate" to "Ready" even if the cumulative time of "Operate" exceeds 35 minutes.
-
DPNR/DPF Status Reju(PM) stays "Ready" even if the both Exhaust Temperature B1S1 and Exhaust Temperature B1S2 have reached 250°C (482°F) or more for more than 10 minutes with an engine speed of 2000 rpm or more. (PM regeneration could not operate.)
-
-
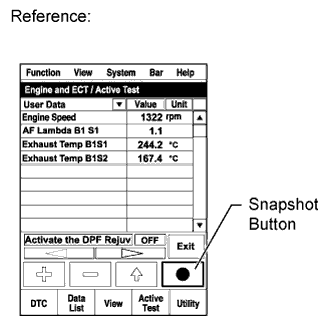
Take a snapshot with the intelligent tester when the Exhaust Temperature B1S1 and Exhaust Temperature B1S2 rise and become stable.
Tech Tips
Detailed graphs can be displayed by transferring the stored snapshot from the tester to a PC (personal computer) with Intelligent Viewer installed.
-
Enter the following menus: Powertrain / Engine / Data List / DPNR/DPF Status Reju(PM).
-
Confirm the DPNR/DPF Status Reju(PM).
Tech Tips
-
During the performing PM regeneration, the DPNR/DPF Status Reju(PM) displays "Operate".
-
If the PM regeneration is stopped (DPNR/DPF Status Reju(PM) displays "Ready") because of the exhaust gas temperature is drop away depending the driving conditions, the PM regeneration is restart automatically (DPNR/DPF Status Reju(PM) displays "Operate") when the exhaust gas temperature is recuperated by a high engine speed driving.
-
If the cumulative time of DPNR/DPF Status Reju(PM) at "Operate" exceeds 35 minutes, the active test stops forcibly. In this case, the DPNR/DPF Status Reju(PM) turns to "Ready" and the Active Test / Activate the DPF Rejuvenate (PM) will be prohibited forcibly for one hour during engine running. Thus, perform the active test again after running the engine for one hour.
DPNR/DPF Status Reju(PM) (Reference) Tester Display Status Standby Before entering the "Activate the DPF Rejuvenate (PM)" Ready Enabling condition for "Activate the DPF Rejuvenate (PM)" is not sufficient Operate
-
PM regeneration is performing.
-
If "Activate the DPF Rejuvenate (PM)" is not finished completely, the status turns to "Ready".
For example, the vehicle is idling for more than 3 minutes during the PM regeneration is performing, the exhaust gas temperature falls to outside of enabling condition and PM regeneration is stopped.
-
If "Activate the DPF Rejuvenate (PM)" is finished completely, the status turns to "Compl".
Compl PM regeneration is completed (Amount of PM is 0 g) -
-
Read the values of the Data List / Exhaust Temperature B1S2 in the Snapshot Review function.
Standard DPNR/DPF Status Reju(PM) is "Compl" and Exhaust Temperature B1S2 is 500°C (932°F) or more during PM regeneration.
NG
GO TO DTC P2463 INSPECTION PROCEDURE Click here
OK 
END
-