WASHER MOTOR (for Front Side) INSTALLATION

-
INSTALL WINDSHIELD WASHER MOTOR AND PUMP ASSEMBLY
-
Install the windshield washer motor and pump onto the packing of the washer jar.
-
-
INSTALL WINDSHIELD WASHER JAR ASSEMBLY (for 1ND-TV)
-
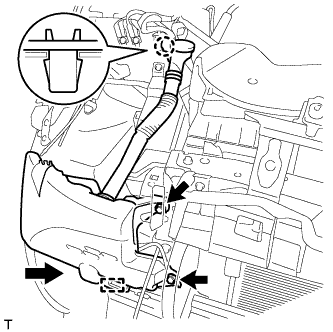
Connect the connectors.
-
Install the guide and install the washer jar as shown by the arrow.
-
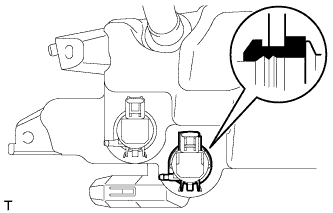
Engage the claw.
-
Install the 2 bolts.
- Torque:
- 5.5 N*m { 56 kgf*cm, 49 in.*lbf }
-
-
INSTALL WINDSHIELD WASHER JAR ASSEMBLY (for 1KR-FE)
-
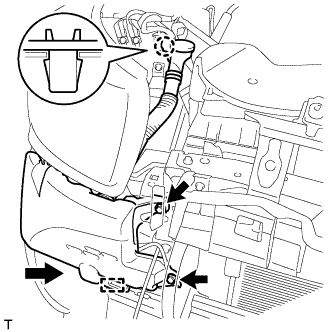
Connect the connectors.
-
Install the guide and install the washer jar as shown by the arrow.
-
Engage the claw.
-
Install the 2 bolts.
- Torque:
- 5.5 N*m { 56 kgf*cm, 49 in.*lbf }
-
-
FILL UP WASHER JAR WITH WINDSHIELD WASHER FLUID
-
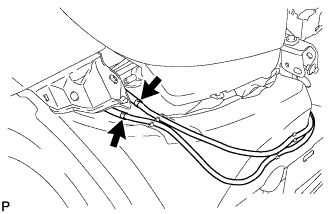
Connect the 2 washer hoses.
-
Fill the washer jar with washer fluid.
-
-
INSTALL HEADLIGHT ASSEMBLY RH (for 1ND-TV)
Tech Tips
Use the same procedure as for the LH side Click here.
-
INSTALL FRONT BUMPER COVER
-
Install the front bumper cover Click here.
-
-
INSPECT HEADLIGHT AIMING (for 1ND-TV)
-
Cover the headlight on the opposite side or disconnect its connector, to prevent light from the headlight not being inspected from affecting the headlight aiming inspection.
Note
Do not keep the headlight covered for more than 3 minutes. The headlight lens is made of synthetic resin, and may easily melt or be damaged due to heat.
-
Start the engine.
Tech Tips
Engine speed must be 1500 rpm or more.
-
w/ Headlight leveling:
Set the headlight leveling switch to 0 (zero).
-
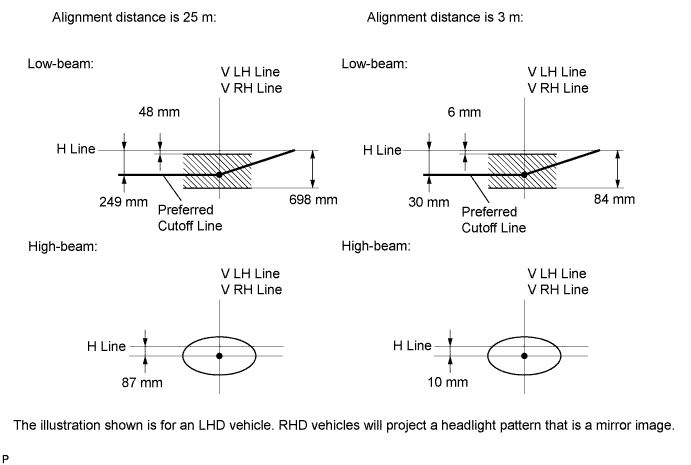
Turn on the headlight and make sure that the cutoff line falls within the specified area, as shown in the illustration.
Tech Tips
-
Alignment distance is 25 m (82 ft):
The cutoff line is 48 mm (1.88 in.) to 698 mm (27.48 in.) below the H line with low-beam (ECE Regulation No. 48).
-
Alignment distance is 3 m (9.84 ft):
The cutoff line is 6 mm (0.23 in.) to 84 mm (3.3 in.) below the H line with low-beam (ECE Regulation No. 48).
-
Alignment distance is 25 m (82 ft):
The cutoff line is 249 mm (9.8 in.) below the H line with low-beam.
-
Alignment distance is 3 m (9.84 ft):
The cutoff line is 30 mm (1.18 in.) below the H line with low-beam.
-
Since the low-beam light and the high-beam light are a unit, if the aiming on one is correct, the other should also be correct. However, check both beams just to make sure.
-
-
-
ADJUST HEADLIGHT AIMING (for 1ND-TV)
-
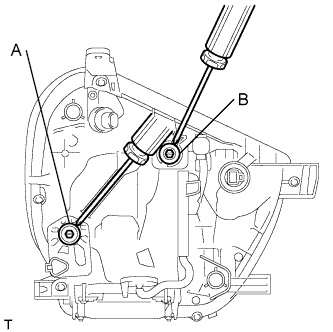
Adjust the aiming vertically:
Adjust the headlight aim to within the specified range by turning aiming screw A with a screwdriver.
Tech Tips
The final turn of the aiming screw should be made in the clockwise direction. If the screw is tightened excessively, loosen it and then retighten it, so that the final turn of the screw is in the clockwise direction.
-
Perform low-beam aim adjustment.
Tech Tips
The headlight aim moves down when the aiming screw is turned clockwise, and moves up when the aiming screw is turned counterclockwise.
-
Adjust the aim horizontally:
Adjust the headlight aim to within the specified range by turning aiming screw B with a screwdriver.
Tech Tips
The final turn of the aiming screw should be made in the clockwise direction. If the screw is tightened excessively, loosen it and then retighten it, so that the final turn of the screw is in the clockwise direction.
-