GENERATOR (for 100 A Type) INSTALLATION

-
INSTALL GENERATOR ASSEMBLY
-
Install the generator with the 3 bolts.
- Torque:
- 25 N*m { 255 kgf*cm, 18 ft.*lbf }
Note
Make sure that the wire harness of the crankshaft position sensor does not get caught between the cylinder block and generator when installing the generator.
-
Install the wire harness clamp bracket with the bolt.
- Torque:
- 8.4 N*m { 85 kgf*cm, 74 in.*lbf }
-
Connect the generator wire to terminal B with the nut.
- Torque:
- 9.8 N*m { 100 kgf*cm, 87 in.*lbf }
-
Connect the generator connector and attach the clamp.
-
Install the terminal cap.
-
-
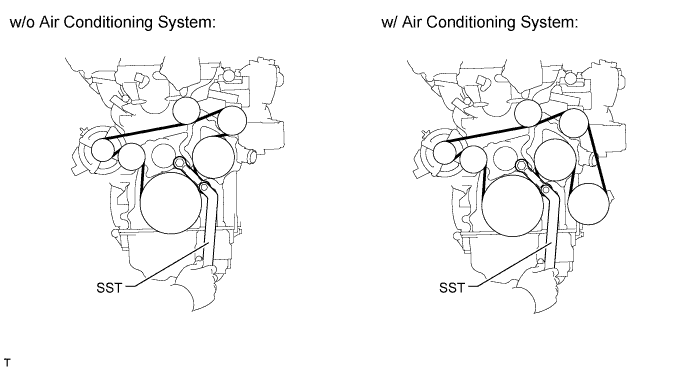
INSTALL FAN AND GENERATOR V BELT
-
Using SST and a 22 mm wrench, rotate the tensioner pulley counterclockwise, and then install the fan and generator V belt.
- SST
- 09216-42010
CAUTION:
-
Be careful as the wrench only fits loosely on the belt tensioner tool set point. The wrench may come off the set point and cause injuries.
-
Be careful that your hands do not become jammed between parts such as the belt, pulleys, etc.
Note
-
Make sure that the belt is set properly on each pulley.
-
Make sure SST is installed as shown in the illustration. If not, SST and/or the belt may not be able to be removed.
-
-
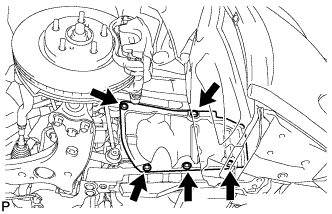
INSTALL FRONT SUSPENSION MEMBER REINFORCEMENT RH
-

Install the front suspension member reinforcement with the 4 bolts.
- Torque:
- 96 N*m { 979 kgf*cm, 71 ft.*lbf }
Note
Tighten the bolts in the order shown in the illustration.
-
-
INSTALL REAR ENGINE UNDER COVER RH
-
Install the under cover with the 5 clips.
-
-
INSTALL ENGINE UNDER COVER
-
Install the engine under cover with the 11 clips.
-
-
INSTALL FRONT LOWER BUMPER ABSORBER
-
Insert the 2 hooks of the front lower bumper absorber into the installation holes on the body to install the front lower bumper absorber.
-
Install the 8 bolts and 3 screws.
-
Install the 4 screws and 2 bolts.
-
-
INSTALL RADIATOR SUPPORT OPENING COVER
-
Install the radiator support opening cover with the 7 clips.
-
-
INSTALL NO. 1 ENGINE COVER
-
Attach the 4 clips to install the No. 1 engine cover.
-
-
CONNECT CABLE TO NEGATIVE BATTERY TERMINAL
Note
When disconnecting the cable, some systems need to be initialized after the cable is reconnected Click here.
-
INSTALL FRONT DRIVE SHAFT ASSEMBLY RH