OIL PRESSURE SWITCH INSTALLATION

-
INSTALL ENGINE OIL PRESSURE SWITCH ASSEMBLY
-
Remove the adhesive from the threads of the oil pressure switch and the bolt hole of the oil filter bracket.
-
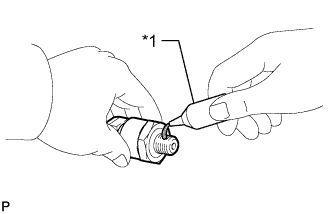
Text in Illustration *1 Adhesive Apply adhesive to 2 or 3 threads of the oil pressure switch.
Adhesive Toyota Genuine Adhesive 1344, Three Bond 1344 or equivalent Note
Do not apply adhesive to the oil inlet port of the sensor.
-
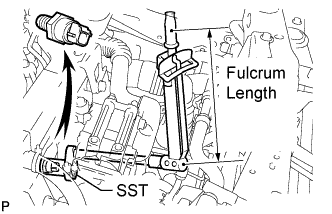
Using SST, install the engine oil pressure switch.
- SST
- 09224-00010
- Torque:
- without SST
- 13 N*m { 133 kgf*cm, 10 ft.*lbf }
- with SST
- 12 N*m { 122 kgf*cm, 9 ft.*lbf }
Tech Tips
-
Use a torque wrench with a fulcrum length of 300 mm (11.8 in.).
-
Make sure SST and the wrench are connected in a straight line.
Note
Do not start the engine for at least 1 hour after installation.
-
Connect the engine oil pressure switch connector.
-
-
ADD ENGINE OIL
-
Add new engine oil.
Standard Oil Grade Item Oil Grade Oil Viscosity (SAE) for CCo:
Diesel fuel that contains between 50 ppm and 500 ppm of sulfur
ACEA B1, API CF-4 or CF
(You may also use API CE or CD)
- 5W-30
- 10W-30
- 15W-40
- 20W-50
for CCo:
Diesel fuel that contains 50 ppm or less of sulfur
ACEA C2, ACEA B1, API CF-4 or CF
(You may also use API CE or CD)
- 0W-30
- 5W-30
- 10W-30
- 15W-40
- 20W-50
for DPF ACEA C2 - 0W-30
- 5W-30
Standard Capacity Item Specified Condition Drain and refill with oil filter change 6.3 liters (6.7 US qts, 5.5 Imp. qts) Drain and refill without oil filter change 5.9 liters (6.2 US qts, 5.2 Imp. qts) Dry fill 7.1 liters (7.5 US qts, 6.2 Imp. qts)
-
-
INSPECT FOR OIL LEAK
-
Warm up the engine and check for an engine oil leak.
-
-
INSPECT ENGINE OIL LEVEL
-
Warm up the engine, stop the engine and wait 5 minutes. The engine oil level should be between the dipstick low level mark and full level mark.
If low, check for leakage and add oil up to the full level mark.
Note
Do not fill engine oil above the full level mark.
-
-
INSTALL RADIATOR SUPPORT OPENING COVER
-
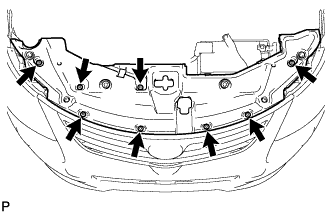
Install the radiator support opening cover with the 8 clips.
-
-
INSTALL NO. 1 ENGINE COVER
-
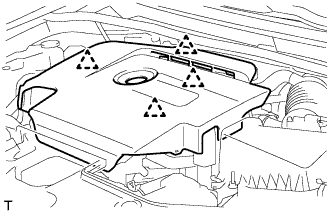
Attach the 4 clips to install the No. 1 engine cover.
-
-
INSTALL ENGINE UNDER COVER
-
Install the engine under cover with the 8 clips.
-