CLUTCH MASTER CYLINDER INSTALLATION

-
INSTALL CLUTCH MASTER CYLINDER ASSEMBLY
-
Install the clutch master cylinder bracket.
-
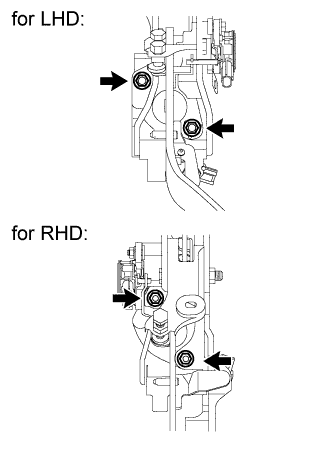
Install the clutch master cylinder assembly with the 2 nuts.
- Torque:
- 18 N*m { 178 kgf*cm, 13 ft.*lbf }
-
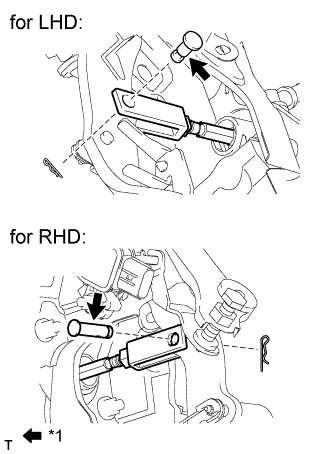
Apply MP grease to the contact surface of the clutch master cylinder push rod clevis with hole pin.
-
Connect the clevis to the clutch pedal sub-assembly with the clutch master cylinder push rod clevis with hole pin.
Tech Tips
-
for LHD:
Install the clutch master cylinder push rod clevis with hole pin from the right side of the vehicle.
-
for RHD:
Install the clutch master cylinder push rod clevis with hole pin from the left side of the vehicle.
-
-
Install the clip to the clutch master cylinder push rod clevis with hole pin.
-
-
CONNECT CLUTCH MASTER CYLINDER TO FLEXIBLE HOSE TUBE
-
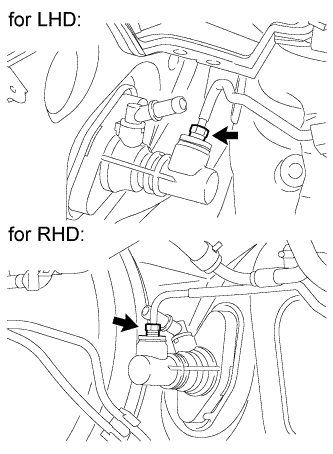
Using a union nut wrench, connect the clutch master cylinder to flexible hose tube.
- Torque:
- 15 N*m { 155 kgf*cm, 11 ft.*lbf }
Note
Use the formula to calculate special torque values for situations where a union nut wrench is combined with a torque wrench Click here.
-
-
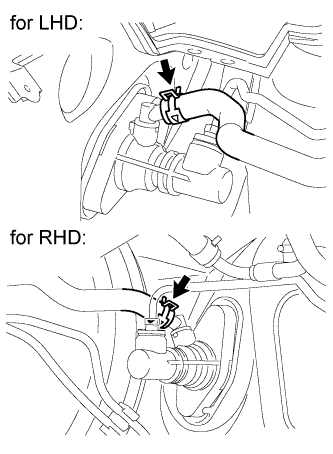
INSTALL CLUTCH RESERVOIR TUBE
-
Connect the clutch reservoir tube to the clutch master cylinder assembly with the clip.
-
-
INSTALL BRAKE BOOSTER ASSEMBLY (for LHD)
-
Install the brake booster assembly Click here.
-
-
FILL BRAKE FLUID RESERVOIR
-
Fill the reservoir with brake fluid.
Brake Fluid SAE J1704 or FMVSS No. 116 DOT 4 Note
Add brake fluid to keep the level between the MIN and MAX lines of the reservoir while bleeding the brakes.
-
-
BLEED CLUTCH LINE
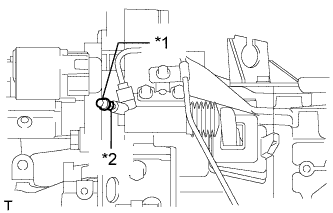
Text in Illustration *1 Bleeder Plug Cap *2 Bleeder Plug
-
Remove the bleeder plug cap.
-
Connect a vinyl tube to the bleeder plug.
-
Depress the clutch pedal several times, and then loosen the bleeder plug while the pedal is depressed.
-
When fluid no longer comes out, tighten the bleeder plug, and then release the clutch pedal.
-
Repeat the previous 2 steps until all the air in the fluid is completely bled.
-
Tighten the bleeder plug.
- Torque:
- 8.4 N*m { 86 kgf*cm, 74 in.*lbf }
-
Install the bleeder plug cap.
-
Check that all the air has been bled from the clutch line.
-
-
INSPECT FLUID LEVEL
-
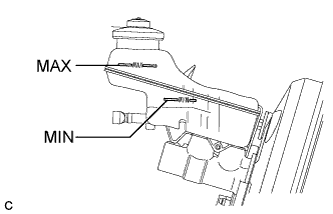
Check the fluid level.
If the brake fluid level is lower than the MIN line, check for leaks and inspect the disc brake pads. If necessary, refill the reservoir with brake fluid to the MAX line after repair or replacement.
Brake Fluid SAE J1704 or FMVSS No. 116 DOT 4
-
-
INSPECT FOR FLUID LEAK
Tech Tips
Check for leaks in the clutch system.
-
INSPECT AND ADJUST CLUTCH PEDAL SUB-ASSEMBLY
-
for LHD:
Inspect and adjust the clutch pedal sub-assembly Click here.
-
for RHD:
Inspect and adjust the clutch pedal sub-assembly Click here.
-
-
INSTALL LOWER NO. 1 INSTRUMENT PANEL AIRBAG ASSEMBLY
-
Install the lower No. 1 instrument panel airbag assembly Click here.
-
-
PERFORM CLUTCH ENGAGEMENT POINT LEARNING