ТЕРМОСТАТ УСТАНОВКА
-
УСТАНОВИТЕ ТЕРМОСТАТ
-
Установите на термостат новую прокладку.
-
Установите термостат на впускной патрубок охлаждающей жидкости.
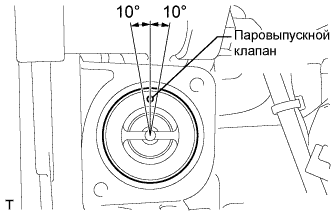
Note
Паровыпускной клапан должен быть установлен в пределах 10° от положения, указанного на рисунке.
-
-
УСТАНОВИТЕ ВПУСКНОЙ ПАТРУБОК ОХЛАЖДАЮЩЕЙ ЖИДКОСТИ
-
Установите впускной патрубок охлаждающей жидкости и закрепите его 2 гайками.
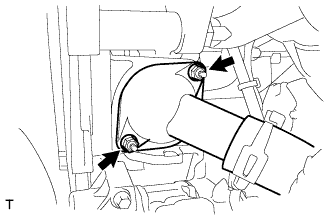
- Torque:
- 10 Н*м { 102 кгс*см, 7 фунт-сила-дюймов }
-
-
ДОБАВЬТЕ ОХЛАЖДАЮЩУЮ ЖИДКОСТЬ ДВИГАТЕЛЯ
-
Tighten the radiator drain cock plug.
-
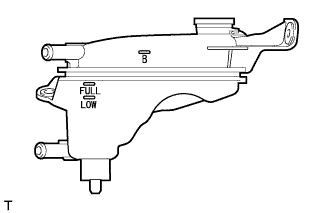
Add TOYOTA Super Long Life Coolant (SLLC) through the radiator reservoir filler opening until the coolant reaches the B line.
Standard capacity 6.2 liters (6.6 US qts, 5.4 Imp. qts) Tech Tips
TOYOTA vehicles are filled with TOYOTA SLLC at the factory. In order to avoid damage to the engine cooling system and other technical problems, only use TOYOTA SLLC or similar high quality ethylene glycol based non-silicate, non-amine, non-nitrite, non-borate coolant with long-life hybrid organic acid technology (coolant with long-life hybrid organic acid technology is a combination of low phosphates and organic acids).
Note
Never use water as a substitute for engine coolant.
-
Squeeze the inlet and outlet radiator hoses several times by hand, and then check the level of the coolant.
If the coolant level is low, add coolant.
-
Install the cap and warm up the engine sufficiently.
-
Bleed air from the cooling system.
Note
-
Before starting the engine, turn the A/C switch off.
-
Adjust the air conditioning temperature setting to MAX (HOT).
-
Adjust the air conditioning blower setting to Lo.
-
Warm up the engine until the thermostat opens. While the thermostat is open, allow the coolant to circulate for several minutes.
Tech Tips
The thermostat opening timing can be confirmed by squeezing the inlet radiator hose by hand, and sensing vibrations when the engine coolant starts to flow inside the hose.
CAUTION:
When squeezing the radiator hose:-
Wear protective gloves.
-
Be careful as the radiator hoses are hot.
-
Keep your hands away from the radiator fan.
-
-
After the engine has warmed up, repeat the following procedure for at least 7 minutes: run the engine at 3000 rpm for 5 seconds, and then at idle speed for 45 seconds (repeat this procedure at least 8 times).
-
Squeeze the inlet and outlet radiator hoses several times by hand to bleed air from the system.
CAUTION:
When squeezing the radiator hose:-
Wear protective gloves.
-
Be careful as the radiator hoses are hot.
-
Keep your hands away from the radiator fan.
-
-
-
After the engine has cooled down, check that the coolant level is between FULL and LOW lines.
If the coolant level is low, add coolant to the FULL line on the reservoir.
-
-
ПРОВЕРЬТЕ, НЕТ ЛИ УТЕЧЕК ОХЛАЖДАЮЩЕЙ ЖИДКОСТИ
CAUTION:
Во избежание ожогов не снимайте крышку расширительного бачка радиатора, пока двигатель и радиатор не остынут. Тепловое расширение может вызвать выброс из радиатора горячей охлаждающей жидкости и пара.
-
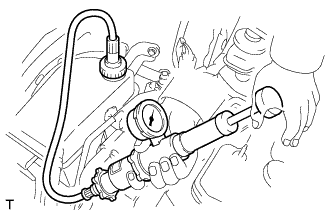
Заполните радиатор охлаждающей жидкостью, а затем подсоедините приспособление для опрессовки системы охлаждения и проверки пробки радиатора.
-
Прогрейте двигатель.
-
С помощью приспособления для опрессовки системы охлаждения и проверки пробки радиатора увеличьте давление в радиаторе до 118 кПа (1,2 кгс/см2, 17 фунтов на кв. дюйм) и убедитесь, что давление не падает.
Если давление снижается, проверьте на наличие утечек шланги, радиатор и насос системы охлаждения. Если нет следов или признаков утечки внешней охлаждающей жидкости, проверьте сердцевину отопителя, блок цилиндров и головку блока цилиндров.
-
-
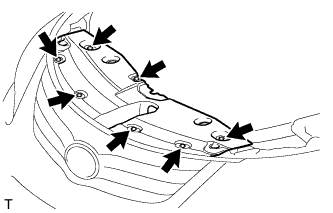
УСТАНОВИТЕ КРЫШКУ ОТВЕРСТИЯ КРОНШТЕЙНА РАДИАТОРА
-
Установите крышку отверстия кронштейна радиатора и закрепите ее 7 фиксаторами.
-