NAME PLATE INSTALLATION
CAUTION / NOTICE / HINT
Tech Tips
When installing the name plates or emblem, heat the vehicle body and name plates or emblem using a heat light.
| Item | Temperature |
|---|---|
| Vehicle Body | 40 to 60°C (104 to 140°F) |
| Name Plate or Emblem | 20 to 30°C (68 to 86°F) |
Note
Do not heat the vehicle body, name plates or emblem excessively.
PROCEDURE
-
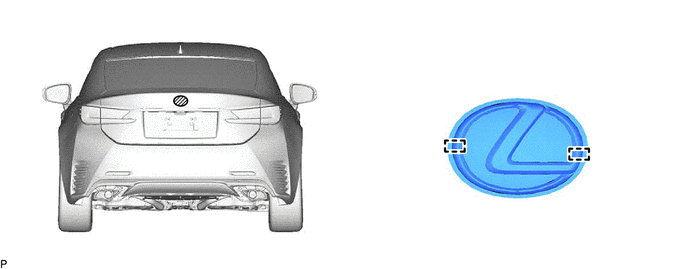
INSTALL SYMBOL EMBLEM
-
Clean the vehicle body surface.
-
Using a heat light, heat the vehicle body surface.
-
Remove any remaining double-sided tape from the vehicle body.
-
Wipe off any tape adhesive residue with cleaner.
-
-
Using a heat light, heat the vehicle body and a new symbol emblem.
-
Remove the release paper from the symbol emblem.
Tech Tips
After removing the release paper, keep the exposed adhesive free from foreign matter.
-
Engage the 2 pins and install the symbol emblem as shown in the illustration.
-
-
INSTALL NO. 1 LUGGAGE COMPARTMENT DOOR NAME PLATE
-
Clean the vehicle body surface.
-
Using a heat light, heat the vehicle body surface.
-
Remove any remaining double-sided tape from the vehicle body.
-
Wipe off any tape adhesive residue with cleaner.
-
-
Using a heat light, heat the vehicle body and a new No. 1 luggage compartment door name plate.
-
Remove the release paper from the No. 1 luggage compartment door name plate.
Tech Tips
After removing the release paper, keep the exposed adhesive free from foreign matter.
-
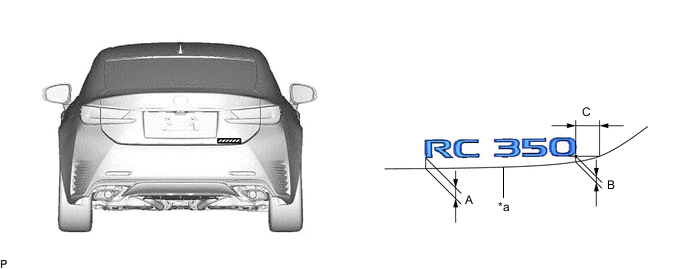
Install the No. 1 luggage compartment door name plate as shown in the illustration.

*a Profile of Luggage Compartment Door Panel - - Standard Measurement Area Measurement Area Measurement A 35.6 mm (1.40 in.) B 8.1 mm (0.319 in.) C 12.0 mm (0.472 in.) - -
-
-
INSTALL NO. 3 LUGGAGE COMPARTMENT DOOR PLATE
-
Clean the vehicle body surface.
-
Using a heat light, heat the vehicle body surface.
-
Remove any remaining double-sided tape from the vehicle body.
-
Wipe off any tape adhesive residue with cleaner.
-
-
Using a heat light, heat the vehicle body and a new No. 3 luggage compartment door plate.
-
Remove the release paper from the No. 3 luggage compartment door plate.
Tech Tips
After removing the release paper, keep the exposed adhesive free from foreign matter.
-
Install the No. 3 luggage compartment door plate as shown in the illustration.
for RC 350 Plate:
*a Profile of Luggage Compartment Door Panel - - Standard Measurement Area Measurement Area Measurement A 11.3 mm (0.445 in.) B 5.6 mm (0.22 in.) C 25.9 mm (1.02 in.) - - for RC 200t Plate:

*a Profile of Luggage Compartment Door Panel - - Standard Measurement Area Measurement Area Measurement A 9.8 mm (0.386 in.) B 4.2 mm (0.165 in.) C 21.9 mm (0.862 in.) - -
-
-
INSTALL NO. 2 FRONT FENDER NAME PLATE
-
Clean the vehicle body surface.
-
Using a heat light, heat the vehicle body surface.
-
Remove any remaining double-sided tape from the vehicle body.
-
Wipe off any tape adhesive residue with cleaner.
-
-
Using a heat light, heat the vehicle body and a new No. 2 front fender name plate.
-
Remove the release paper from the No. 2 front fender name plate.
Tech Tips
After removing the release paper, keep the exposed adhesive free from foreign matter.
-
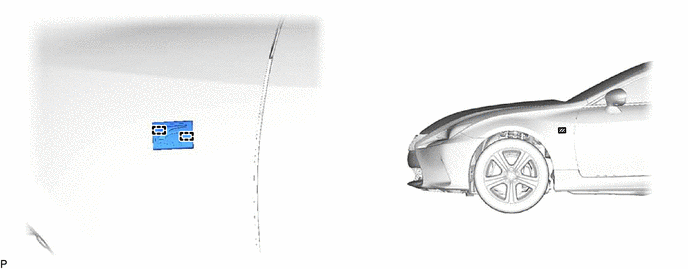
Engage the 2 pins and install the No. 2 front fender name plate as shown in the illustration.
-
-
INSTALL NO. 1 FRONT FENDER NAME PLATE
-
Clean the vehicle body surface.
-
Using a heat light, heat the vehicle body surface.
-
Remove any remaining double-sided tape from the vehicle body.
-
Wipe off any tape adhesive residue with cleaner.
-
-
Using a heat light, heat the vehicle body and a new No. 1 front fender name plate.
-
Remove the release paper from the No. 1 front fender name plate.
Tech Tips
After removing the release paper, keep the exposed adhesive free from foreign matter.
-
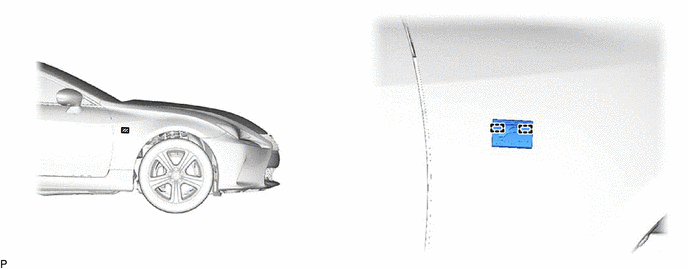
Engage the 2 pins and install the No. 1 front fender name plate as shown in the illustration.
-