LUGGAGE COMPARTMENT DOOR OUTSIDE GARNISH INSTALLATION
PROCEDURE
-
INSTALL LUGGAGE COMPARTMENT DOOR OUTSIDE GARNISH PROTECTOR
-
Clean the luggage compartment door outside garnish.
-
Remove any remaining double-sided tape from the luggage compartment door outside garnish.
-
Wipe off any tape adhesive residue with cleaner.
-
-
Remove the release paper from a new luggage compartment door outside garnish protector.
Tech Tips
After removing the release paper, keep the exposed adhesive free from foreign matter.
-
Install the luggage compartment door outside garnish protector.
-
-
INSTALL LUGGAGE COMPARTMENT DOOR OUTSIDE GARNISH SUB-ASSEMBLY
-
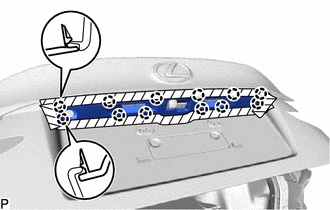
Install 10 new clips to the luggage compartment door outside garnish sub-assembly.
-
Engage the 2 guides and 10 clips.
-
Install the 2 nuts.
-
Install the luggage compartment door outside garnish sub-assembly with the 2 screws.
-
-
INSTALL LUGGAGE ELECTRICAL KEY SWITCH (w/o Rear Monitor)
-
INSTALL LUGGAGE ELECTRICAL KEY SWITCH WITH REAR TELEVISION CAMERA ASSEMBLY (w/ Rear Monitor)
-
INSTALL NO. 3 LUGGAGE COMPARTMENT DOOR OUTSIDE GARNISH
-
Engage the 12 claws to install the No. 3 luggage compartment door outside garnish.
-
-
INSTALL REAR LIGHT ASSEMBLY LH
-
INSTALL REAR LIGHT ASSEMBLY RH
Tech Tips
Use the same procedure as for the LH side.
-
INSTALL LUGGAGE COMPARTMENT DOOR COVER
-
ADJUST REAR TELEVISION CAMERA ASSEMBLY OPTICAL AXIS (w/ Parking Assist Monitor System)