GENERATOR INSTALLATION

PROCEDURE
-
INSTALL GENERATOR ASSEMBLY
-
Using an E6 "TORX" socket wrench, install the stud bolt.
- Torque:
- 4.0 N*m { 41 kgf*cm, 35 in.*lbf }
-

Bolt (A) 
Bolt (B) Install the wire harness bracket with the bolt (A).
- Torque:
- 10 N*m { 102 kgf*cm, 7 ft.*lbf }
-
Install the generator bracket with the bolt (B).
- Torque:
- 20 N*m { 204 kgf*cm, 15 ft.*lbf }
-
Install the generator assembly with the 2 bolts.
- Torque:
- 43 N*m { 438 kgf*cm, 32 ft.*lbf }
-
Install the nut.
- Torque:
- 20 N*m { 204 kgf*cm, 15 ft.*lbf }
-
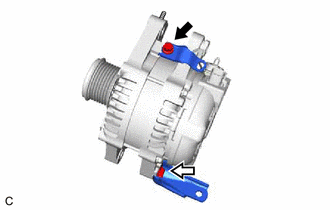
Engage the 2 clamps, and connect the generator assembly connector.
-
Connect the engine wire to terminal B with the nut.
- Torque:
- 9.8 N*m { 100 kgf*cm, 87 in.*lbf }
-
Install the terminal cap.
-
Install the engine wire bracket with the bolt.
- Torque:
- 10 N*m { 102 kgf*cm, 7 ft.*lbf }
-
Connect the cooling fan ECU connector.
-
-
INSTALL NO. 2 IDLER PULLEY SUB-ASSEMBLY
-
Install the No. 2 idler pulley sub-assembly and No. 2 idler pulley cover plate with the bolt.
- Torque:
- 43 N*m { 438 kgf*cm, 32 ft.*lbf }
-
-
INSTALL NO. 2 ENGINE COVER
-
INSTALL NO. 1 RADIATOR HOSE
-
Install the No. 1 radiator hose and slide the 2 clips to secure it.
-
-
INSTALL V-RIBBED BELT
-
ADD ENGINE COOLANT
-
INSPECT FOR COOLANT LEAK
-
INSTALL CENTER NO. 4 ENGINE UNDER COVER
-
INSTALL COOL AIR INTAKE DUCT SEAL
-
INSTALL ENGINE ROOM SIDE COVER
-
CONNECT CABLE TO NEGATIVE BATTERY TERMINAL
Note
When disconnecting the cable, some systems need to be initialized after the cable is reconnected.