REAR DISC BRAKE PAD REPLACEMENT

CAUTION / NOTICE / HINT
Note
After replacing the rear disc brake pads, the brake pedal may feel soft due to clearance between the rear disc brake pads and rear disc. Depress the brake pedal several times until the brake pedal feels firm.
Tech Tips
-
Use the same procedure for the RH side and LH side.
-
The following procedure is for the LH side.
PROCEDURE
-
REMOVE REAR WHEEL
-
REMOVE REAR DISC BRAKE PAD
-
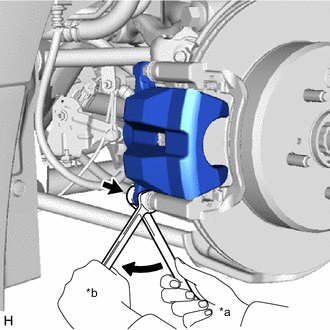
*a Turn *b Hold Hold the rear No. 2 disc brake cylinder slide pin and remove the bolt.
-
Pull the rear disc brake cylinder assembly upward.
-
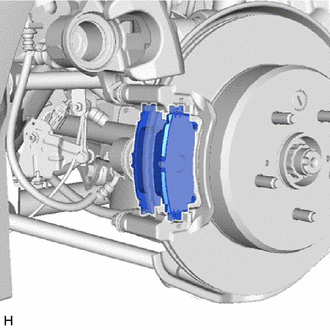
Remove the 2 rear disc brake pads from the rear disc brake cylinder mounting.
CAUTION:
Be careful not to get pinched by the rear disc brake cylinder assembly or other parts when removing the rear disc brake pads.
-
-
REMOVE REAR DISC BRAKE ANTI-SQUEAL SHIM KIT
-
INSTALL REAR DISC BRAKE ANTI-SQUEAL SHIM KIT
-
INSTALL REAR DISC BRAKE PAD
-

Using SST, push in the rear disc brake piston.
- SST
- 09719-77020
Note
-
Make sure the brake fluid does not overflow from the reservoir.
-
Do not forcibly push in the rear disc brake piston.
-
Install the 2 rear disc brake pads to the rear disc brake cylinder mounting.
Note
There should be no oil or grease on the friction surfaces of the disc brake pads or the rear disc.
CAUTION:
Be careful not to get pinched by the rear disc brake cylinder assembly or other parts when installing the rear disc brake pads.
-
Hold the rear No. 2 disc brake cylinder slide pin and install the rear disc brake cylinder assembly to the rear disc brake cylinder mounting with the bolt.
- Torque:
- 26.5 N*m { 270 kgf*cm, 20 ft.*lbf }
-
-
INSPECT BRAKE FLUID LEVEL IN RESERVOIR
-
INSTALL REAR WHEEL