BRAKE BOOSTER(for LHD) REMOVAL
CAUTION / NOTICE / HINT
Note
Make sure to release vacuum from the brake booster assembly before removing the brake master cylinder sub-assembly from the brake booster assembly.
PROCEDURE
-
PRECAUTION
Note
After turning the engine switch off, waiting time may be required before disconnecting the cable from the negative (-) battery terminal. Therefore, make sure to read the disconnecting the cable from the negative (-) battery terminal notices before proceeding with work.
-
REMOVE LOWER NO. 1 INSTRUMENT PANEL AIRBAG ASSEMBLY
-
REMOVE FRONT WHEEL LH
-
DRAIN BRAKE FLUID
Note
If brake fluid leaks onto any painted surface, immediately wash it off.
-
SEPARATE NO. 3 ENGINE ROOM RELAY BLOCK ASSEMBLY
-
REMOVE WIRING HARNESS CLAMP BRACKET
-
REMOVE BRAKE MASTER CYLINDER SUB-ASSEMBLY
-
REMOVE BRAKE MASTER CYLINDER O-RING
-
DISCONNECT UNION TO CHECK VALVE HOSE
-
REMOVE FRONT NO. 1 BRAKE TUBE
-
REMOVE REAR NO. 1 BRAKE TUBE
-
REMOVE BRAKE ACTUATOR WITH BRACKET
-
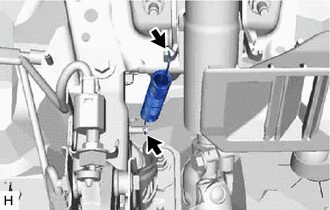
REMOVE BRAKE PEDAL RETURN SPRING
-
Remove the brake pedal return spring from the steering column assembly and push rod pin.
-
-
REMOVE PUSH ROD PIN
-
REMOVE FRONT NO. 3 BRAKE TUBE
-
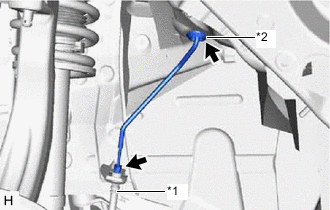
*1 Front Flexible Hose *2 Grommet Using a union nut wrench, disconnect the front No. 3 brake tube from the front flexible hose.
-
Disengage the grommet.
-

Disengage the clamp and remove the front No. 3 brake tube.
Note
-
Do not kink or damage the front No. 3 brake tube.
-
Do not allow any foreign matter such as dirt or dust to enter the front No. 3 brake tube from the connecting parts.
-
-
-
REMOVE BRAKE BOOSTER ASSEMBLY
-
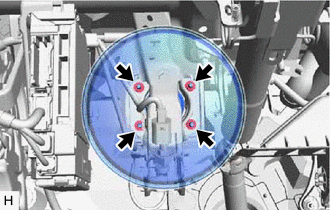
Remove the 4 nuts and brake booster assembly from the vehicle body.
Note
Do not kink or damage the brake lines.
-
-
REMOVE BRAKE BOOSTER GASKET
-
REMOVE BRAKE MASTER CYLINDER PUSH ROD CLEVIS
-
Loosen the clevis lock nut and remove the brake master cylinder push rod clevis and clevis lock nut from the brake booster assembly.
-
-
REMOVE BRAKE VACUUM CHECK VALVE ASSEMBLY
-
Remove the brake vacuum check valve assembly from the brake booster assembly.
-
-
REMOVE CHECK VALVE GROMMET
-
Remove the check valve grommet from the brake booster assembly.
-