REAR DIFFERENTIAL CARRIER ASSEMBLY(for 2GR-FKS) INSTALLATION

PROCEDURE
-
INSTALL REAR DIFFERENTIAL CARRIER ASSEMBLY
Note
-
Do not damage the installation surface when installing the rear differential carrier assembly.
-
The remaining oil may leak out when installing the rear differential carrier assembly.
-
Securely support the rear differential carrier assembly while performing this step to avoid excessively tilting or dropping the rear differential carrier assembly.
-
Install the bolts with the rear differential carrier assembly secured.
-
*a Torque Wrench Fulcrum Length Support the rear differential carrier assembly with a jack.
CAUTION:
The rear differential carrier assembly is a heavy component. Make sure that it is supported securely.
-
Install the 2 rear upper differential mount stoppers to the rear differential carrier assembly.
-
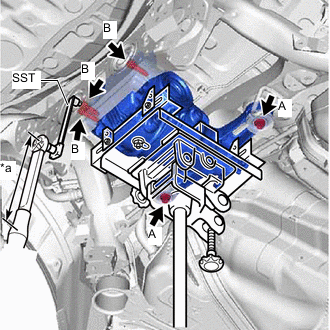
Temporarily install the rear differential carrier assembly to the rear suspension member sub-assembly with the 2 rear lower differential mount stoppers and 2 new bolts (A).
-
Using SST and a 12 mm hexagon socket wrench, temporarily install the rear differential carrier assembly to the rear suspension member sub-assembly with 3 new bolts (B).
- SST
- 09961-01270
-
Using SST and a 12 mm hexagon socket wrench, tighten the 3 bolts (B).
- SST
- 09961-01270
- Torque:
- Specified tightening torque
- 103 N*m { 1050 kgf*cm, 76 ft.*lbf }
Note
Do not tilt the sleeve or deform the rubber of the mount when tightening the bolt (B).
Tech Tips
-
This torque value is effective when SST is parallel to the torque wrench.
-
Calculate the torque wrench reading when changing the fulcrum length of the torque wrench.
-
When using SST (fulcrum length of 200 mm (7.87 in.)) + torque wrench (fulcrum length of 425 mm (1.39 ft.)):
70 N*m (714 kgf*cm, 52 ft.*lbf)
-
Tighten the 2 bolts (A).
- Torque:
- Bolt Type A
- 95.1 N*m { 970 kgf*cm, 70 ft.*lbf }
- Bolt Type B
- 88.9 N*m { 907 kgf*cm, 66 ft.*lbf }
-
-
CONNECT TAIL EXHAUST PIPE LH
-
CONNECT TAIL EXHAUST PIPE ASSEMBLY
-
INSTALL PROPELLER WITH CENTER BEARING SHAFT ASSEMBLY
-
INSTALL REAR DRIVE SHAFT ASSEMBLY
-
Install the rear drive shaft assembly LH and rear drive shaft assembly RH.
-
-
INSTALL REAR STEERING LINK ASSEMBLY (w/ Dynamic Rear Steering)
-
ADD DIFFERENTIAL OIL
-
INSPECT FOR DIFFERENTIAL OIL LEAK