- Click here
INSTALL REAR SEAT INNER TRACK ASSEMBLY RH
-
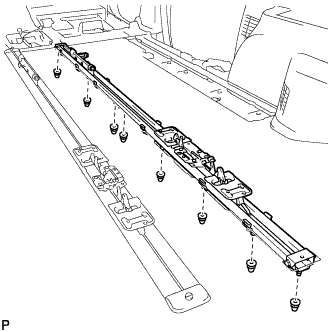
Install the 8 nuts to the bottom of the vehicle to install the rear seat inner track assembly RH.
67 N*m 684 kgf*cm 49 ft.*lbf
-
- Click here
INSTALL REAR SEAT INNER TRACK ASSEMBLY LH
Tip:Use the same procedure for the RH side and LH side.
- Click here
INSTALL REAR SEAT OUTER TRACK ASSEMBLY RH
-
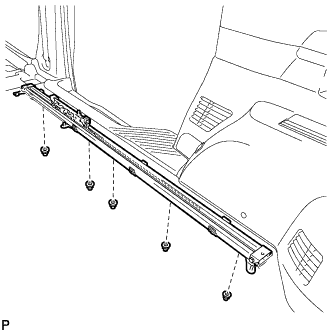
Install the 5 nuts to the bottom of the vehicle to install the rear seat outer track assembly RH.
67 N*m 684 kgf*cm 49 ft.*lbf
-
- Click here
INSTALL REAR SEAT OUTER TRACK ASSEMBLY LH
Tip:Use the same procedure for the RH side and LH side.
- Click here
CONNECT HEATER CLAMP (for Front Side)
-
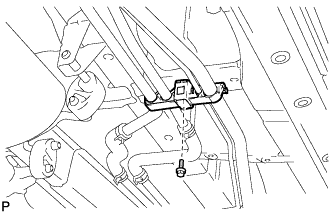
Connect the heater clamp with the bolt.
-
- Click here
CONNECT HEATER CLAMP (for Rear Side)
-
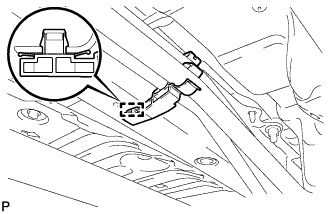
Engage the clamp and connect the heater clamp.
-
- Click here
INSTALL FRONT FLOOR NO. 2 HEAT INSULATOR
-
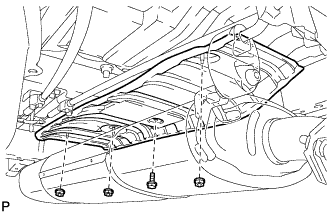
Install the front floor No. 2 heat insulator with the bolt and 3 nuts.
Bolt 14 N*m 143 kgf*cm 10 ft.*lbf Nut 6.0 N*m 61 kgf*cm 53 in.*lbf
-
- Click here
INSTALL FUEL TANK ASSEMBLY
-
Install the fuel tank assembly (Click here).
-
- Click here
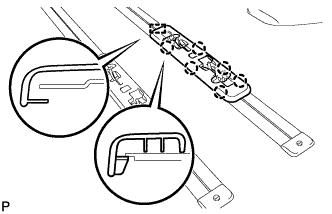
INSTALL NO. 3 SEAT TRACK LOWER RAIL PROTECTOR
-
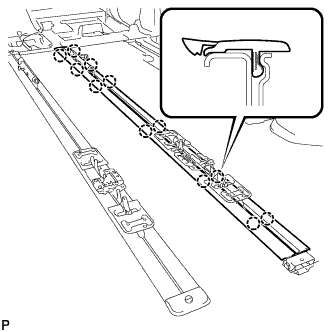
Engage the 12 claws and install the 2 No. 3 seat track lower rail protectors.
Tip:Use the same procedure for the RH side and LH side.
-
- Click here
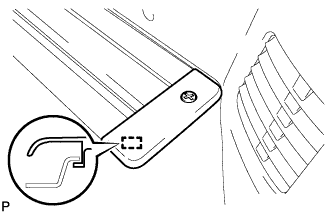
INSTALL NO. 2 SEAT TRACK LOWER RAIL PROTECTOR
-
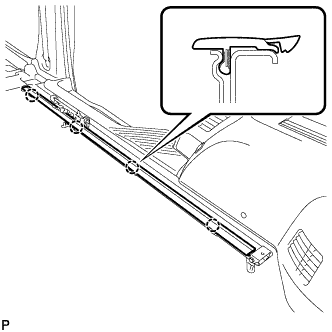
Engage the 4 claws and install the No. 2 seat track lower rail protector.
Tip:Use the same procedure for the RH side and LH side.
-
- Click here
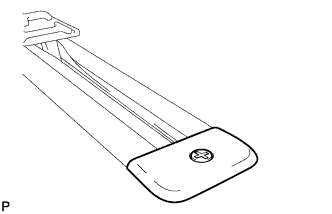
INSTALL NO. 1 SEAT TRACK LOWER RAIL PROTECTOR
-
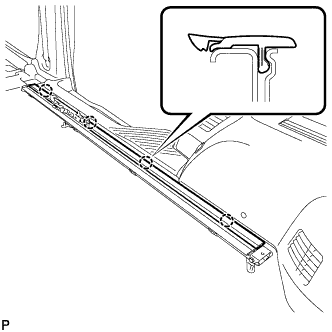
Engage the 4 claws and install the No. 1 seat track lower rail protector.
Tip:Use the same procedure for the RH side and LH side.
-
- Click here
INSTALL WIRING HARNESS PROTECTOR SET (for Power Seat)
-
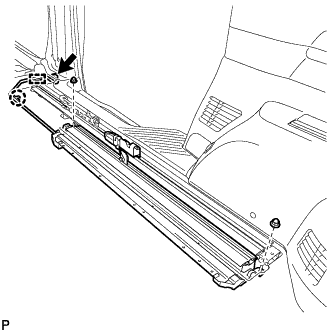
Install the wiring harness protector set with the 2 nuts.
-
Engage the claw and clamp.
-
Connect the connector.
-
- Click here
INSTALL WIRING HARNESS PROTECTOR SET (for Power Seat)
Tip:Use the same procedure for the RH side and LH side.
- Click here
INSTALL NO. 3 FLOOR CARPET MOULDING (for Manual Seat)
-
Engage the clip and install the No. 3 floor carpet moulding.
Tip:Use the same procedure for the other 7 mouldings.
-
- Click here
INSTALL NO. 3 FLOOR CARPET MOULDING (for Power Seat)
-
For mouldings other than those to be installed on the rear outer sides of the vehicle:
-
Engage the clip and install the No. 3 floor carpet moulding.
Tip:Use the same procedure for the other 7 mouldings.
-
-
For mouldings to be installed on the rear outer sides of the vehicle:
-
Engage the guide.
-
Engage the clip and install the No. 3 floor carpet moulding.
Tip:Use the same procedure for the RH side and LH side.
-
-
- Click here
INSTALL REAR SEAT LOCK STRIKER COVER
-
Engage the 7 claws and guide, and install the rear seat lock striker cover.
Tip:Use the same procedure for the RH side and LH side.
-
- Click here
INSTALL REAR SEAT TRACK SLIDE STOPPER
- Click here
INSTALL REAR NO. 2 SEAT TRACK ASSEMBLY RH
-
Install the rear No. 2 seat track assembly RH with the 2 bolts and 2 nuts.
42 N*m 428 kgf*cm 31 ft.*lbf
-
- Click here
INSTALL REAR NO. 2 SEAT TRACK ASSEMBLY LH
Tip:Use the same procedure for the RH side and LH side.
- Click here
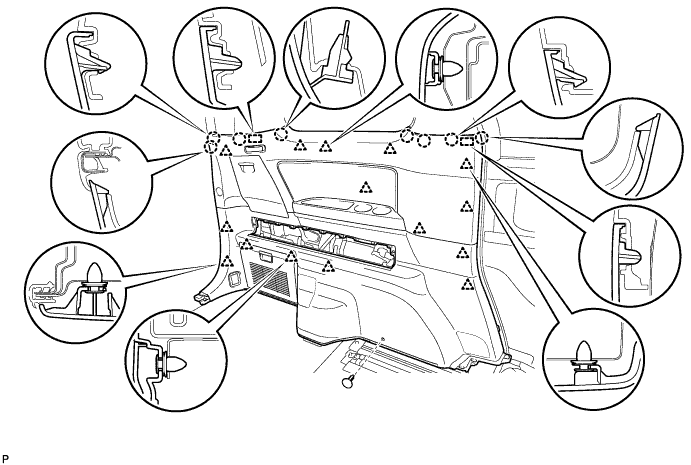
INSTALL REAR QUARTER TRIM PANEL ASSEMBLY RH
-
Connect the connectors.
-
Engage the 2 guides, 7 claws and 14 clips to install the rear quarter trim panel assembly RH.
-
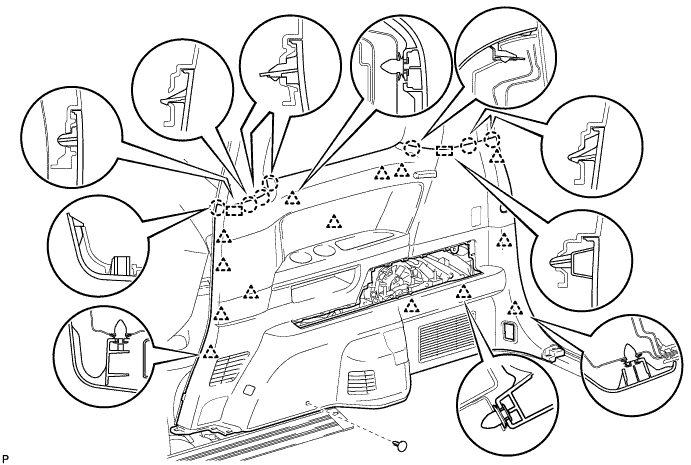
Install the clip(A).
-
- Click here
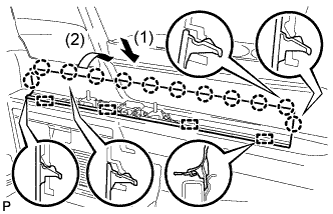
INSTALL DECK SIDE GARNISH RH
-
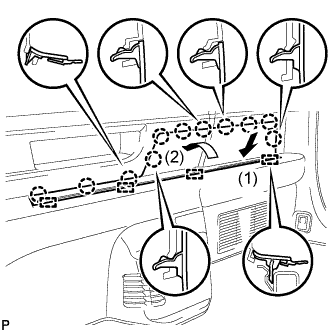
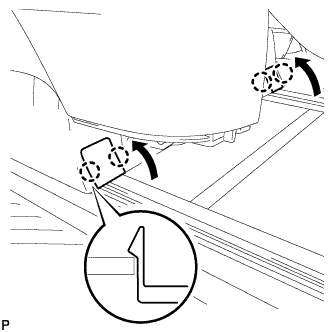
Engage the 4 guides and 11 claws to install the deck side garnish RH as shown in the illustration.
-
- Click here
INSTALL ROPE HOOK ASSEMBLY (for RH Side)
-
Install the rope hook assembly with the bolt.
6.5 N*m 66 kgf*cm 58 in.*lbf -
Engage the 2 claws.
-
- Click here
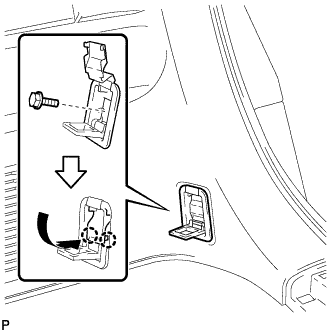
INSTALL NO. 1 LUGGAGE COMPARTMENT TRIM HOOK
-
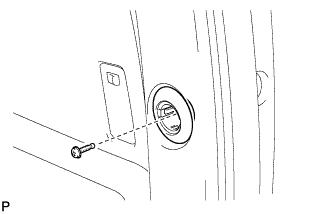
Install the bolt.
-
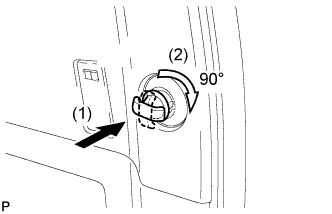
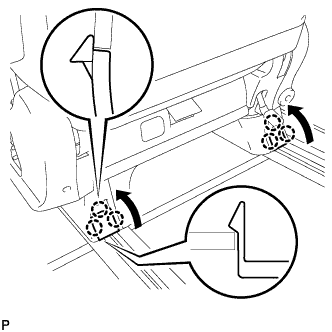
Push in the No. 1 luggage compartment trim and turn it clockwise approximately 90° to install the No. 1 luggage compartment trim hook.
-
- Click here
INSTALL REAR QUARTER TRIM PANEL ASSEMBLY LH
-
Engage the 2 guides, 8 claws and 15 clips, and install the rear quarter trim panel assembly LH.
-
Install the clip(A).
-
- Click here
INSTALL DECK SIDE GARNISH LH
-
Engage the 4 guides and 12 claws to install the deck side garnish LH as shown in the illustration.
-
- Click here
INSTALL ROPE HOOK ASSEMBLY (for LH Side)
Tip:Use the same procedure for the LH side and RH side.
- Click here
INSTALL NO. 2 LUGGAGE COMPARTMENT TRIM HOOK
Tip:Use the same procedure for the No. 2 luggage compartment trim hook side and No. 1 luggage compartment trim hook side.
- Click here
INSTALL REAR NO. 2 SEAT ASSEMBLY RH
-
Temporary install the rear No. 2 seat assembly.
Note:Do not damage the rear No. 2 seat assembly, body or body interior.
-
Connect the rear No. 2 seat outer belt assembly.
-
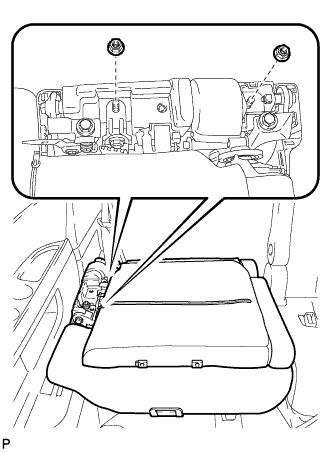
Temporary tighten the 2 nuts.
-
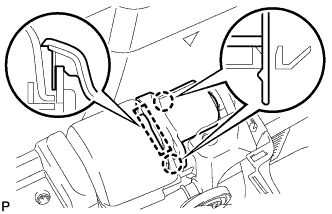
Lock the inner leg in the inner rail.
-
Remove the clip of the seat track upper rail cover.
-
Temporary install the seat track upper rail cover.
-
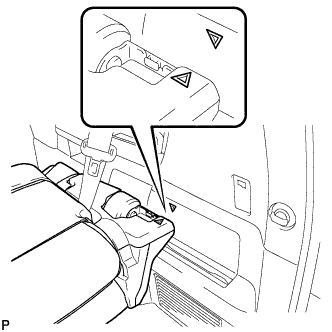
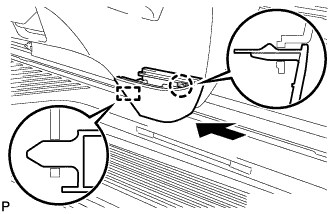
Adjust the rear No. 2 seat assembly so that the positioning marks are aligned as shown in the illustration.
-
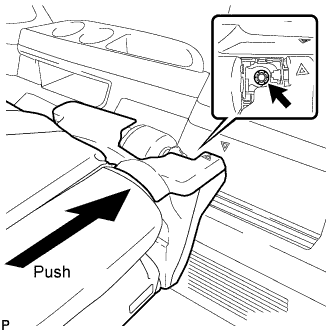
As shown in the illustration, tighten the nut while pushing the rear No. 2 seat assembly towards the outside of the vehicle.
42 N*m 428 kgf*cm 31 ft.*lbf Note:
-
If this operation is difficult to perform alone, use two or more people.
-
Make sure not to misalign the positioning marks when pushing the seat.
-
If the nut is tightened without the seat pushed towards the outside of the vehicle, the inner lock may not operate normally.
-
-
Remove the seat track upper rail cover.
-
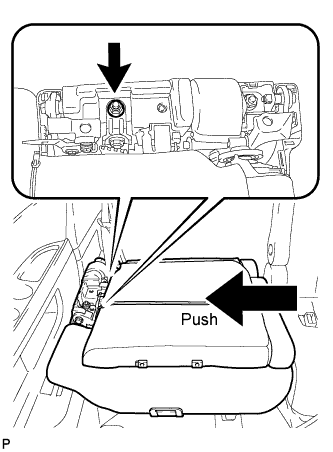
As shown in the illustration, tighten the nut while pushing the rear No. 2 seat assembly towards the outside of the vehicle, and install the rear No. 2 seat assembly.
42 N*m 428 kgf*cm 31 ft.*lbf Note:
-
If this operation is difficult to perform alone, use two or more people.
-
Make sure not to misalign the positioning marks when pushing the seat.
-
If the nut is tightened without the seat pushed towards the outside of the vehicle, the inner lock may not operate normally.
-
After reassembling the seat, check that the inner lock operates normally and that the inner lock and lock cover do not interfere with each other.
-
-
Check that the rear No. 2 seat flips up and slides smoothly. If abnormal, loosen the 2 nuts and perform operations starting from step (f) again.
-
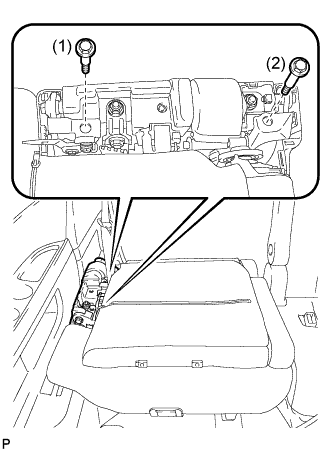
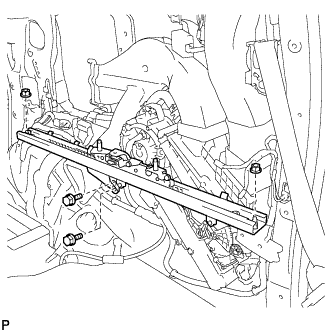
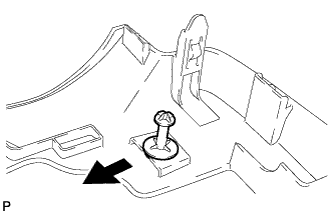
Remove the 2 stopper bolts in the order indicated in the illustration.
Note:Before removing the stopper bolts, make sure that the inner leg is securely locked in the inner rail.
-
- Click here
INSTALL NO. 2 SEAT HEADREST ASSEMBLY
- Click here
INSTALL NO. 1 SEAT TRACK LOCK PLATE COVER
-
Engage the 2 claws and guide to install the No. 1 seat track lock plate cover.
-
- Click here
INSTALL UPPER SEAT TRACK RAIL COVER RH
-
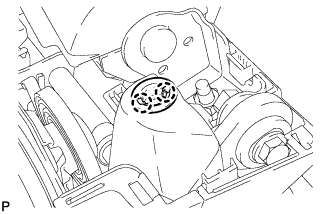
Engage the 2 claws to install the grommet.
-

Install the clip of the seat track upper rail cover.
-
Engage the 2 guides.
-
Engage the 5 claws and clip to install the upper seat track rail cover.
-
- Click here
INSTALL RECLINING ADJUSTER RELEASE HANDLE RH
-

Engage the claw to install the reclining adjuster release handle.
-
- Click here
INSTALL REAR NO. 2 SEAT ASSEMBLY LH
Tip:Use the same procedure for the RH side and LH side (Click here).
- Click here
INSTALL REAR SEAT HEADREST ASSEMBLY
- Click here
INSTALL NO. 2 SEAT HEADREST ASSEMBLY
- Click here
INSTALL NO. 1 SEAT TRACK LOCK PLATE COVER
Tip:Use the same procedure for the RH side and LH side (Click here).
- Click here
INSTALL UPPER SEAT TRACK RAIL COVER LH
Tip:Use the same procedure for the RH side and LH side (Click here).
- Click here
INSTALL RECLINING ADJUSTER RELEASE HANDLE LH
Tip:Use the same procedure for the RH side and LH side (Click here).
- Click here
INSTALL REAR NO. 1 SEAT ASSEMBLY RH (for Manual Seat)
-
Place the rear No. 1 seat assembly in the cabin.
Note:Be careful not to damage the vehicle body.
-
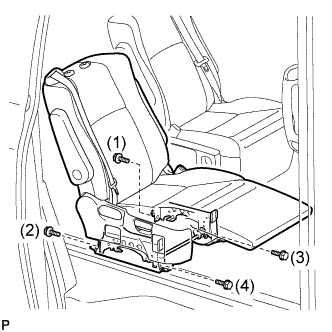
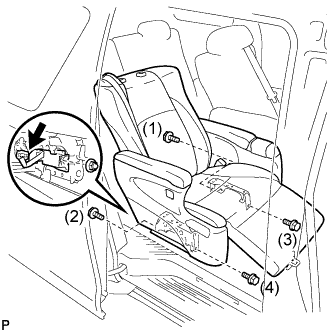
Temporary install the rear No. 1 seat assembly with the 4 bolts.
-
Tighten the bolt (1).
50 N*m 510 kgf*cm 37 ft.*lbf -
Tighten the bolt (2).
50 N*m 510 kgf*cm 37 ft.*lbf -
Slide the rear No. 1 seat assembly rearward.
-
Tighten the bolt (3).
50 N*m 510 kgf*cm 37 ft.*lbf -
Slide the rear No. 1 seat assembly inward.
-
Tighten the bolt (4).
50 N*m 510 kgf*cm 37 ft.*lbf Note:During the sliding operation of the rear No. 1 seat assembly, check that the left and right adjusters move together smoothly and lock simultaneously. If the seat adjusters do not lock simultaneously, loosen the seat fixation bolts to adjust the adjuster position.
-
Engage the 6 claws to close the 2 covers.
-
Engage the 4 claws to close the 2 covers.
-
- Click here
INSTALL REAR SEAT LOWER CUSHION SHIELD RH (for Manual Seat)
-
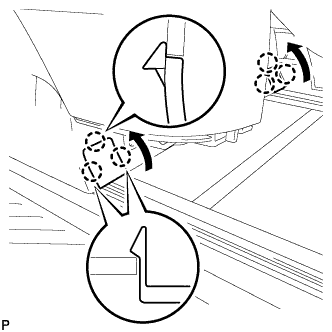
Engage the guide.
-
Engage the claw to install the rear seat lower cushion shield as shown in the illustration.
-
- Click here
INSTALL REAR SEAT HEADREST ASSEMBLY (for Manual Seat)
- Click here
INSTALL REAR NO. 1 SEAT ASSEMBLY LH (for Manual Seat)
Tip:Use the same procedure for the RH side and LH side (Click here).
- Click here
INSTALL REAR SEAT LOWER CUSHION SHIELD LH (for Manual Seat)
Tip:Use the same procedure for the RH side and LH side (Click here).
- Click here
INSTALL REAR SEAT HEADREST ASSEMBLY (for Manual Seat)
- Click here
INSTALL REAR NO. 1 SEAT ASSEMBLY RH (for Power Seat)
-
Place the rear No. 1 seat assembly in the cabin.
Note:Be careful not to damage the vehicle body.
-
Temporary install the rear No. 1 seat assembly with the 4 bolts.
-
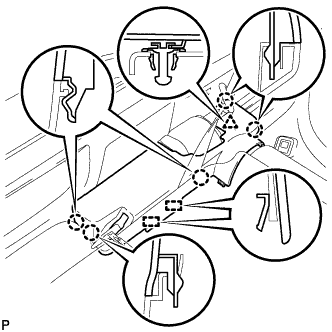
Install the rear No. 1 seat assembly with the 4 bolts.
50 N*m 510 kgf*cm 37 ft.*lbf Note:Tighten the bolts in the order indicated in the illustration.
-
Install the wiring harness protector set with the nut.
-
Connect each connector.
-
Engage the 6 claws to close the 2 covers as shown in the illustration.
-
Engage the 6 claws to close the 2 covers as shown in the illustration.
-
- Click here
INSTALL REAR SEAT LEG COVER RH (for Power Seat)
-
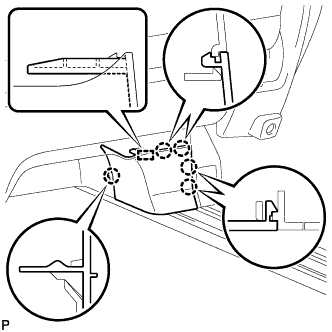
Engage the 5 claws and the guide to install the rear seat leg cover.
-
- Click here
INSTALL REAR SEAT LOWER CUSHION SHIELD RH (for Power Seat)
-
Engage the claw and the guide to install the rear seat lower cushion shield as shown in the illustration.
-
- Click here
INSTALL REAR SEAT HEADREST ASSEMBLY (for Power Seat)
- Click here
INSTALL REAR NO. 1 SEAT ASSEMBLY LH (for Power Seat)
Tip:Use the same procedure for the RH side and LH side (Click here).
- Click here
INSTALL NO. 2 SEAT LEG COVER LH (for Power Seat)
Tip:Use the same procedure for the RH side and LH side (Click here).
- Click here
INSTALL REAR SEAT LOWER CUSHION SHIELD LH (for Power Seat)
Tip:Use the same procedure for the RH side and LH side (Click here).
- Click here
INSTALL REAR SEAT HEADREST ASSEMBLY (for Power Seat)
- Click here
INSPECT REAR NO. 1 SEAT ASSEMBLY (for Power Seat)
Tip:Inspect the power seat operation (Click here).