- Click here
REMOVE NO. 1 INSTRUMENT CLUSTER FINISH PANEL (for Driver Side)
-
Operate the tilt lever to lower the steering wheel assembly.
-
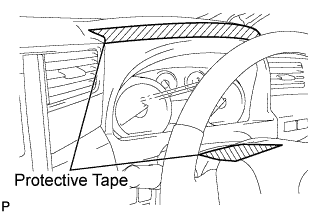
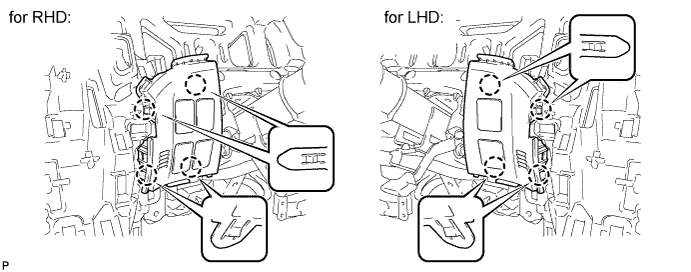
Apply protective tape to the areas shown in the illustration.
-
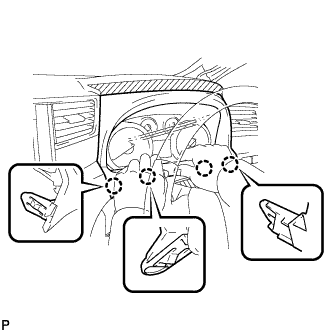
Disengage the 4 claws.
-
Disengage the 7 claws and 2 guides to remove the No. 1 instrument cluster finish panel.
-
- Click here
REMOVE COWL SIDE TRIM BOARD (for Driver Side)
for RHD: (Click here)
for LHD: (Click here)
- Click here
REMOVE NO. 1 INSTRUMENT PANEL UNDER COVER SUB-ASSEMBLY (for Driver Side)
for RHD: (Click here)
for LHD: (Click here)
- Click here
REMOVE LOWER INSTRUMENT PANEL FINISH PANEL (for Driver Side)
for RHD: (Click here)
for LHD: (Click here)
- Click here
REMOVE CENTER FLOOR CARPET COVER RH (for Driver Side)
for RHD: (Click here)
for LHD: (Click here)
- Click here
REMOVE CENTER FLOOR CARPET COVER LH (for Driver Side)
-

Using a clip remover, remove the clip.
-
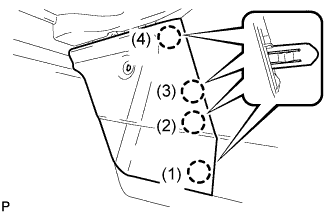
Disengage the 4 claws and remove the center floor carpet cover LH in the order shown in the illustration.
Tip:Remove the center floor carpet cover LH while pushing on the instrument cluster finish panel.
-
- Click here
REMOVE INSTRUMENT PANEL BOX ASSEMBLY (for Driver Side)
-
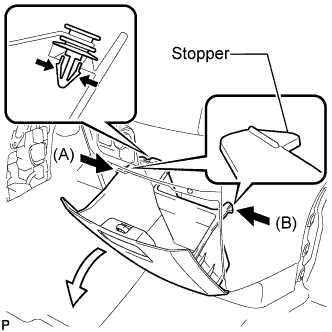
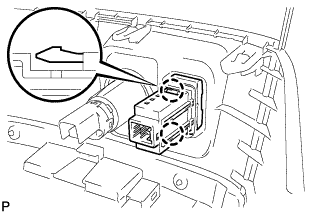
Slightly bend stoppers (A) and (B) in the directions indicated by the arrows in the illustration and pull the instrument panel box assembly until the stoppers are released.
-
Remove the damper clip.
-
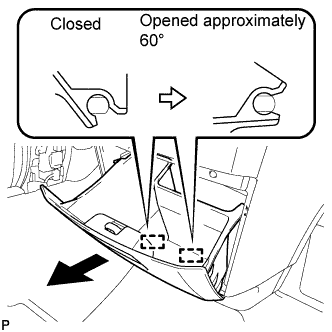
Open the instrument panel box assembly to approximately 60° from its closed position. Pull it horizontally toward the rear of the vehicle to disengage the 2 hinges and remove the instrument panel box assembly.
Note:Pulling the instrument panel box assembly upward to remove it causes the hinges to deform. Be sure to pull out the instrument panel box horizontally.
-
- Click here
REMOVE INSTRUMENT CLUSTER FINISH PANEL ASSEMBLY (for Driver Side)
-
Remove the bolt <C>.
-
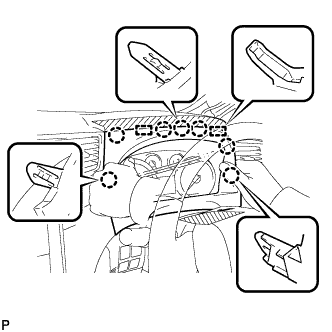
Disengage the 12 claws.
Tip:First disengage the 6 claws for the right side and then pull the panel to the rear of the vehicle to disengage the 6 claws for the left side.
-
Disengage the 3 claws.
-
Disconnect each connector and remove the instrument cluster finish panel assembly.
-
- Click here
REMOVE SHIFT LEVER KNOB SUB-ASSEMBLY (for Driver Side)
-
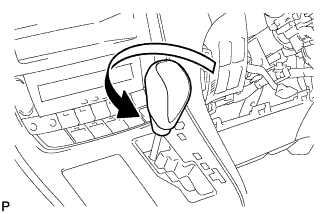
Turn the shift lever knob counterclockwise and remove the shift lever knob sub-assembly.
-
- Click here
REMOVE CENTER INSTRUMENT CLUSTER FINISH PANEL SUB-ASSEMBLY (for Driver Side)
-
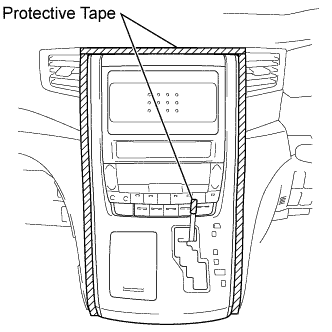
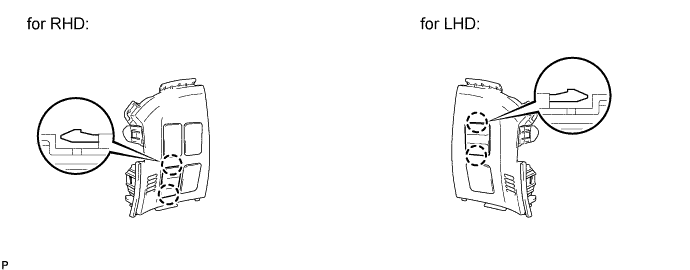
Apply protective tape to the area shown in the illustration.
-
Move the shift lever to N.
-
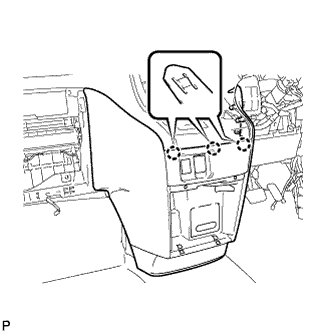
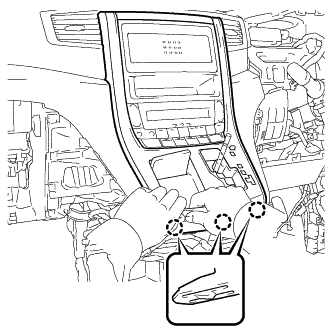
Disengage the 3 claws as shown in the illustration.
Note:Make sure to disengage the lower claws first. The center instrument cluster finish panel sub-assembly may be damaged if the upper claws are disengaged first.
-
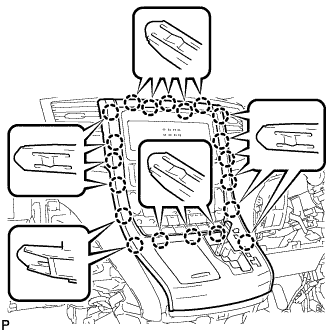
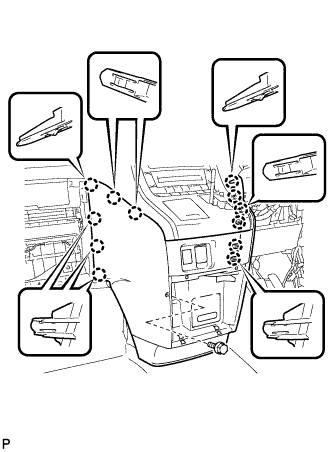
Disengage the 20 claws.
Note:Make sure to disengage the lower claws first. The center instrument cluster finish panel sub-assembly may be damaged if the upper claws are disengaged first.
-
Disconnect the connector and remove the center instrument cluster finish panel sub-assembly.
-
- Click here
REMOVE NO. 2 INSTRUMENT CLUSTER FINISH PANEL GARNISH (for Driver Side)
for RHD: (Click here)
for LHD: (Click here)
- Click here
REMOVE NO. 2 SWITCH HOLE BASE (for Driver Side)
-
Disengage the 4 claws.
-
Disconnect the aspirator pipe and each connector to remove the No. 2 switch hole base.
-
- Click here
REMOVE SEAT HEATER SWITCH (for Driver Side)
-
Disengage the 2 claws and remove the seat heater switch.
-
- Click here
REMOVE SHIFT LEVER KNOB SUB-ASSEMBLY (for Front Passenger Side)
-
Turn the shift lever knob counterclockwise and remove the shift lever knob sub-assembly.
-
- Click here
REMOVE CENTER INSTRUMENT CLUSTER FINISH PANEL SUB-ASSEMBLY (for Front Passenger Side)
-
Apply protective tape to the area shown in the illustration.
-
Move the shift lever to N.
-
Disengage the 3 claws as shown in the illustration.
Note:Make sure to disengage the lower claws first. The center instrument cluster finish panel sub-assembly may be damaged if the upper claws are disengaged first.
-
Disengage the 20 claws.
Note:Make sure to disengage the lower claws first. The center instrument cluster finish panel sub-assembly may be damaged if the upper claws are disengaged first.
-
Disconnect the connector and remove the center instrument cluster finish panel sub-assembly.
-
- Click here
REMOVE SEAT HEATER SWITCH (for Front Passenger Side)
-
Disengage the 2 claws and remove the seat heater switch.
-