RADIO ANTENNA CORD INSTALLATION

-
INSTALL NO. 2 ANTENNA CORD SUB-ASSEMBLY (w/o Sliding Roof)
-
Engage the 6 clamps to install the No. 2 antenna cord sub-assembly to the roof headlining assembly as shown in the illustration.
-
-
INSTALL NO. 2 ANTENNA CORD SUB-ASSEMBLY (w/ Sliding Roof)
-
Engage the 6 clamps to install the No. 2 antenna cord sub-assembly to the roof headlining assembly as shown in the illustration.
-
-
INSTALL REAR NO. 2 WASHER HOSE (w/o Sliding Roof)
-
Engage the 10 clamps and install the rear No. 2 washer hose to the roof headlining assembly.
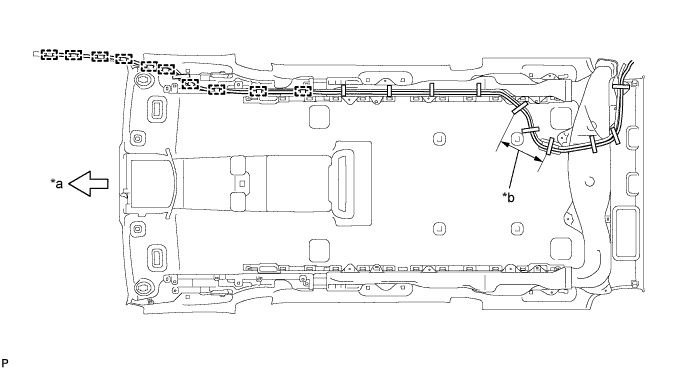
Text in Illustration *a Front Side *b Adjustment Area -
Put the strips of the tape back to the positions shown in the illustration in order to secure the antenna cord and washer hose to the roof headlining assembly.
Tech Tips
-
If the tape has lost adhesion, use other tape, such as packing tape, with enough adhesion to secure the antenna cord and washer hose to the roof headlining assembly.
-
Secure the antenna cord and washer hose to the roof headlining assembly with tape as shown in the illustration.
-
If the entire length of the washer hose is too long, adjust the length by tucking in the hose at the area shown in the illustration.
-
-
-
INSTALL REAR NO. 2 WASHER HOSE (w/ Sliding Roof)
-
Engage the 10 clamps and install the rear No. 2 washer hose to the roof headlining assembly.
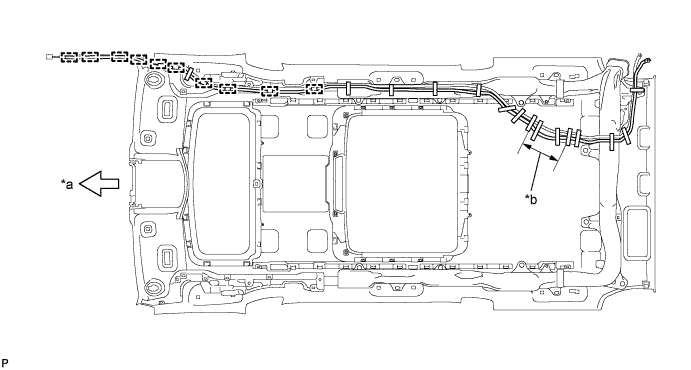
Text in Illustration *a Front Side *b Adjustment Area -
Put the strips of the tape back to the positions shown in the illustration in order to secure the antenna cord and washer hose to the roof headlining assembly.
Tech Tips
-
If the tape has lost adhesion, use other tape, such as packing tape, with enough adhesion to secure the antenna cord and washer hose to the roof headlining assembly.
-
Secure the antenna cord and washer hose to the roof headlining assembly with tape as shown in the illustration.
-
If the entire length of the washer hose is too long, adjust the length by tucking in the hose at the area shown in the illustration.
-
-
-
INSTALL ROOF HEADLINING ASSEMBLY
-
INSTALL ANTENNA CORD SUB-ASSEMBLY (for RHD)
-
Connect the 2 connectors and install the antenna cord sub-assembly with the bolt.
-
Engage the 9 clamps.
-
-
INSTALL ANTENNA CORD SUB-ASSEMBLY (for LHD)
-
w/o Front Center Speaker:
-
Connect the 2 connectors and install the antenna cord sub-assembly with the bolt.
-
Engage the 8 clamps.
-
-
w/ Front Center Speaker:
-
Connect the connector and install the antenna cord sub-assembly with the bolt.
-
Engage the 7 clamps.
-
-
-
INSTALL UPPER INSTRUMENT PANEL SUB-ASSEMBLY