OIL PAN INSTALLATION
-
INSTALL TRANSAXLE OIL PAN SUB-ASSEMBLY
-
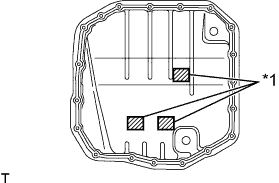
Text in Illustration *1 Magnet Install the 3 magnets to the oil pan.
-
Install a new gasket to the oil pan.
-
Apply adhesive to 19 new bolts.
Adhesive Toyota Genuine Adhesive 1324, Three Bond 1324 or equivalent -
Install the oil pan to the transaxle with the 19 bolts.
- Torque:
- 7.5 N*m { 76 kgf*cm, 66 in.*lbf }
Note
-
Completely remove any oil or grease from the contact surface of the transaxle case and oil pan sub-assembly with gasket before installation.
-
In order to ensure proper sealing of the transaxle oil pan bolts, apply adhesive to the bolts and install them within 10 minutes of adhesive application.
-
Do not reuse the bolts.
-
-
INSTALL NO. 1 TRANSMISSION OIL FILLER TUBE
-
Using a 6 mm socket hexagon wrench, install the No. 1 transmission oil filler tube to the oil pan.
- Torque:
- 1.7 N*m { 17 kgf*cm, 15 in.*lbf }
-
-
INSTALL FRONT SUSPENSION MEMBER REINFORCEMENT LH
Tech Tips
Perform the same procedure as for the RH side.
-
ADD CONTINUOUSLY VARIABLE TRANSAXLE FLUID
-
INSPECT FOR OIL LEAK
-
INSTALL REAR ENGINE UNDER COVER LH
-
INSTALL NO. 1 ENGINE UNDER COVER
-
INSTALL FRONT WHEEL LH
- Torque:
- 103 N*m { 1050 kgf*cm, 76 ft.*lbf }