SEAT HEATER SWITCH INSTALLATION

Tech Tips
-
Use the same procedure for RHD and LHD vehicles.
-
The procedure listed below is for LHD vehicles.
-
INSTALL SEAT HEATER SWITCH (for Automatic Transmission)
-
Attach the 4 claws to install the 2 switches.
-
Connect the 2 connectors.
-
-
INSTALL CONSOLE PANEL SUB-ASSEMBLY (for Automatic Transmission)
-
Connect each connector.
-
Attach the 8 clips and 2 claws to install the console panel.
-
-
INSTALL SHIFT LEVER KNOB SUB-ASSEMBLY (for Automatic Transmission)
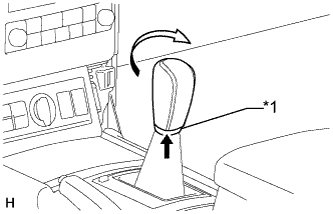
Text in Illustration *1 Shifting Hole Cover
-
Install the shift lever knob and twist it in the direction indicated by the arrow.
-
Install the shifting hole cover to the shift lever knob.
-
-
INSTALL SEAT HEATER SWITCH (for Manual Transmission)
-
Attach the 4 claws to install the 2 switches.
-
-
INSTALL FRONT CONSOLE UPPER PANEL GARNISH
-
Attach the 5 clips to install the front console upper panel garnish.
-
-
INSTALL INSTRUMENT PANEL FINISH PANEL END LH
-
Attach the 4 clips to install the instrument panel finish panel end.
-
-
INSTALL INSTRUMENT PANEL FINISH PANEL END RH
-
Connect the connector.
-
Attach the 4 clips to install the instrument panel finish panel end.
-
-
INSTALL NO. 2 INSTRUMENT PANEL FINISH PANEL CUSHION
-
Attach the 5 clips to install the No. 2 instrument panel finish panel cushion.
-
-
INSTALL NO. 1 INSTRUMENT PANEL FINISH CUSHION
Tech Tips
Use the same procedure described for the No. 2 instrument panel finish panel cushion.
-
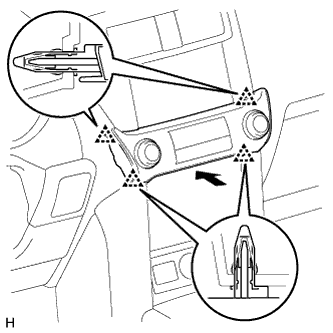
INSTALL INTEGRATION CONTROL AND PANEL ASSEMBLY
-
Connect the connector.
-
Attach the 4 clips to install the integration control and panel assembly.
-