REAR NO. 2 SEAT ASSEMBLY (for Manual Seat Type LH Side) DISASSEMBLY

CAUTION:
Wear protective gloves. Sharp areas on the parts may injure your hands.
Tech Tips
-
Use the same procedure for the RH and LH sides.
-
The procedure listed below is for the LH side.
-
REMOVE REAR SEAT HEADREST ASSEMBLY
-
Remove the headrest.
-
-
REMOVE CAP
-
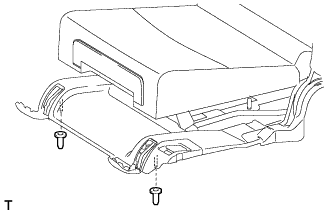
Remove the 2 caps.
-
-
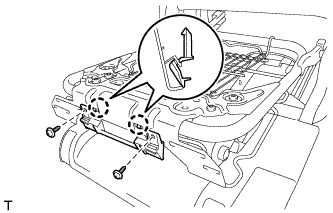
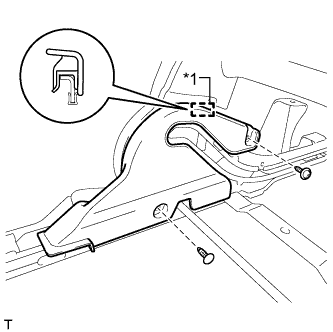
REMOVE REAR SEAT LOWER CUSHION HINGE COVER LH
-
Remove the 2 screws.
-
Detach the 3 claws and remove the cover.
-
-
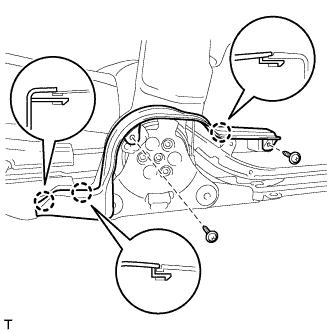
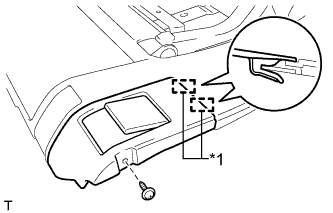
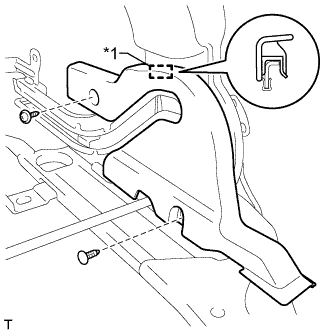
REMOVE REAR SEAT LOWER CUSHION HINGE COVER RH
-
Text in Illustration *1 Guide Remove the 2 screws.
-
Detach the 2 claws and guide and remove the cover.
-
-
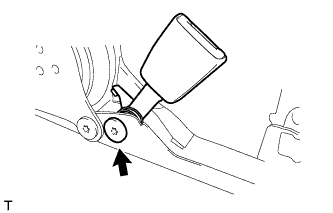
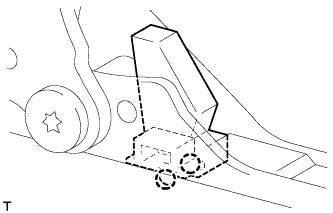
REMOVE REAR NO. 2 SEAT INNER BELT ASSEMBLY LH
-
Using a T45 "TORX" socket wrench, remove the bolt and inner belt assembly.
-
-
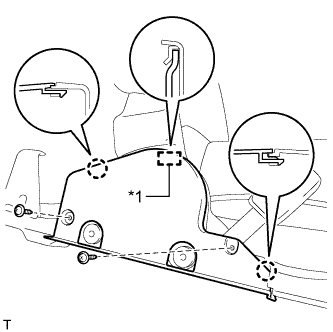
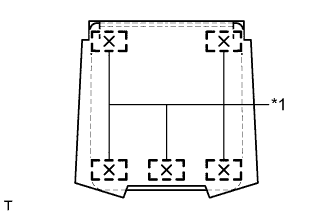
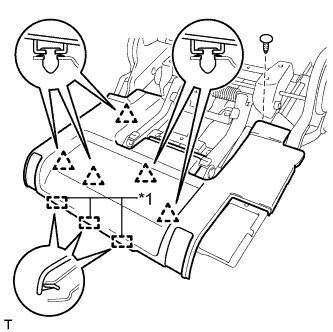
REMOVE REAR NO. 1 SEAT CUSHION MOULDING
-
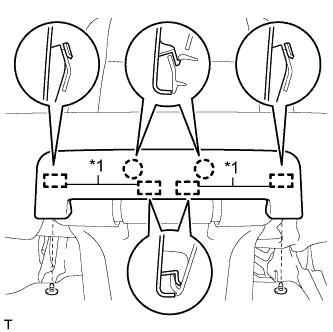
Text in Illustration *1 Guide Using a clip remover, remove the 2 clips.
-
Detach the 2 claws and 4 guides and remove the moulding.
-
-
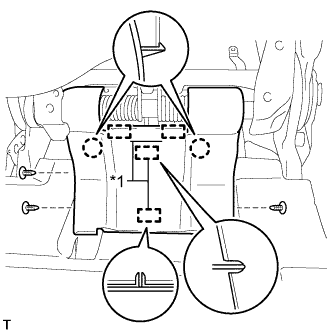
REMOVE SEAT CUSHION COVER WITH PAD
-
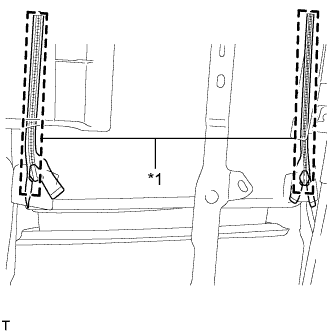
Text in Illustration *1 Fastener Open the 2 fasteners.
-
Using a clip remover, remove the 2 clips and open the under part of the seat cushion cover.
-

Text in Illustration *1 Hook Detach the 2 hooks and remove the seat cushion cover with pad.
-
-
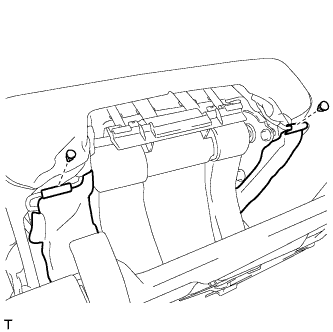
REMOVE NO. 3 SEAT CUSHION COVER SUB-ASSEMBLY LH
-
Text in Illustration *1 Fastener Detach the fastener.
-
Remove the hog rings and seat cushion cover.
-
-
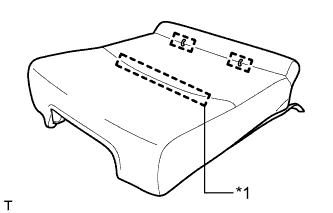
REMOVE REAR SEAT CUSHION INNER EDGE PROTECTOR LH
-
Text in Illustration *1 Tack Pin Cut off the tack pins and remove the edge protector from the seat cushion pad.
-
-
REMOVE REAR NO. 2 SEAT CUSHION MOULDING
-
Remove the 2 screws.
-
Detach the 2 claws and remove the moulding.
-
-
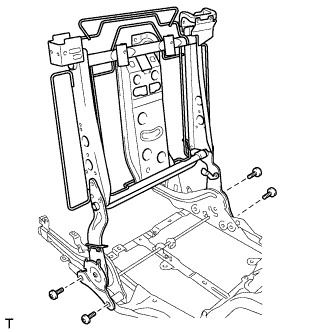
REMOVE NO. 2 SEAT CUSHION FRAME SUB-ASSEMBLY LH
-
Operate the rear No. 2 seat lock control lever and retract the seat cushion frame.
-
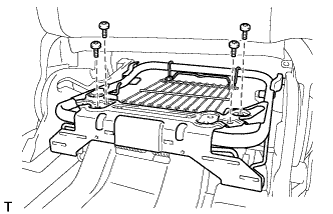
Using a T40 "TORX" socket wrench, remove the 4 "TORX" bolts and remove the seat cushion frame.
-
-
REMOVE 3RD SEAT LINK SUB-ASSEMBLY LH
-
Text in Illustration *1 Guide Remove the 3 clips.
-
Detach the 2 claws and 4 guides and remove the 3rd seat link.
-
-
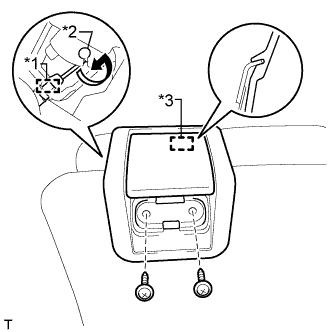
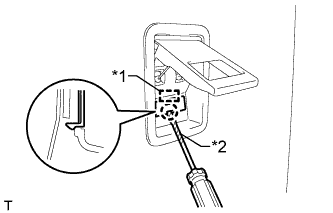
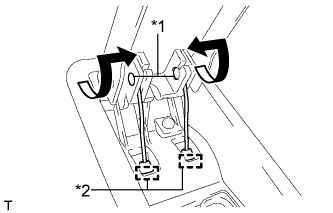
REMOVE REAR NO. 2 SEAT LOCK CONTROL LEVER SUB-ASSEMBLY LH
-
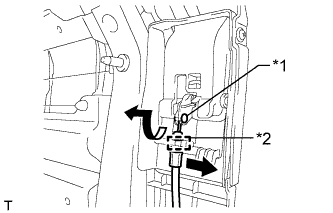
Text in Illustration *1 Cable End *2 Clamp Detach the clamp.
-
Twist the cable end in the direction indicated by the arrow and disconnect the cable.
-
Text in Illustration *1 Guide Remove the screw.
-
Detach the 2 guides and remove the lever.
-
-
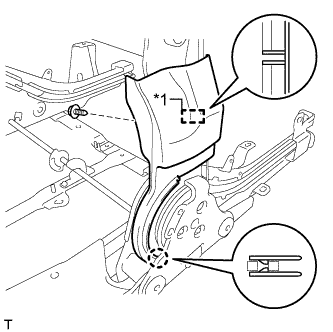
REMOVE REAR SEAT LEG COVER LH
-
Text in Illustration *1 Hook Remove the clip.
-
Detach the 3 hooks and 5 clips and remove the cover.
-
-
REMOVE REAR NO. 3 SEAT LEG COVER LH
-
Detach the 2 claws and remove the cover.
-
-
REMOVE REAR SEAT CUSHION INNER HINGE COVER LH
-
Text in Illustration *1 Guide Remove the screw and clip.
-
Detach the guide and remove the cover.
-
-
REMOVE REAR SEAT CUSHION INNER HINGE COVER RH
-
Text in Illustration *1 Guide Remove the screw and clip.
-
Detach the guide and remove the cover.
-
-
REMOVE REAR SEAT LOCK CONTROL CABLE LH
-
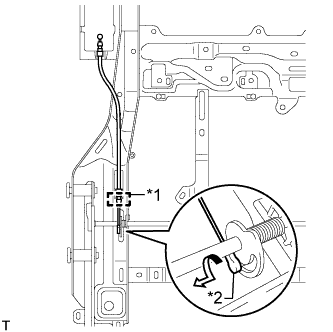
Text in Illustration *1 Clamp *2 Cable End Detach the clamp.
-
Twist the cable end in the direction indicated by the arrow and remove the cable.
-
-
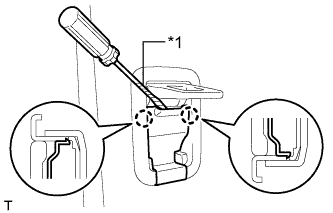
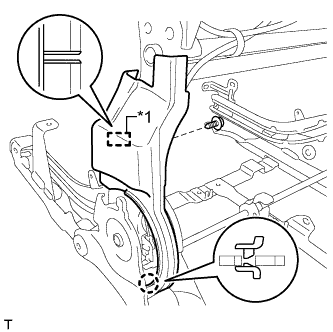
REMOVE REAR NO. 1 SEATBACK LOCK STRIKER COVER
-

Text in Illustration *1 Guide *2 Protective Tape Using a screwdriver, detach the claw and guide and remove the cover.
Tech Tips
Tape the screwdriver tip before use.
-
-
REMOVE REAR SEAT LOCK CONTROL LEVER SUB-ASSEMBLY LH
-
Text in Illustration *1 Clamp *2 Cable End *3 Guide Remove the 2 screws.
-
Detach the guide and remove the lever.
-
Detach the clamp.
-
Twist the cable end in the direction indicated by the arrow and disconnect the cable.
-
-
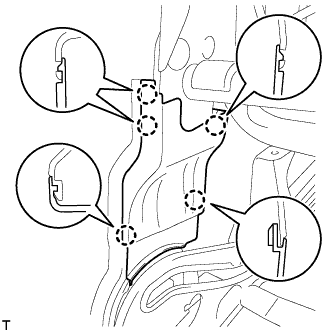
REMOVE ROPE HOOK ASSEMBLY
-
Text in Illustration *1 Protective Tape Using a screwdriver, detach the 2 claws and open the cover.
Tech Tips
Tape the screwdriver tip before use.
-
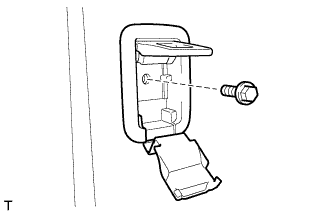
Remove the bolt and rope hook.
-
-
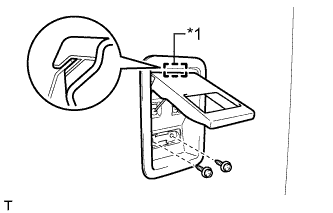
REMOVE REAR NO. 2 SEATBACK LOCK STRIKER COVER
-
Text in Illustration *1 Guide *2 Protective Tape Using a screwdriver, detach the claw and guide and remove the cover.
Tech Tips
Tape the screwdriver tip before use.
-
-
REMOVE REAR SEAT LOCK RELEASE LEVER ASSEMBLY
-
Text in Illustration *1 Hook Remove the 2 screws.
-
Detach the hook and remove the lever.
-
Text in Illustration *1 Cable End *2 Clamp Detach the 2 clamps.
-
Twist the 2 cable ends in the direction indicated by the arrow and disconnect the 2 cables.
-
-
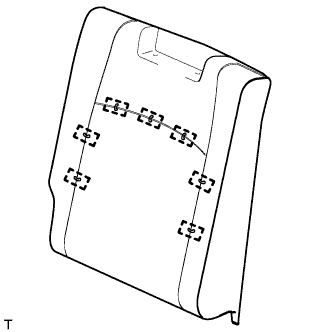
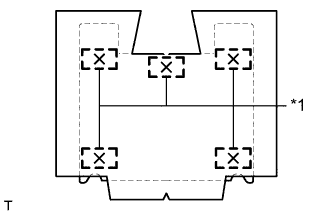
REMOVE REAR SEATBACK BOARD SUB-ASSEMBLY LH
-
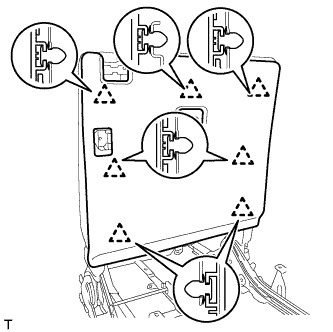
Detach the 7 clips and remove the board.
-
-
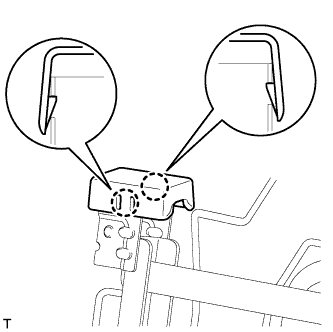
REMOVE REAR NO. 2 SEAT HEADREST SUPPORT ASSEMBLY
-
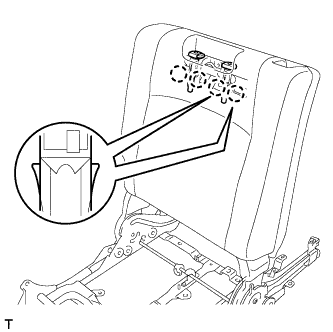
Detach the 4 claws and remove the 2 headrest supports.
-
-
REMOVE SEATBACK COVER WITH PAD
-
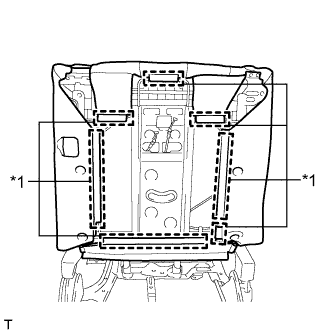
Text in Illustration *1 Hook Detach the hooks and remove the seatback cover with pad.
-
-
REMOVE REAR NO. 3 SEATBACK COVER SUB-ASSEMBLY LH
-
Remove the hog rings and seatback cover.
-
-
REMOVE REAR NO. 2 SEATBACK EDGE PROTECTOR
-
Text in Illustration *1 Tack Pin Cut off the tack pins and remove the protector from the seatback pad.
-
-
REMOVE NO. 2 SEATBACK COVER
-
Detach the 2 claws and remove the cover.
-
-
REMOVE REAR NO. 3 SEAT INNER RECLINING COVER LH
-

Detach the 4 claws and remove the cover.
-
-
REMOVE REAR NO. 3 SEAT OUTER RECLINING COVER LH
-
Text in Illustration *1 Guide Remove the screw.
-
Detach the guide and 2 claws and remove the cover.
-
-
REMOVE REAR NO. 2 SEAT INNER RECLINING COVER LH
-
Detach the 5 claws and remove the cover.
-
-
REMOVE REAR NO. 2 SEAT OUTER RECLINING COVER LH
-
Text in Illustration *1 Guide Remove the screw.
-
Detach the guide and 2 claws and remove the cover.
-
-
REMOVE FOLD SEAT LOCK CONTROL CABLE SUB-ASSEMBLY
-
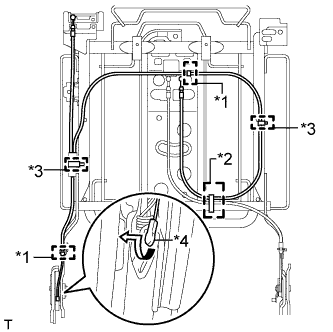
Text in Illustration *1 Clamp A *2 Clamp B *3 Cable Tie *4 Cable End Remove the clamp labeled B and detach the 2 labeled clamps A.
-
Cut off the 2 cable ties.
-
Twist the cable end in the direction indicated by the arrow and remove the cable.
-
-
REMOVE NO. 2 SEAT LOCK CABLE
-
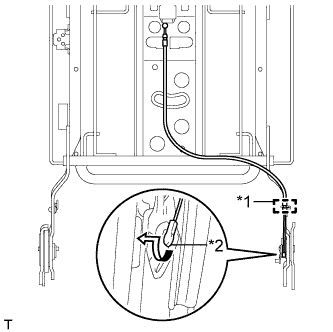
Text in Illustration *1 Clamp *2 Cable End Detach the clamp.
-
Twist the cable end in the direction indicated by the arrow and remove the cable.
-
-
REMOVE NO. 3 SEATBACK FRAME SUB-ASSEMBLY LH
-
Using a T45 "TORX" socket wrench, remove the 4 "TORX" bolts and frame.
-
-
REMOVE NO. 3 SEAT LEG ASSEMBLY LH
-
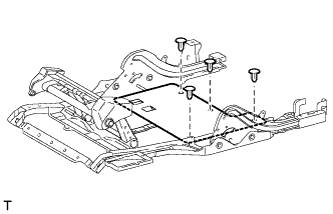
Remove the 4 clips and seat cushion under carpet LH from the No. 3 seat leg.
-
-
REMOVE NO. 2 SEAT LEG ASSEMBLY (for RH Side)
-
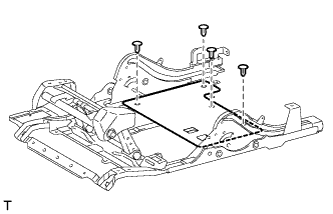
Remove the 4 clips and seat cushion under carpet RH from the No. 2 seat leg.
-