SECURITY HORN ASSEMBLY (w/ Built-in Battery type) INSTALLATION

Tech Tips
A bolt without a torque specification is shown in the standard bolt chart Click here.
-
INSTALL THEFT WARNING SIREN ASSEMBLY (for 3 Door)
-
Connect the connector.
-
Install the guide and attach the claw.
-
Install the theft warning siren assembly with the 2 bolts.
- Torque:
- 5.5 N*m { 55 kgf*cm, 49 in.*lbf }
-
-
INSTALL DECK TRIM SIDE PANEL ASSEMBLY RH (for 3 Door)
-
Connect the connector.
-
Attach the 9 claws and 11 clips to install the deck trim side panel.
-
Install the 3 bolts and 2 screws.
-
Install the rear No. 1 seat outer belt floor anchor with the bolt.
- Torque:
- 42 N*m { 428 kgf*cm, 31 ft.*lbf }
-
Install the front seat outer belt floor anchor with the bolt.
- Torque:
- 42 N*m { 428 kgf*cm, 31 ft.*lbf }
-
-
INSTALL OUTER LAP BELT ANCHOR COVER (for 3 Door)
Tech Tips
Use the same procedure for the other outer lap belt anchor cover.
-
Attach the 3 claws to install the outer lap belt anchor cover.
-
-
INSTALL QUARTER TRIM POCKET TRAY (for 3 Door)
-
Attach the 6 claws and 2 guides to install the quarter trim pocket tray.
-
-
INSTALL FRONT DECK SIDE TRIM COVER (for 3 Door)
Tech Tips
Use the same procedure for the other front deck side trim cover.
-
Attach the 2 claws to install the front deck side trim cover.
-
-
INSTALL NO. 1 TONNEAU COVER HOLDER CAP (for 3 Door)
Tech Tips
Use the same procedure for the other tonneau cover holder cap.
-
Attach the 2 claws to install the tonneau cover holder cap.
-
-
INSTALL NO. 1 LUGGAGE COMPARTMENT TRIM HOOK (for 3 Door)
Tech Tips
Use the same procedure for the other No. 1 luggage compartment trim hook.
-
Install the No. 1 luggage compartment trim hook so that it is positioned horizontally.
-
-
INSTALL REAR FLOOR CARPET ASSEMBLY (for 3 Door)
-
Install the rear floor carpet.
-
-
INSTALL QUARTER TRIM COVER HOLE RH (for 3 Door)
Tech Tips
Use the same procedure described for the LH side.
-
INSTALL REAR FLOOR MAT REAR SUPPORT PLATE (for 3 Door)
-
Attach the 6 claws to install the rear floor mat rear support plate.
-
Install the 5 screws.
-
-
INSTALL MAT SET PLATE COVER (for 3 Door)
Tech Tips
Use the same procedure for all mat set plate covers.
-
Attach the 2 claws to install the mat set plate cover.
-
-
INSTALL TONNEAU COVER ASSEMBLY (for 3 Door)
-
Install the tonneau cover.
-
-
INSTALL FRONT DOOR OPENING TRIM WEATHERSTRIP RH (for 3 Door)
Tech Tips
Use the same procedure described for the LH side.
-
INSTALL DOOR SCUFF PLATE ASSEMBLY RH (for 3 Door)
Tech Tips
Use the same procedure described for the LH side.
-
INSTALL REAR SEAT ASSEMBLY (for 3 Door)
-
for 60/40 Split Tumble Seat Type LH Side:
Install the rear No. 1 seat assembly Click here.
-
for 60/40 Split Tumble Seat Type RH Side:
Install the rear No. 1 seat assembly Click here.
-
-
INSTALL THEFT WARNING SIREN ASSEMBLY (for 5 Door)
-
Connect the connector.
-
Install the guide and attach the claw.
-
Install the theft warning siren assembly with the 2 bolts.
- Torque:
- 5.5 N*m { 55 kgf*cm, 49 in.*lbf }
-
-
INSTALL REAR SIDE NO. 2 AIR DUCT
-
Install the duct with the 2 clips and attach the clamp.
-
-
INSTALL DECK TRIM SIDE PANEL ASSEMBLY RH
-
w/o Rear No. 2 Seat:
-
Connect each connector.
-
Pass the rear seatback lock control lever base through the deck trim side panel.
-
Attach the 5 clips and 8 claws to install the deck trim side panel.
-
Install the 4 bolts and screw.
-
Attach the 6 claws and 2 guides to install the rear seatback lock control lever base to the deck trim side panel.
-
Install the rear No. 1 seat outer belt floor anchor with the bolt.
- Torque:
- 42 N*m { 428 kgf*cm, 31 ft.*lbf }
-
-
w/ Rear No. 2 Seat:
-
Connect each connector.
-
Attach the 4 clips and 8 claws to install the deck trim side panel.
-
Install the 2 bolts and screw.
-
Install the rear No. 2 seat outer belt floor anchor with the bolt.
- Torque:
- 42 N*m { 428 kgf*cm, 31 ft.*lbf }
-
Install the rear No. 1 seat outer belt floor anchor with the bolt.
- Torque:
- 42 N*m { 428 kgf*cm, 31 ft.*lbf }
-
-
-
INSTALL ASSIST GRIP SUB-ASSEMBLY (w/ Rear No. 2 Seat)
Tech Tips
Use the same procedure for the other assist grip.
-
Install the assist grip with the 2 bolts.
-
-
INSTALL ASSIST GRIP PLUG (w/ Rear No. 2 Seat)
Tech Tips
Use the same procedure for all assist grip plugs.
-
Attach the 2 claws to install the assist grip plug.
-
-
INSTALL FRONT DECK SIDE TRIM COVER (w/ Tonneau Cover)
Tech Tips
Use the same procedure for the other front deck side trim cover.
-
Attach the 2 claws to install the front deck side trim cover
-
-
INSTALL NO. 1 TONNEAU COVER HOLDER CAP (w/o Tonneau Cover)
Tech Tips
Use the same procedure for the other tonneau cover holder cap.
-
Attach the 2 claws to install the tonneau cover holder cap.
-
-
INSTALL NO. 1 LUGGAGE COMPARTMENT TRIM HOOK
Tech Tips
Use the same procedure for the other No. 1 luggage compartment trim hook.
-
Install the No. 1 luggage compartment trim hook by turning it clockwise.
-
-
INSTALL REAR NO.1 SEAT OUTER LAP BELT ANCHOR COVER
Tech Tips
Use the same procedure for the other rear No. 1 seat outer lap belt anchor cover.
-
Attach the 3 claws to install the rear No. 1 seat outer lap belt anchor cover.
-
-
INSTALL REAR FLOOR CARPET ASSEMBLY
-
Attach the 4 claws to install the rear floor carpet.
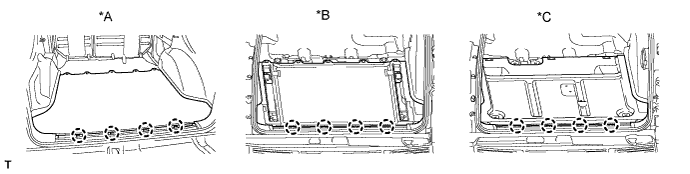
Text in Illustration *A w/o Deck Rail *B w/ Deck Rail *C for Face to Face Seat Type - -
-
-
INSTALL FLOOR SIDE RAIL RH (w/ Deck Rail)
Tech Tips
Use the same procedure described for the LH side.
-
INSTALL FLOOR SIDE RAIL LH (w/ Deck Rail)
-
Install the floor side rail with the 3 bolts.
-
-
INSTALL REAR FLOOR MAT REAR SUPPORT PLATE (w/o Rear No. 2 Seat)
-
Attach the 5 clips and 4 claws to install the rear floor mat rear support plate.
-
-
INSTALL NO. 1 DECK BOARD SUB-ASSEMBLY (w/o Rear No. 2 Seat)
-
Attach the clip to install the No. 1 deck board.
-
-
INSTALL FRONT LUGGAGE COMPARTMENT TRIM COVER (w/o Rear No. 2 Seat)
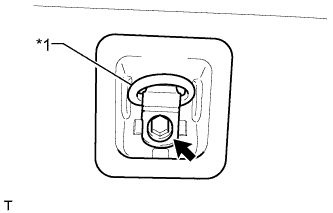
Text in Illustration *1 Luggage Hold Belt Striker Tech Tips
Use the same procedure for the other front luggage compartment trim cover.
-
Install the luggage hold belt striker and front luggage compartment trim cover with the bolt.
-
Attach the 4 claws to install the cap.
-
-
INSTALL TONNEAU COVER ASSEMBLY (w/ Tonneau Cover)
-
Install the tonneau cover.
-
-
INSTALL OUTER LAP BELT ANCHOR COVER
Tech Tips
Use the same procedure for the other outer lap belt anchor cover.
-
Attach the 3 claws to install the outer lap belt anchor cover
-
-
INSTALL REAR DOOR OPENING TRIM WEATHERSTRIP RH
Tech Tips
Use the same procedure described for the LH side.
-
INSTALL REAR DOOR SCUFF PLATE RH
Tech Tips
Use the same procedure described for the LH side.
-
INSTALL QUARTER SCUFF PLATE INNER RH
Tech Tips
Use the same procedure described for the LH side.
-
INSTALL REAR NO. 1 SEATBACK ASSEMBLY
-
for 60/40 Split Double-folding Seat Type LH Side:
Install the rear No. 1 seatback assembly Click here.
-
for 60/40 Split Double-folding Seat Type RH Side:
Install the rear No. 1 seatback assembly Click here.
-
-
INSTALL REAR NO. 1 FLOOR STEP COVER (w/ Rear No. 2 Seat)
Tech Tips
Use the same procedure for all rear No. 1 floor step covers.
-
Attach the 2 claws to install the rear No. 1 floor step cover.
-
-
INSTALL REAR NO. 2 SEAT ASSEMBLY
-
for Manual Seat Type:
Install the rear No. 2 seat assembly Click here.
-
for Power Seat Type:
Install the rear No. 2 seat assembly Click here.
-
for Face to Face Seat Type:
Install the rear No. 2 seat assembly Click here.
-
-
CONNECT CABLE TO NEGATIVE BATTERY TERMINAL
Note
When disconnecting the cable, some systems need to be initialized after the cable is reconnected Click here.
-
CHECK SRS WARNING LIGHT
-
Check the SRS warning light Click here.
-