GENERATOR INSTALLATION

-
INSTALL GENERATOR
-
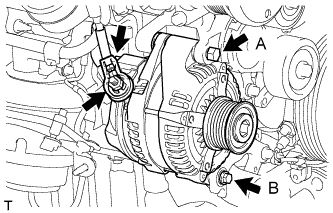
Install the generator with the 2 bolts.
- Torque:
- for bolt A
- 62 N*m { 632 kgf*cm, 46 ft.*lbf }
- for bolt B
- 21 N*m { 214 kgf*cm, 15 ft.*lbf }
-
Install the generator wire with the nut.
- Torque:
- 9.8 N*m { 100 kgf*cm, 87 in.*lbf }
-
Install the terminal cap.
-
Connect the generator connector.
-
-
INSTALL NO. 1 AIR HOSE
Note
Before installation, remove any oil residue from the inside of the inlet pipe and intercooler.
-
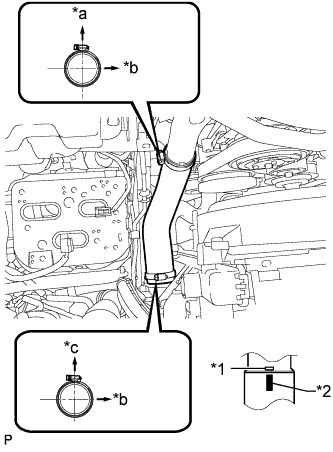
Text in Illustration *1 Embossed Mark *2 Paint Mark *a Rear Side of Vehicle *b LH Side *c Upper Align the paint mark of the intercooler air hose with the embossed mark of the intercooler.
-
Tighten the 2 clamps.
- Torque:
- 6.5 N*m { 66 kgf*cm, 58 in.*lbf }
-
-
INSTALL AIR CLEANER CASE ASSEMBLY
-
Install the air cleaner case with the 3 bolts.
- Torque:
- 12 N*m { 122 kgf*cm, 9 ft.*lbf }
-
-
INSTALL AIR CLEANER FILTER ELEMENT SUB-ASSEMBLY
-
INSTALL AIR CLEANER CAP SUB-ASSEMBLY
-
Attach the 4 clamps to install the air cleaner cap.
-
except Cold Area Specification Vehicles:
Attach the 2 clamps and connect the mass air flow meter connector.
-
for Cold Area Specification Vehicles:
Attach the 3 clamps and connect the mass air flow meter connector.
-
-
INSTALL FRONT FENDER APRON SEAL RH
-
Install the front fender apron seal RH with the 4 clips.
-
-
INSTALL FAN AND GENERATOR V BELT
-
Install the fan and generator V belt Click here.
-
-
CONNECT CABLE TO NEGATIVE BATTERY TERMINAL
Note
When disconnecting the cable, some systems need to be initialized after the cable is reconnected Click here.