FRONT DIFFERENTIAL CARRIER ASSEMBLY INSTALLATION

-
INSTALL FRONT DIFFERENTIAL CARRIER ASSEMBLY
-
Install the front No. 3 differential support with the 2 bolts.
- Torque:
- 108 N*m { 1100 kgf*cm, 80 ft.*lbf }
-
Install the front No. 2 differential support with the 2 bolts.
- Torque:
- 160 N*m { 1630 kgf*cm, 118 ft.*lbf }
-
Install the front No. 1 differential support with the 3 bolts.
- Torque:
- 186 N*m { 1900 kgf*cm, 137 ft.*lbf }
-
Support the front differential with a jack.
-
Install the 2 front mounting bolts and 2 nuts.
- Torque:
- 137 N*m { 1400 kgf*cm, 101 ft.*lbf }
-
Connect the hose and connector.
-
Install the No. 1 front differential mounting nut.
- Torque:
- 87 N*m { 887 kgf*cm, 64 ft.*lbf }
-
Install the front differential breather tube bracket with the bolt.
- Torque:
- 13 N*m { 133 kgf*cm, 10 ft.*lbf }
-
Lower the jack.
-
-
INSTALL FRONT PROPELLER SHAFT ASSEMBLY
-
Install the front propeller shaft assembly Click here.
-
-
INSTALL FRONT DRIVE SHAFT ASSEMBLY
-
Install the front drive shaft assembly Click here.
-
-
INSTALL FRONT NO. 1 SUSPENSION ARM SUB-ASSEMBLY LH
-
Install the front lower No. 1 suspension arm sub-assembly Click here.
-
-
INSTALL FRONT NO. 1 SUSPENSION ARM SUB-ASSEMBLY RH
Tech Tips
Use the same procedure described for the LH side.
-
CONNECT TIE ROD END SUB-ASSEMBLY LH
-
Connect the tie rod end sub-assembly LH Click here.
-
-
CONNECT TIE ROD END SUB-ASSEMBLY RH
Tech Tips
Use the same procedure as for the LH side.
-
INSTALL FRONT SPEED SENSOR
-
Install the front speed sensor Click here.
-
-
INSTALL FRONT WHEEL
- Torque:
- 112 N*m { 1137 kgf*cm, 82 ft.*lbf }
-
ADD DIFFERENTIAL OIL
-
Remove the differential filler plug and gasket.
-

Pour oil into the rear differential carrier assembly so that the oil level is within 0 to 5 mm (0 to 0.197 in.) of the bottom of the filler plug opening.
Note
Excessively large or small quantities of oil may cause problems.
Standard Front Differential Capacity Differential Type Oil Type and Viscosity Specified Condition Standard Toyota Genuine Differential gear oil LT 75W-85 GL-5 or equivalent 1.35 to 1.45 liters (1.43 to 1.53 US qts, 1.18 to 1.27 Imp. qts.) Standard Rear Differential Capacity Differential Type Oil Type and Viscosity Body Type Specified Condition Standard Toyota Genuine Differential gear oil LT 75W-85 GL-5 or equivalent 5 Door 2.65 to 2.75 liters (2.80 to 2.91 US qts, 2.33 to 2.42 Imp. qts.) 3 Door 2.15 to 2.25 liters (2.27 to 2.38 US qts, 1.89 to 1.98 Imp. qts.) w/ Differential Lock Toyota Genuine Differential gear oil LT 75W-85 GL-5 or equivalent 5 Door 2.60 to 2.70 liters (2.75 to 2.85 US qts, 2.29 to 2.38 Imp. qts.) 3 Door 2.15 to 2.25 liters (2.27 to 2.38 US qts, 1.89 to 1.98 Imp. qts.) -
Install a new gasket and the differential filler plug.
- Torque:
- Front differential carrier
- 39 N*m { 398 kgf*cm, 29 ft.*lbf }
- Rear differential carrier
- 49 N*m { 500 kgf*cm, 36 ft.*lbf }
-
Drive the vehicle and check the oil level again.
If necessary, add differential oil.
-
-
INSPECT DIFFERENTIAL OIL LEVEL
-
Stop the vehicle on a level surface.
-
Remove the differential filler plug and gasket.
-
Check that the oil level is within 0 to 5 mm (0 to 0.197 in.) of the bottom of the filler plug opening.
Note
Excessively large or small quantities of oil may cause problems.
If the oil level is low, add differential oil to adjust the oil level.
If the oil level is still low, check for oil leakage. If leakage is found, repair or replace the part necessary to stop the leakage.
-
Install a new gasket and differential filler plug.
- Torque:
- Front differential carrier
- 39 N*m { 398 kgf*cm, 29 ft.*lbf }
- Rear differential carrier
- 49 N*m { 500 kgf*cm, 36 ft.*lbf }
-
-
CHECK FOR DIFFERENTIAL OIL LEAKAGE
-
INSTALL REAR ENGINE UNDER COVER ASSEMBLY (except 5L-E)
-
Install the rear engine under cover with the 4 bolts.
- Torque:
- 29 N*m { 296 kgf*cm, 21 ft.*lbf }
-
-
INSTALL TRANSMISSION UNDER COVER SUB-ASSEMBLY (except 5L-E)
-
Install the transmission under cover with the 2 bolts.
- Torque:
- 29 N*m { 296 kgf*cm, 21 ft.*lbf }
-
-
INSTALL NO. 1 ENGINE UNDER COVER
-
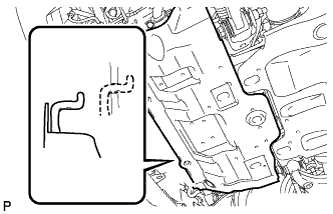
Hook the engine under cover to the vehicle body as shown in the illustration.
-
Install the 4 bolts.
- Torque:
- 29 N*m { 296 kgf*cm, 21 ft.*lbf }
-
-
CONNECT CABLE TO NEGATIVE BATTERY TERMINAL
Note
When disconnecting the cable, some systems need to be initialized after the cable is reconnected Click here.
-
CHECK SPEED SENSOR SIGNAL
-
Check the VSC sensor signal Click here.
-
-
INSPECT AND ADJUST FRONT WHEEL ALIGNMENT
-
Inspect and adjust the front wheel alignment Click here.
-