FRONT DIFFERENTIAL CARRIER ASSEMBLY REMOVAL

-
DISCONNECT CABLE FROM NEGATIVE BATTERY TERMINAL
Note
-
w/ Navigation System (for HDD):
After the engine switch is turned off, the HDD navigation system requires approximately 90 seconds to record various types of memory and settings. As a result, after turning the engine switch off, wait 90 seconds or more before disconnecting the cable from the negative (-) battery terminal.
-
When disconnecting the cable, some systems need to be initialized after the cable is reconnected Click here.
-
-
REMOVE FRONT WHEELS
-
REMOVE NO. 1 ENGINE UNDER COVER SUB-ASSEMBLY
-
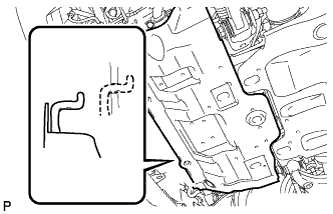
Remove the 4 bolts.
-
Unhook the engine under cover from the vehicle body as shown in the illustration.
-
-
REMOVE TRANSMISSION UNDER COVER (except 5L-E)
-
Remove the 2 bolts and transmission under cover.
-
-
REMOVE REAR ENGINE UNDER COVER ASSEMBLY (except 5L-E)
-
Remove the 4 bolts and rear engine under cover.
-
-
DRAIN DIFFERENTIAL OIL
-
Stop the vehicle on a level surface.
-
Remove the differential drain plug and gasket.
-
Drain the oil.
-
Install a new gasket and the differential drain plug.
- Torque:
- Front differential carrier
- 65 N*m { 660 kgf*cm, 48 ft.*lbf }
- Rear differential carrier
- 49 N*m { 500 kgf*cm, 36 ft.*lbf }
-
-
REMOVE FRONT PROPELLER SHAFT ASSEMBLY
-
Remove the front propeller shaft Click here.
-
-
REMOVE FRONT DRIVE SHAFT ASSEMBLY
-
Remove the front drive shaft Click here.
-
-
REMOVE FRONT STABILIZER LINK ASSEMBLY
-
w/ KDSS:
Remove the stabilizer link Click here.
-
w/o KDSS:
Remove the stabilizer link Click here.
-
-
REMOVE FRONT SPEED SENSOR
-
Remove the front speed sensor Click here.
-
-
DISCONNECT TIE ROD END SUB-ASSEMBLY LH
-
Disconnect the tie rod end sub-assembly Click here.
-
-
DISCONNECT TIE ROD END SUB-ASSEMBLY RH
-
Disconnect the tie rod end sub-assembly Click here.
-
-
REMOVE FRONT LOWER NO. 1 SUSPENSION ARM SUB-ASSEMBLY LH
-
Remove the front lower No. 1 suspension arm sub-assembly Click here.
-
-
REMOVE FRONT LOWER NO. 1 SUSPENSION ARM SUB-ASSEMBLY RH
Tech Tips
Use the same procedure described for the LH side.
-
REMOVE FRONT DIFFERENTIAL CARRIER ASSEMBLY
-
Remove the bolt and disconnect the front differential breather tube bracket.
-
Support the front differential with a jack.
-
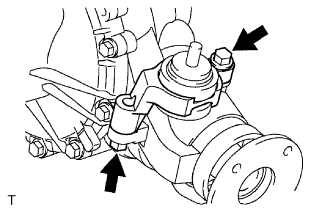
Remove the front No. 1 differential mounting nut.
-
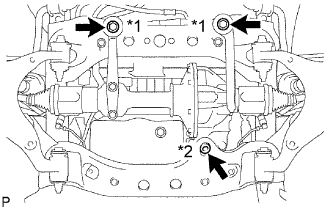
Remove the 2 front mounting bolts and nut.
Text in Illustration *1 Mounting Bolt *2 Mounting Nut -
Disconnect the actuator hose and connector.
-
Lower the jack and remove the front differential.
-
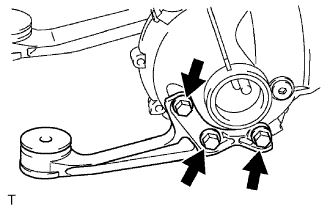
Remove the 3 bolts and front No. 1 differential support.
-
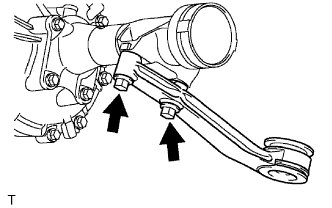
Remove the 2 bolts and front No. 2 differential support.
-
Remove the 2 bolts and front No. 3 differential support.
-