OIL COOLER (for 1KD-FTV) REMOVAL

-
REMOVE REAR ENGINE UNDER COVER ASSEMBLY
-
Remove the 4 bolts and rear engine under cover.
-
-
REMOVE NO. 1 ENGINE UNDER COVER SUB-ASSEMBLY
-
Remove the 4 bolts and No. 1 engine under cover.
-
-
REMOVE FRONT FENDER APRON SEAL RH
-
Using a clip remover, remove the 5 clips and front fender apron seal RH.
-
-
REMOVE FRONT NO. 1 FENDER APRON TO FRAME SEAL RH
-
Using a clip remover, remove the 4 clips and front No. 1 fender apron to frame seal RH.
-
-
REMOVE NO. 1 OIL COOLER INLET HOSE AND NO. 1 OIL COOLER OUTLET HOSE
-
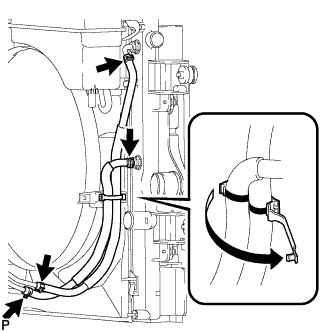
Detach the claw to open the No. 1 flexible hose clamp.
-
Disconnect the No. 1 oil cooler inlet hose and No. 1 oil cooler outlet hose from the radiator.
-
Disconnect the 2 hoses from the oil cooler inlet tube and No. 1 oil cooler outlet tube and remove them.
Note
When disconnecting the hoses from the tube, support the tube by hand and be careful to prevent the tube from being deformed.
-
-
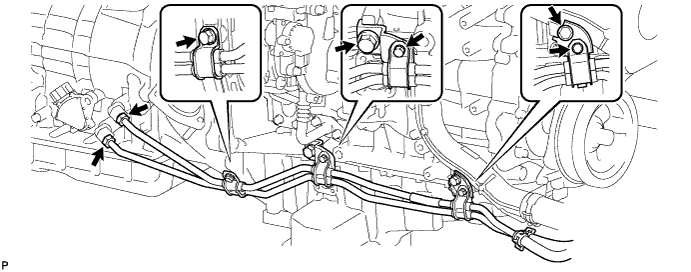
REMOVE NO. 1 OIL COOLER INLET TUBE AND NO. 1 OIL COOLER OUTLET TUBE
-
Using a union nut wrench, disconnect the No. 1 oil cooler inlet tube and No. 1 oil cooler outlet tube from each oil cooler tube union.
-
Remove the 3 bolts to open the 3 flexible hose clamps and remove the 2 oil cooler tubes.
-
Remove the 2 bolts and 2 flexible hose clamps.
-