AIR CONDITIONING PRESSURE SENSOR INSTALLATION

-
INSTALL AIR CONDITIONING PRESSURE SWITCH
-
Sufficiently apply compressor oil to a new O-ring and the fitting surface of the pressure switch.
Compressor oil ND-OIL 8 or equivalent -
Install the O-ring to the pressure switch.
-
Install the pressure switch.
- Torque:
- 11 N*m { 112 kgf*cm, 8 ft.*lbf }
-
Connect the connector.
-
-
CHARGE REFRIGERANT
- SST
- 09985-20010 ( 09985-02130, 09985-02150, 09985-02090, 09985-02110, 09985-02010, 09985-02050, 09985-02060, 09985-02070 )
-
Perform vacuum purging using a vacuum pump.
-
Charge refrigerant HFC-134a (R134a).
Standard Model Code Air Conditioning Type Cool Box Refrigerant Charging Amount Except the model codes below w/o Rear Cooler w/ Cool Box 600 +/-30 g (21.2 +/-1.1 oz.) w/o Cool Box 550 +/-30 g (19.3 +/-1.1 oz.) w/ Rear Cooler w/ Cool Box 800 +/-30 g (28.2 +/-1.1 oz.) w/o Cool Box 770 +/-30 g (27.2 +/-1.1 oz.) w/ Rear Cooler
for Cold Area Specification Vehicles
w/o Cool Box 720 +/-30 g (25.3 +/-1.1 oz.) TRJ150L-GKMEKV
TRJ150L-GKPEKV
TRJ155L-GJPEKV
GRJ150L-GKFEKV
GRJ150L-GKAEKV
KDJ150L-GKFEYV
KDJ150L-GKAEYV
w/o Rear Cooler w/ Cool Box 600 +/-30 g (21.2 +/-1.1 oz.) w/o Cool Box 550 +/-30 g (19.3 +/-1.1 oz.) or 600 +/-30 g (21.2 +/-1.1 oz.) *1 w/ Rear Cooler w/ Cool Box 800 +/-30 g (28.2 +/-1.1 oz.) w/o Cool Box 770 +/-30 g (27.2 +/-1.1 oz.) *1: For vehicles with the 2TR-FE engine which have neither the rear cooler nor cool box, the refrigerant charging amount changes based on region.
Note
-
Do not operate the cooler compressor before charging refrigerant as the cooler compressor will not work properly without any refrigerant, and will overheat.
-
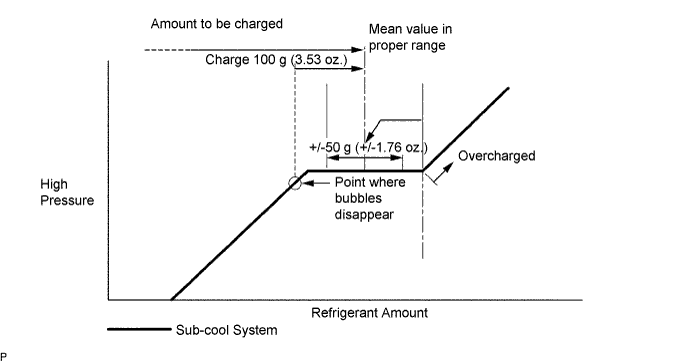
Approximately 100 g (3.53 oz.) of refrigerant may need to be charged after bubbles disappear. The refrigerant amount should be checked by measuring its quantity, and not with the sight glass.
-
-
WARM UP ENGINE
-
Warm up the engine at less than 1850 rpm for 2 minutes or more after charging the refrigerant.
Note
Be sure to warm up the compressor when turning the A/C switch is on after removing and installing the cooler refrigerant lines (including the compressor), to prevent damage to the compressor.
-
-
CHECK FOR REFRIGERANT GAS LEAK
-
Warm up the engine at less than 1850 rpm for 2 minutes or more after charging the refrigerant.
Note
Be sure to warm up the compressor when turning the A/C switch is on after removing and installing the cooler refrigerant lines (including the compressor), to prevent damage to the compressor.
-
-
INSTALL RADIATOR GRILLE
-
Install the radiator grille Click here.
-
-
INSTALL UPPER RADIATOR SUPPORT SEAL
-
Install the upper radiator support seal with the 13 clips.
-