CONDENSER REMOVAL

-
DRAIN ENGINE COOLANT
-
for 1GR-FE:
Drain the engine coolant Click here.
-
for 2TR-FE:
Drain the engine coolant Click here.
-
for 1KD-FTV, w/ DPF:
Drain the engine coolant Click here.
-
for 1KD-FTV, w/o DPF:
Drain the engine coolant Click here.
-
for 5L-E:
Drain the engine coolant Click here.
-
-
REMOVE RADIATOR ASSEMBLY
-
for 1GR-FE:
Remove the radiator assembly Click here.
-
for 2TR-FE:
Remove the radiator assembly Click here.
-
for 1KD-FTV, w/ DPF:
Remove the radiator assembly Click here.
-
for 1KD-FTV, w/o DPF:
Remove the radiator assembly Click here.
-
for 5L-E:
Remove the radiator assembly Click here.
-
-
RECOVER REFRIGERANT FROM REFRIGERATION SYSTEM
-
Start the engine.
-
Operate the cooler compressor under the conditions shown below:
Item Condition Engine Speed Idling Operating Time 3 minutes or more A/C Switch Status On Blower Switch Status HI Set Temperature MAX COOL This causes most of the compressor oil from the various components of the A/C system to collect in the A/C compressor.
Note
It is not necessary to operate the cooler compressor if the A/C does not operate because of compressor lock, etc.
-
Stop the engine.
-
Recover the refrigerant from the A/C system using a refrigerant recovery unit.
Tech Tips
Use the refrigerant recovery unit in accordance with the manufacturer's instruction manual.
-
-
DISCONNECT DISCHARGE HOSE SUB-ASSEMBLY
-
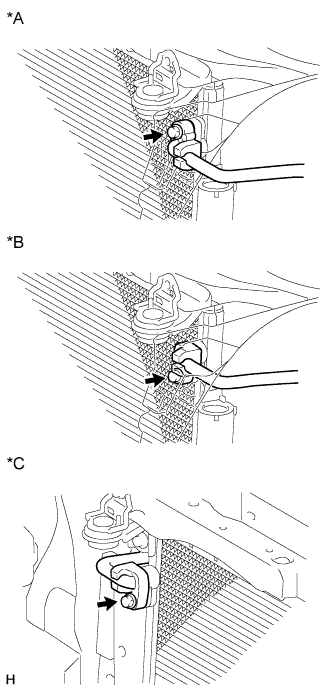
Text in Illustration *A for 1GR-FE *B for 2TR-FE *C for 1KD-FTV, for 5L-E Remove the bolt and disconnect the discharge hose from the cooler condenser.
Note
-
When removing the bolt, do not allow any tools to contact the pipe.
-
When removing the bolt, hold a part of the pipe near the connector.
-
-
Remove the O-ring from the discharge hose.
Note
Seal the openings of the disconnected parts using vinyl tape to prevent moisture and foreign matter from entering them.
-
-
DISCONNECT AIR CONDITIONING TUBE ASSEMBLY
-
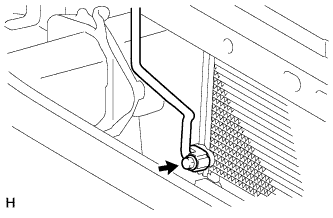
Remove the bolt and disconnect the air conditioning tube assembly from the cooler condenser.
Note
-
When removing the bolt, do not allow any tools to contact the pipe.
-
When removing the bolt, hold a part of the pipe near the connector.
-
-
Remove the O-ring from the air conditioning tube assembly.
Note
Seal the openings of the disconnected parts using vinyl tape to prevent moisture and foreign matter from entering them.
-
-
DISCONNECT NO. 1 COOLER CONDENSER BRACKET
-
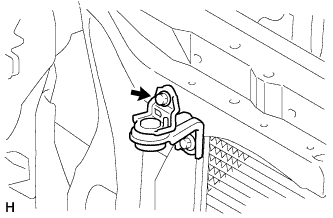
Remove the bolt and disconnect the No. 1 cooler condenser bracket.
-
-
DISCONNECT NO. 2 COOLER CONDENSER BRACKET
-
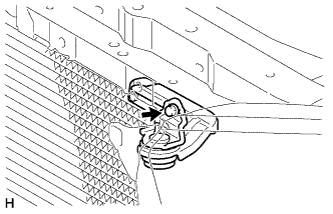
Remove the bolt and disconnect the No. 2 cooler condenser bracket.
-
-
REMOVE COOLER CONDENSER ASSEMBLY
-
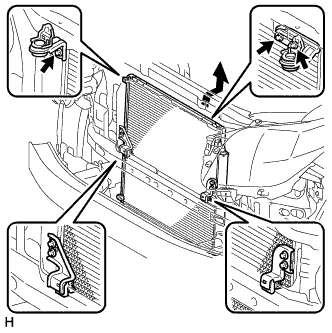
Remove the 3 bolts and cooler condenser as shown in the illustration.
-
-
REMOVE COOLER DRYER
-
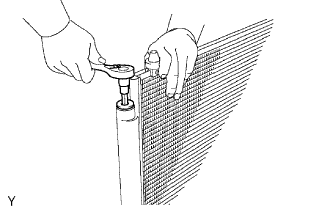
Using a 14 mm socket hexagon wrench, remove the cap from the modulator.
-

Remove the O-ring from the cap.
-
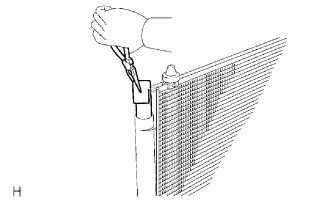
Using pliers, remove the cooler dryer.
-